


Library Manager...
File change event: Define here the event which will cause the creation of a new file for alarm-saving. Possible entries: Never, after one Hour, after one Day, after one Week, after one Month, at a rising edge of the variable defined in field Triggervariable, when the number of records in the file as defined in Number of records gets exceeded.
Triggervariable resp. Number of records: see above, File change event.
Delete old files after .. Hours: Number of days since the day of creation, after which all alarm logfiles except from the actual one should be deleted.
The log-file (History) contains the following entries:
(See the column types and exemplary entries for two alarms)
Date/Time in |
Date |
Time |
Event |
Expression |
Alarm type |
Limit |
Tolerance |
current |
class |
Priority |
Message |
DWORD |
|
|
|
|
|
|
|
value |
|
|
|
|
|
|
|
|
|
|
|
|
|
|
|
1046963332 |
6.3.03 |
16:08:52 |
INTO |
PLC_PRG.b |
LO |
-30 |
5 |
-31 |
Alarm_high |
0 |
Temperature ! |
|
|
|
|
|
|
|
|
|
|
|
|
1046963333 |
6.3.03 |
16:08:53 |
ACK |
PLC_PRG.n |
HIHI |
35 |
|
|
Warnng |
9 |
Rising Temp. ! |
|
|
|
|
|
|
|
|
|
|
|
|
Example as it might look in the log-file:
1046963332,6.3.03 16:08:52,INTO,PLC_PRG.ivar5,HIHI,,,, |
9.00,a_class2,0, |
|
1046963333,6.3.03 16:08:53,INTO,PLC_PRG.ivar4,ROC,2,,, |
6.00,a_class2,2, |
|
1046963333,6.3.03 16:08:53,INTO,PLC_PRG.ivar3,DEV-,,,, |
-6.00,a_class2,5, |
|
1046963334,6.3.03 |
16:08:54,INTO,PLC_PRG.ivar2,LOLO,-35,,3, -47.00,warning,10,warning: low temperature ! |
|
1046963334,6.3.03 |
16:08:54,INTO,PLC_PRG.ivar1,HI,20,,5, |
47.00,a_class1,2,temperature to high ! Acknowldge ! |
6.3.6'Extras' Menu: Settings
The dialog Alarm configuration settings opens on the command 'Extras' 'Settings' in the Alarm Configuration:
Category Date/Time:
Here you set the formatting for the representation of the alarms in the log-file. Define the format according to the following syntax. Dashes and colons are to be set in inverted commas:
for date: dd'-'MM'-'yyyy -> e.g. "12.Jan-1993" for time: hh':'mm':'ss -> e.g. "11:10:34" Language:
Choose here a language file which should be used when the language in CoDeSys is changed. Regard that for this purpose the language file also must contain the translations for the text strings of the alarm configuration. In this context see the following descriptions:
-Visualization, Setting the language, see User Manual for the CoDeSys Visualization
-Translate project into another language, see Chapter 4.3
6.4Library Manager...
The library manager shows all libraries that are connected with the current project. The POUs, data types, and global variables of the libraries can be used the same way as user-defined POUs, data types, and global variables.
The library manager is opened with the 'Window' 'Library Manager' command. Information concerning included libraries is stored with the project and can be viewed in the dialog 'Informations about external library'. To open this dialog select the corresponding library name in the library manager and execute the command 'Extras' 'Properties'.
6-16 |
CoDeSys V2.3 |
6 - The Resources
Library Manager
Using the Library Manager
The window of the library manager is divided into three or four areas by screen dividers. The libraries attached to the project are listed in the upper left area.
In the area below that, depending on which register card has been selected, there is a listing of the
POUs , Data types, Visualizations or Global variables of the library selected in the upper area.
Folders are opened and closed by doubleclicking the line or pressing <Enter>. There is a plus sign in front of closed folders, and a minus sign in front of opened folders.
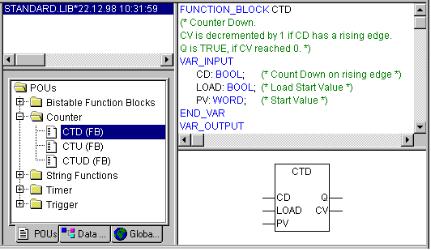
If a POU is selected by clicking the mouse or selecting with the arrow keys then the declaration of the POU will appear in the upper right area of the library manager; and in the lower right is the graphic display in the form of a black box with inputs and outputs.
With data types and global variables, the declaration is displayed in the right area of the library manager.
Standard Library
The library with "standard.lib" is always available. It contains all the functions and function blocks which are required from the IEC61131-3 as standard POUs for an IEC programming system. The difference between a standard function and an operator is that the operator is implicitly recognized by the programming system, while the standard POUs must be tied to the project (standard.lib).
The code for these POUs exists as a C-library and is a component of CoDeSys.
User-defined Libraries
If a project is to be compiled in its entity and without errors, then it can be saved in a library with the 'Save as' command in the 'File' menu. The project itself will remain unchanged. An additional file will be generated, which has the default extension ".lib". This library afterwards can be used and accessed like e.g. the standard library.
For the purpose to have available the POUs of a project in other projects, save the project as an Internal Library *.lib. This library afterwards can be inserted in other projects using the library manager.
If you have implemented POUs in other programming languages, e.g. C, and want to get them into a library, then save the project using data type External Library *.lib). You will get the library file but additionally a file with the extension "*.h". This file is structured like a C header file and contains the declarations of all POUs, data types and global variables, which are available with the library. If an external library is used in a project, then in simulation mode that implementation of the POUs will be executed, which was written with CoDeSys; but on the target the C-written implementation will be processed.
CoDeSys V2.3 |
6-17 |

Log...
If you want to add licensing information to a library, then press button Edit license info... and insert the appropriate settings in the dialog 'Edit Licensing Informationen'. See the corresponding description at 'File' 'Save as...' resp. at License Management in CoDeSys.
'Insert' 'Additional Library'
With this command you can attach an additional library to your project.
When the command is executed, the dialog box for opening a file appears. Choose the desired library with the "*.lib" extension and close the dialog with OK. The library is now listed in the library manager and you can use the objects in the library as user-defined objects.
As soon as you include a library for which a license is needed and no valid license is found, you may get a message that the library is only available in demo mode or that the library is not licensed for the currently set target. You can ignore this message at that time or start appropriate actions concerning the license. An invalid license will produce an error during compile ('Project' 'Build'). In this case a double-click on the error message resp. <F4> will open the dialog 'License information' where you can start the appropriate actions. (See separate documentation on the 'License Manager'.
Remove Library
With the 'Edit' 'Delete' command you can remove a library from a project and from the library manager.
'Extras' 'Properties'
This command will open the dialog 'Informations about internal (resp. external) library'. For internal libraries you will find there all data, which have been inserted in the Project Info (where applicable including the license information) when the library had been created in CoDeSys. For external libraries the library name and library path will be displayed.
6.5Log...
The log stores in chronological order actions that occur during an Online session. For this purpose a binary log file (*.log) is set up. Afterward, the user can store excerpts from the appropriate project log in an external log.
The log window can be opened in either Offline or Online mode and can thus serve as a direct monitor online.
'Window' 'Log'
To open, select the menu item 'Window' 'Log' or select entry 'Log' in the Resources tab.
In the log window, the filename of the currently displayed log appears after Log:. If this is the log of the current project, the word "(Internal)" will be displayed.
Registered entries are displayed in the log window. The newest entry always appears at the bottom.
Only actions belonging to categories that have been activated in the 'Filter' field of the menu 'Project' 'Options' 'Log' will be displayed.
6-18 |
CoDeSys V2.3 |

6 - The Resources
Log window
Available information concerning the currently selected entry is displayed below the log window:
Category: The category to which the particular log entry belongs. The following four categories are possible:
•User action: The user has carried out an Online action (typically from the Online menu).
•Internal action: An internal action has been executed in the Online layer (e.g. Delete Buffers or Init debugging).
•Status change: The status of the runtime system has changed (e.g. from Running to Break, if a breakpoint is reached).
•Exception: An exception has occurred, e.g. a communication error.
Description: The type of action. User actions have the same names as their corresponding menu commands; all other actions are in English and have the same name as the corresponding
OnlineXXX() function.
Info: This field contains a description of an error that may have occurred during an action. The field is empty if no error has occurred.
System time: The system time at which the action began, to the nearest second.
Relative time: The time measured from the beginning of the Online session, to the nearest millisecond.
Duration: Duration of the action in milliseconds.
Menu Log
When the log window has the input focus, the menu option Log appears in the menu bar instead of the items 'Extras' and 'Options'.
The menu includes the following items:
Load… An external log file *.log can be loaded and displayed using the standard file open dialog.
CoDeSys V2.3 |
6-19 |