


Alarm Configuration
Colors/Bitmaps for class <class name>
Each alarm class can get assigned own colors and bitmaps, which will be used for the differentiation of the alarms in the visualization element alarm table. Select a Foreground color and Background color for the possible events INTO, ACK and OUTOF (see above). The standard dialog for selecting a color will open as soon as you perform a mouse-click on the color symbol. For selecting a bitmap a mouse-click on the grey rectangle will open the standard dialog for selecting a file.
6.3.4Alarm groups
Alarm groups are used for organizing the available alarms. Each alarm is definitely assigned to right one alarm group and is managed by this group. All alarms of a group can get assigned a common deactivation variable and common parameters regarding the alarm saving. Regard that even a single alarm must be configured within an alarm group.
A hierarchical structure of alarm groups can be defined via folder elements. When a alarm group is selected in the configuration tree, automatically the dialog Alarm group will be displayed:
Configuration dialog Alarm group
In the field Description you can enter a name for the alarm group.
As Deactivation variable a boolean project variable can be defined. At a rising edge on this variable the alarm creation for all alarms of the group will be deactivate, at a falling edge it will be re-activated.
Via button Add an alarm can be added to the group. A new line in the table window will be inserted and there the following parameters are to be set:
Expression: Enter here the project variable or an expression (e.g. "a + b") to which the alarm should refer. It is recommended to use the input assistant <F2> resp. the intellisense function for an correct entry.
Type: The alarm types listed in the following can be used. For each type regard the appropriate comment resp. the definitions to be done in the area beyond the table !
DIG=0 Digital alarm, active as soon as the expression gets FALSE. DIG=1 Digital alarm, active as soon as the expression gets TRUE.
LOLO Analog alarm, active as soon as the value of the expression falls below the Value defined for Alarm type LOLO. You can define a tolerance (Deadband). As long as the expression value is within the dead band, no alarm will be activated, even if the LOLO-value has been falling below the limit.
LO corresponding to LOLO
6-14 |
CoDeSys V2.3 |
6 - The Resources
HI Analog alarm, active as soon as the expression exceeds the Value defined for Alarm type HIHI. You can define a tolerance (Deadband). As long as the expression value is within the dead band, no alarm will be activated, even if the HI value has exceeded the limit.
HIHI corresponding to HI
DEV- Deviation from the target value; Alarm gets active as soon as the value of the expression falls below the value defined for Alarm type DEV- plus the percentage deviation. Percentage deviation = target value * (deviation in %) / 100.
DEV+ Deviation from the target value); Alarm gets active expression exceeds the value defined for Alarm type DEV+ Percentage deviation = target value * (deviation in %) / 100.
as soon as the value of the plus the percentage deviation.
ROC Rate of Change per time unit; Alarm gets active as soon as the expression deviates strongly from the previous value. The limit value for activating an alarm is defined by the number of value changes (Rate of changes) per second, minute or hour (units per).
Class: Choose the desired alarm class. The selection list will offer all classes which have been defined in the alarm class configuration before the last saving of the project.
Priority: Here you can define a priority level 0-152. 0 is the highest priority. The priority will impinge on the sorting of the alarms within the alarm table.
Message: Define here the text for the message box, which will appear in case of an alarm. This box must be confirmed by the user with OK, but this OK will not automatically acknowledge the alarm ! For confirming (acknowledge) the alarm you must access the alarm table. This is possible via the visualization element alarm table or via the date of the alarm entry in the table. This date can be read from a log file which can be created optionally.
Deactivation: Here a project variable can be entered, which at a rising edge will deactivate any creation of the alarm. Regard however, that this setting will be overwritten by the entry which might be found in the field 'Deactivation variable' ! (see above).
6.3.5Alarm saving
For each alarm group a file can be defined, in which the alarm events are stored, if (!) a 'Save' action has been assigned to the class in the alarm class configuration dialog.
Select the alarm group in the configuration tree and open the dialog tab 'Alarm saving':
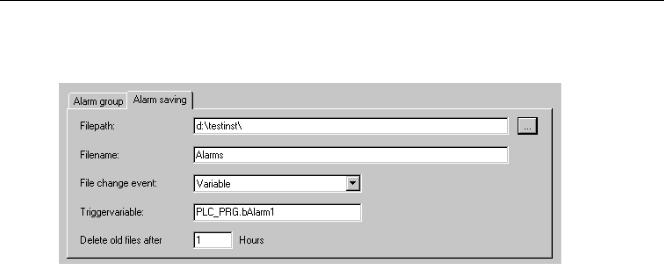
Configuration dialog 'Alarm saving'
The following definitions are possible:
Filepath: Directories path of the file which is defined in Filename; via button "..." you get the standard dialog for selecting a directory.
Filename: Name of the file which should save the alarm events (e.g. "alarmlog"). Automatically a file will be created which gets the name defined here plus an attached digit and which has the extension ".alm". The digit indicates the version of the log-file. The first file gets a "0"; each further file, which will be created according to the defined File change event, will be numbered with 1, 2 etc. (Examples: "alarmlog0.alm", "alarmlog1.alm).
CoDeSys V2.3 |
6-15 |