

If we remember all the way back to lesson one on the chromatic scale we will find the following rule :
One SemiTone = One Fret of the Guitar
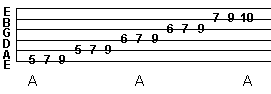
So as we move up the guitar string fret by fret we are moving up the chromatic scale one semitone at a time. This is a way of playing the A chromatic scale on the 'A' String.

Notice that it is just moving up in semitones
When playing the above example use alternate picking (a downstroke of the pick followed by an upstroke). This will be good practice for when we enter into the speed picking lessons. This would mean that you had played a full 12-note cycle of the chromatic scale, here is another fingering that is more useful.

The above example is exactly the same notes (the 'A' chromatic scale) but played across different strings, why? Well notice that you do not have to move your left hand very far this makes playing the scale easier, and in time your right hand will be on automatic pilot when it comes to scales so anything that can speed up the left hand will be great.
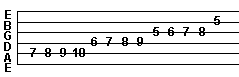
Here is another fingering that covers all the strings and repeats the sequence of notes.

Please note : because of how the 'B' string is tuned it effects the pattern of notes in the chromatic scale - look in the example above and you will see that rather than following the pattern the 'B' string is played a fret higher than you may expect this is at this stage something to be a little wary of.
When playing this count 1..2..3..4 with your foot and also in your head (or out loud if no-one is watching), and always (at the moment) alternate the pick strokes (down, up, down, up etc...).
AND PLAY SLOW.....If you try to practice these scales too quick then your hands will never develop the teamwork that is required between them and the result will be sloppy.
Remember that both these examples are the same scale (A chromatic) that are just fingered differently.
The notes of the Chromatic scale from a to a are (using sharps): A, A#, B, C, C#, D, D#, E, F, F#, G, G#, A.x4
In the above examples we are moving from A right up to another higher A moving in semitones, there are notes repeated all over the fretboard, which means that we can change fingering's quite a lot depending on what we want to achieve.
How do I play the Scale in other keys and positions?
As we have seen the chromatic scale can just be played by advancing up a guitar string fret by fret (semitone at a time). What this means is if you wished to play a 'E' chromatic scale then you would just find an 'E' note and ascend semitone by semitone. If you have trouble finding notes high on the fretboard then just start on one of the open strings and using a chromatic pattern work up the fretboard until you have found the correct note. I know (and have taught) guitarist who have been playing for 4-5 years who still do not know the notes on the fretboard and it severely limits their playing because they are trapped in a couple of positions on the fretboard.
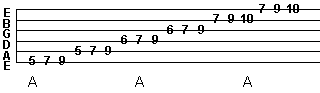
Here is a suggested fingering for an E Chromatic Scale:
The last note is played on the 5th fret because that is the E note, it does not fit the pattern because of how the 'B' string is tuned - in the scheme of things it often changes quite a few fingerings as you will see.
So the notes in the above scale are E, F, F#, G, G#, A, A#, B, C, C#, D, D#, E.
A good tip is to say the notes aloud as you are playing them; this will enable you to know where the notes are all over your fretboard. An exercise for you could be to find three different places to play the 'e' chromatic scale on the fretboard.
Well thats about all I want to cover at this stage on the chromatic scale, remember if there is something you don't understand or something that you disagree with on any of these pages then drop me a line and I will try to answer.
Major Scale I
This scale is one of the most important and useful that you will ever learn. I will be using this scale in subsequent lessons to introduce you to the wonders of chord construction, as well as constantly refering to it in other lessons. Have fun with this lesson and keep the facts presented in the back of your mind.
The Major Scale (Ionian Mode)
What is the Major Scale? The Major Scale is the first scale that many people learn, it has a 'happy' sound and is used in much of today’s music. It is also very useful for learning about how music is constructed, and when I am teaching guitar theory I make references to it constantly. Here is a fingering for the A Major Scale:

Now this is a one-'octave' pattern for the A Major Scale, what this means is that the fingering starts on the root note (which in this case is A) and then goes up eight notes to the next occurrence of the 'root' note. The next occurrence of the note is eight notes higher than the first and so is called an octave. You can go eight notes of the major scale above any other particular note and you would find it an octave higher.
The 'root' note is the note that the key of the music is in, in this case we are in the key of A major. (Actually we could be in other keys....but what we will say is that the 'band' is playing in the key of A major and we are playing this over it!!!)
Often the 'root' note will be the first or last chord in the chord progression that you are playing over...often but not always, music has lots of little tricks :) If this doesn't make sense then just take my word that 'A' is the root note at the moment :), I am trying to keep this as simple to understand as possible.
The Notes of this scale are: A, B, C#, D, E, F#, G#, A.
When playing this scale count the notes as you are playing....eg 'root',2,3,4,5,6,7,'octave'... So when playing the major scale if you start on one note and go up eight steps 1.2.3.4.5.6.7.8 then you will be on the same note but one octave up.Mail if this is too confusing and I will endeavor to explain this better!!!
So can I play this scale starting from the note one octave up?
Yes, this following example will show the same A major scale starting on the A note on the seventh fret on the 'D' string.

So in the above example I have started on the A note at the seventh fret on the 'D' String and then gone up the eight notes until I am at another A note an octave up (which is on the b string / 10 fret).
Playing the A major Scale over 2 octaves
To play the scale over 2 octaves just start on the bottom 'A' note (on the fifth fret on the E string) and go up through the two octave patterns that we have already learned.
You are still playing just the same seven notes but repeated up the different octaves.
Playing the A major Scale over 2 1/2 octaves
This is the pattern often used for practicing the Major Scale, it has three notes per string and it covers all of the strings on the guitar so it is an excellent picking excercise. Always at this stage pick down then up, down then up.
Ok so we now know a good fingering for the A Major Scale but where do we go from here ? Well in the upcoming lessons, I will show you how to play this scale using any root note, and then how to play and construct many common chords so you can throw away your chord book!.
Chords I
In this lesson, I would just like to introduce you to several different chord shapes that are commonly used in today’s music. In subsequent lessons, I will show you how to alter these shapes to play many different chord voicings.
Common Major Chord Voicings
The E major Chord (Emaj)
This is the first chord that many people learn; it is a reasonably easy chord for beginners to pick up and can be easily altered later to make many more voicings that are different.
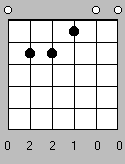

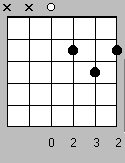
The A major Chord (Amaj)


The C major Chord (Cmaj)


The G major Chord (Gmaj)


The D major Chord (Dmaj)

How do I practice these Chords ?
In order to ensure that you are fretting these chords correctly, I would like you to do the following :
Finger the chord that you wish to play, referencing the chord shapes and tablature above.
Pluck the strings that are included in the chord with your strumming hand, one string at a time. (dont pluck the strings that have a 'x' above them in the chord diagrams).
Listen to each note carefully, if a single note is not sounding correct then check your fingers to ensure that you are playing the note with the tip of your finger and that it is being held down on the fretboard at the correct position.
Do not strain, experiment with moving your thumb to the back of the guitar's neck.
Listen to the examples provided and attempt to play them better!.
So What’s next ?
Try to change from chord to chord quickly; this is one of the trickier aspects of playing chords. I would recommend practicing changes between two of the chords listed here at a single time (e.g. use 'Emaj' then change to 'Amaj' and back until you can do it quick...).
In closing ..
I hope that you have increased your chord knowledge with this lesson, which is really only a small primer for the road that we have ahead. Next time I would like to show you some minor chords and perhaps we could learn to play a couple of songs (that would be nice huh?).Thank you to all the people that have written to me and given me such wonderful comments and questions, keep the email coming, honestly it is my pleasure to help
Chords II - Minor
In this lesson I would like to demonstrate some common minor chord voicings and begin to talk
about playing rhythm.
Common Minor Chord Voicings
The E minor Chord (Emin)
Ok, so lets look back to the lesson on the common Major chords (Chords I) and play the E major chord. Listen to the sound of the chord, now play the E minor chord below - there is only one note difference. (The G# on the G string is flattened to be an open 'G' note).
The E minor Chord (Emin)


When you play the E major chord and then play the E minor chord, you should hear the contrast between the chords. The E major chord should sound "happier" while the E minor chord will have a sadder sound to it.
This should demonstrate to you the basic difference between the major and minor chords. In subsequent lessons we will look at the theory behind this. Practice the following chords, along with their major counterparts.
The A minor Chord (Amin)


The D minor Chord (Dmin)

All right, how about a Song?
Lets learn a reasonably simple song to start us off, "Knocking on Heavens Door" (written by Bob Dylan, played by many others).
The Basic Chords to this song are:
G major , D major , A min
G major , D major , C major
So you are probably saying, "Well I know the chords but my picking hand doesn’t know what to do", lets look at that now. Music is broken up into Bars, inside a Bar there are many Beats.
A basic rock'n'roll bar (4/4 to those who care at this stage) consists of four beats, we could count them like "1-2-3-4".
Depending on the Tempo (speed) of the music we would count the 1-2-3-4 faster or slower. We measure tempo in beats per minute (i.e. the amount of beats that occur in a minute.)
The tempo that we will use for this song is 95 beats per minute.
Get your foot tapping along with the sound of the click and count "1 2 3 4" - each number landing on a click (When you get to four start counting again).
An occurrence of "1 2 3 4" is a Bar.
To start with lets play one chord to a bar simply using a downstroke with the picking hand (i.e. towards the floor across all the strings that need to be played in a given chord).
However for the song let the A minor and the C major chords last twice as long as the others (2 bars instead of one). That will sound like this (click here to hear a sample)