

6 Installing Gpg4win
Chapters 1 to 5 provided you with information on the background related to encryption. While Gpg4win also works if you do not understand the logic behind it, it is also different from other programs in that you are entrusting your secret correspondence to this program. Therefore it is good to know how it works.
With this knowledge you are now ready to install Gpg4win and set up your key pair.
If you already have a GnuPG-based application installed on your computer (e.g. GnuPP, GnuPT, WinPT or GnuPG Basics), please refer to the Annex D for information on transferring your existing certificates.
You can load and install Gpg4win from the Internet or a CD. To do this, you will need administrator rights to your Windows operating system.
If you are downloading Gpg4win from the Internet, please ensure that you obtain the file from a trustworthy site, e.g.: www.gpg4win.org. To start the installation, click on the following file after the download:
gpg4win-2.0.0.exe (or higher version number).
If you received Gpg4win on a CD ROM, please open it and click on the “Gpg4win” installation icon. All other installation steps are the same.
The response to the question of whether you want to install the program is [ Yes ].
30
The Gpg4win Compendium 3.0.0-beta1
Chapter 6. Installing Gpg4win
The installation assistant will start and ask you for the language to be used with the installation process:
Confirm your language selection with [ OK ].
Afterwards you will see this welcome dialog:
Close all programs that are running on your computer and click on [ Next ].
31
The Gpg4win Compendium 3.0.0-beta1
Chapter 6. Installing Gpg4win
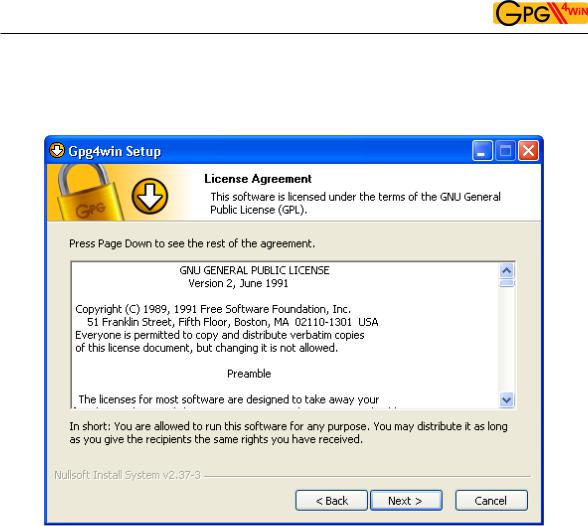
The next page displays the licensing agreement – it is only important if you wish to modify or forward Gpg4win. If you only want to use the software, you can do this right away – without reading the license.
Click on [ Next ].
32
The Gpg4win Compendium 3.0.0-beta1
Chapter 6. Installing Gpg4win
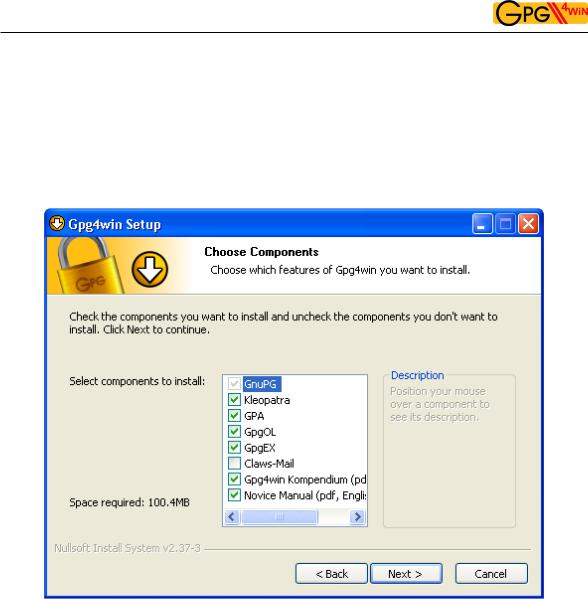
On the page that contains the selection of components you can decide which programs you want to install.
A default selection has already been made for you. Yo can also insall individual components at a later time.
Moving your mouse cursor over a component will display a brief description. Another useful feature is the display of required hard drive space for all selected components.
Click on [ Next ].
33

The Gpg4win Compendium 3.0.0-beta1
Chapter 6. Installing Gpg4win
The system will suggest a folder for the installation, e.g.: C:nProgrammenGNUnGnuPG
You can accept the suggestion or select a different folder for installing Gpg4win.
Then click on [ Next ].
34

The Gpg4win Compendium 3.0.0-beta1
Chapter 6. Installing Gpg4win
Now you can decide which links should be insalled – the system will automatically create a link with the start menu. You can change this link later on using the Windows dashboard settings.
Then click on [ Next ].
35

The Gpg4win Compendium 3.0.0-beta1
Chapter 6. Installing Gpg4win
If you have selected the default setting – link with start menu – you can define the name of this start menu on the next page or simply accept the name.
Then click on [ Install ].
36
The Gpg4win Compendium 3.0.0-beta1
Chapter 6. Installing Gpg4win
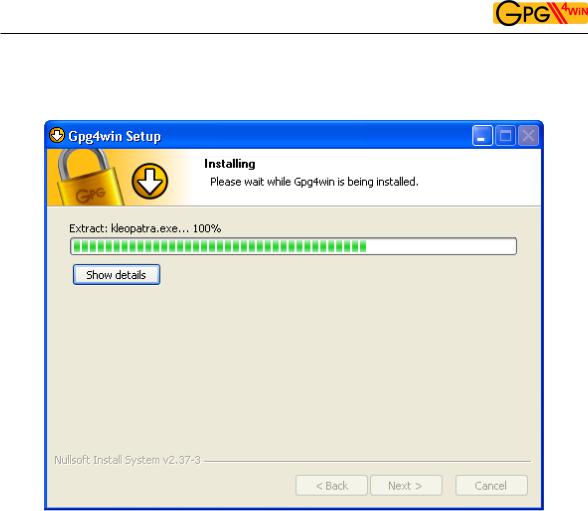
During the installation process that follows, you will see a progress bar and information on which file is currently being installed. You can press [ Show details ] at any time to show the installation log.
Once you have completed the installation, please click on [ Next ].
37

The Gpg4win Compendium 3.0.0-beta1
Chapter 6. Installing Gpg4win
The last page of the installation process is shown once the installation has been successfully completed:
You have the option of displaying the README file, which contains important information on the Gpg4win version you have just installed. If you do not wish to view this file, deactivate this option.
Then click on [ Finish ].
38
The Gpg4win Compendium 3.0.0-beta1
Chapter 6. Installing Gpg4win
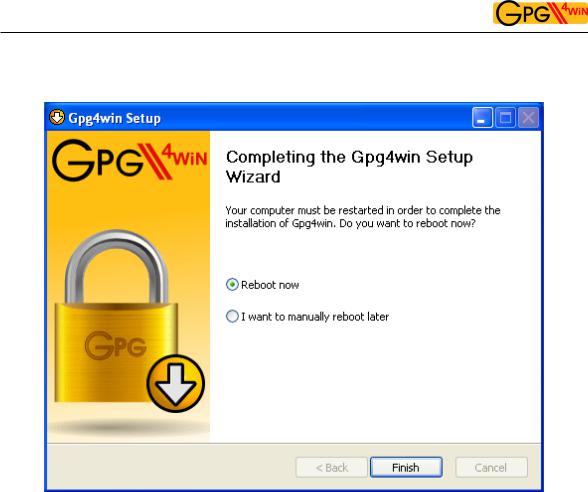
In some cases you may have to restart Windows. In this case, you will see the following page:
Now you can decide whether Windows should be restarted immediately or manually at a later time.
Click on [ Finish ].
Please read the README file which contains up-to-date information on the Gpg4win version that has just been installed. You can find this file e.g. via the start menu:
Start!Programs!Gpg4win!Documentation!Gpg4win README
39

The Gpg4win Compendium 3.0.0-beta1
Chapter 6. Installing Gpg4win
And that’s it!
You have successfully installed Gpg4win and are ready to work with the program.
For information on automatically installing Gpg4win, as may be of interest for software distribution systems, please see the Annex C “Automatic installation of Gpg4win”.
40
7 Creating a certificate
Now that you have found out why GnuPG is so secure (Chapter 3), and how a good passphrase provides protection for your private key (Chapter 4), you are now ready to create your own key pair .
As we saw in Chapter 3, a key pair consists of a public and a private key. With the addition of an e-mail address, login name etc., which you enter when creating the pair (so-called meta data), you can obtain your private certificate with the public and private key.
This definition applies to both OpenPGP as well as S/MIME (S/MIME certificates correspond with a standard described as “X.509”).
It would be nice if I could practice this important step of creating a key pair ....
Not to worry, you can do just that – but only with OpenPGP:
If you decide for the OpenPGP method of authentication, the “Web of Trust”, then you can practice the entire process for creating a key pair, encryption and decryption as often as you like, until you feel very comfortable.
This “dry run” will strengtthen your trust in Gpg4win, and the “hot phase” of OpenPGP key pair creation will no longer be a problem for you.
Your partner in this exercise is Adele . Adele is a test service which is still derived from the GnuPP predecessor project and is still in operation. In this compendium we continue to recommend the use of this practice robot. We would also like to thank the owners of gnupp.de for operating this practice robot.
Using Adele, you can practice and test the OpenPGP key pair which you will be creating shortly, before you start using it in earnest. But more on that later.
41
The Gpg4win Compendium 3.0.0-beta1
Chapter 7. Creating a certificate
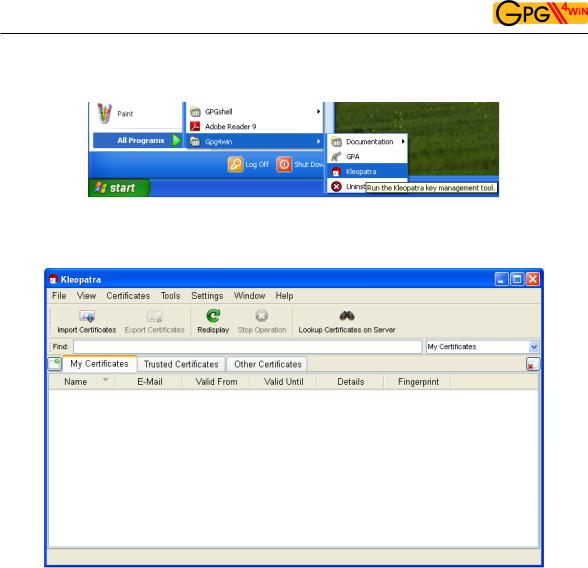
Let’s go! Open Kleopatra using the Windows start menu:
You will see the main Kleopatra screen – the certificate administration:
At the beginning, this overview will be empty, since you have not created or imported any certificates yet.
42

The Gpg4win Compendium 3.0.0-beta1
Chapter 7. Creating a certificate
Click on File!New Certificate.
In the following dialog you select the format for the certificate. You can choose from the following: OpenPGP (PGP/MIME) or X.509 (S/MIME).
The differences and common features of the two formats have already been discussed in Chapter 5.
This chapter of the compendium breaks off into two sections for each method at this point. Information is then combined at the end of the Chapter.
Depending on whether you chose OpenPGP or X.509 (S/MIME), you can now read either:
Section 7.1: Creating an OpenPGP certificate (siehe next page) or
Section 7.2: Creating an X.509 certificate (see page 50).
43

The Gpg4win Compendium 3.0.0-beta1
Chapter 7. Creating a certificate
7.1 Creating an OpenPGP certificate
In the certificate option dialog, click on [ Create personal OpenPGP key pair ].
Now enter your e-mail address and your name in the following window. Name and e-mail address will be made publicly visible later.
You also have the option of adding a comment for the key pair. Usually this field stays empty, but if you are creating a key for test purposes, you should enter "test" so you do not forget it is a test key. This comment becomes part of your login name, and will become public just like your name and e-mail address.
If you first wish to test your OpenPGP key pair, you can simply enter any name and fictional e-mail address, e.g.:
Heinrich Heine and heinrich@gpg4win.de
The Advanced settings are only be required in exceptional cases. For details, see the Kleopatra handbook (via Help!Kleopatra handbook).
Click on [ Next ].
44

The Gpg4win Compendium 3.0.0-beta1
Chapter 7. Creating a certificate
You will see a list of all of the main entries and settings for review purposes. If you are interested in the (default) expert settings, you can view these via the All details option.
If everything is correct, click on [ Create key ].
45

The Gpg4win Compendium 3.0.0-beta1
Chapter 7. Creating a certificate
Now to the most important part: entering your passphrase!
To create a key pair, you must enter your personal passphrase:
If you have read Chapter 4 you should now have an easy-to-remember but hard to break secret passphrase. Enter it in the dialog displayed at the top.
Please note that this window may have been opened in the background and is not visible at first.
If the passphrase is not secure enough because it is too short or does not contain any numbers or special characters, the system will tell you.
At this point you can also enter a test passphrase or start in earnest; it’s up to you.
To make sure that you did not make any typing errors, the system will prompt you to enter your passphrase twice. Always confirm your entry with [ OK ].
46

The Gpg4win Compendium 3.0.0-beta1
Chapter 7. Creating a certificate
Now your OpenPGP key pair is being created:
This may take a couple of minutes. You can assist the creation of the required random numbers by entering information in the lower input field. It does not matter what you type, as the characters will not be used, only the time period between each key stroke. You can also continue working with another application on your computer, which will also slightly increase the quality of the new key pair.
47

The Gpg4win Compendium 3.0.0-beta1
Chapter 7. Creating a certificate
As soon as the key pair creation has been successful, you will see the following dialog:
The 40-digit “fingerprint” of your newly generated OpenPGP certificate is displayed in the results text field. This fingerprint is unique anywhere in the world, i.e. no other person will have a certificate with the same fingerprint. Actually, even at 8 digits it would already be quite unlikely that the same sequence would occur twice anywhere in world. For this reason, it is often only the last 8 digits of a fingerprint which are used or shown, and which are described as the key ID. This fingerprint identifies the identity of the certificate as well as the fingerprint of a person.
However, you do not need to remember or write down the fingerprint. You can also display it later in Kleopatra’s certificate details.
48

The Gpg4win Compendium 3.0.0-beta1
Chapter 7. Creating a certificate
Next, you can activate one or more of the following three buttons:
Creating a backup copy of your (private) certificate...
Enter the path under which your full certificate (which contains your new key pair, hence the private and public key) should be exported:
Kleopatra will automatically select the file type and store your certificate as an .asc or.gpg file
– depending on whether you activate or deactivate the ASCII armor option.
For export, click on [ OK ].
Important: If you save the file on the hard drive, you should copy the file to another data carrier (USB stick, diskette or CD-ROM) as soon as possible, and delete the original file without a trace, i.e. do not leave it in the Recycle bin! Keep this data carrier and back-up copy in a safe place.
You can also create a back-up copy later; to do this, select the following from the Kleopatra main menu: File!Export private certificate... (see Chapter 19).
Sending a certificate via e-mail ...
Clicking on this button should create a new onee-mail – with your new public certificate in the attachment. Your secret Open PGP key will of course not be sent. Enter a recipient e-mail address; you can also add more text to the prepared text for this e-mail.
Please note: Not all e-mail programs support this function. Of course you can also do this manually: If you do not see a newe-mail window, shut down the certificate creation assistant, save your public certificate via File!Export certificate and sent this file via e-mail to the people you are corresponding with. For more details see Section 8.1.
Sending certificates to certificate servers...
Chapter explains how to set up a globally available OpenPGP certificate server in Kleopatra, and how you can publish your public certificate on this server 16.
This completes the creation of your OpenPGP certificate. End the Kleopatra assistant with [ Finish ].
Now let’s go to Section 7.3 on page 56. Starting at that point, the explanations for OpenPGP and X.509 will again be identical.
49
The Gpg4win Compendium 3.0.0-beta1
Chapter 7. Creating a certificate
7.2 Creating an X.509 certificate
In the certificate format selection dialog on page , 43 click on the button [ Create personal X.509 key pair and authentication request ].
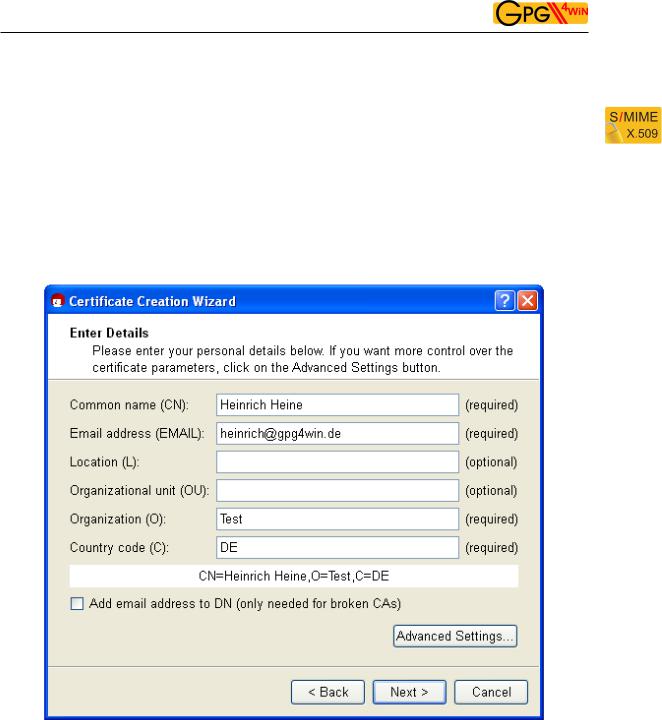
In the following window, enter your name (CN = common name), your e-mail address (EMAIL), organisation (O) and your country code (C). Optionally, you can also add your location (L = Locality) and department (OU = Organizational Unit).
If you first wish to test the X.509 key pair creation process, you can enter any information for name, organization and country code, and can also enter a fictional e-mail address, e.g.:CN=Heinrich
Heine,O=Test,C=DE,EMAIL=heinrich@gpg4win.de
The Advanced settings will only be required in exceptional cases. For details, see the Kleopatra handbook (via Help!Kleopatra handbook).
Click on [ Next ].
50
The Gpg4win Compendium 3.0.0-beta1
Chapter 7. Creating a certificate
You will see a list of all main entries and settings for review purposes. If you are interested in the (default) expert settings, you can view these via the All details option.
Once everything is correct, click on [ Creat key ].
51

The Gpg4win Compendium 3.0.0-beta1
Chapter 7. Creating a certificate
Now to the most important part: Entering your passphrase!
In order to create a key pair, you will be asked to enter your passphrase:
If you have read Chapter 4 you should now have an easy-to-remember but hard to break secret passphrase. Enter it in the dialog displayed at the top!
Please note that this window may have been opened in the background, so it may not be visible at first.
If the passphrase is not secure enough because it is too short or does not contain any numbers or special characters, the system will let you know.
At this point you can also enter a test passphrase or start in earnest; it’s up to you.
To make sure that you did not make any typing errors, the system will prompt you to enter your passphrase twice. Finally, you will be asked to enter your passphrase a third time: By doing that, you are sending your certificate request to the authenticating instance in charge. Always confirm your entries with [ OK ].
52

The Gpg4win Compendium 3.0.0-beta1
Chapter 7. Creating a certificate
Now your X.509 key pair is being created:
This may take a couple of minutes. You can assist the creation of the required random numbers by entering information in the lower input field. It does not matter what you type, as the characters will not be used, only the time period between each key stroke. You can also continue working with other applications on your computer, which will slightly increase the quality of the key pair that is being created.
53

The Gpg4win Compendium 3.0.0-beta1
Chapter 7. Creating a certificate
As soon as the key pair has been successfully created, you will see the following dialog:
The next steps are triggered with the following buttons:
Save request in file...
Here, you enter the path under which your X.509 certificate request should be backed up, and confirm your entry. Kleopatra will automatically add the file ending .p10 during the saving process. This file can then be sent to an authentication instance (in short CA for Certificate Authority). Further below, we will refer you to cacert.org, which is a non-commercial authentication instance (CA) that issues X.509 certificates free of charge.
Sending an request by e-mail ...
This creates a new e-mail with the certificate request which has just been created in the attachment. Enter a recippient e-mail address – usually that of your certificate authority in charge; you can also add more text to the prepared text of this e-mail.
Please note: Not all e-mail programs support this function. Of course you can also do this manually: If you do not see a new e-mailwindow, save your request in a file (see above) and send it by e-mail to your certificate authority (CA).
As soon as the CA has processed your request, the CA system administrator will send you the completed X.509 certificate, which has been signed by the CA. You only need to import the file into Kleopatra (see Chapter 19).
End the Kleopatra assistant with [ Finish ].
54

The Gpg4win Compendium 3.0.0-beta1
Chapter 7. Creating a certificate
Creating an X509 certificate using www.cacert.org
CAcert is a non-commercial certificate authority which issues X.509 certificates free of charge. It offers an alternative to commercial root CAs, some of which charge very high fees for their certificates.
To create a (client) certificate at CAcert, you first have to register at www.cacert.org.
Immediately following registration, you can create one or more client certificates on cacert.org: please make sure you have sufficient key length (e.g. 2048 bits). Use the web assistant to define a secure passphrase for your certificate.
Your client certificate is now created.
Afterwards you will receive an e-mail with two links to your new X.509 certificate and associated CAcert root certificate. Download both certificates.
Follow the instructions to install the certificate on your browser. In Firefox, you can use e.g. Edit!Settings!Advanced!Certificates to find your installed certificate under the first tab “Your certificates" with the name (CN) CAcert WoT User.
You can now issue a personal X.509 certificate which has your name in the CN field. To do this, you must have your CAcert account authenticated by other members of the CACert Web of Trust. Information on obtaining such a confirmation can be found on the Internet pages of CAcert.
Then save a backup copy of your personal X.509 certificate. The ending .p12 will automatically be applied to the backup copy.
Attention: This .p12 file contains your public and your private key. Please ensure that this file is protected againt unauthorised access.
To find out how to import your personal X.509 certificate in Kleopatra, see Chapter 19.
Let’s now look at Section 7.3 on the next page. This is where explanations for OpenPGP and X.509 are identical again.
55

The Gpg4win Compendium 3.0.0-beta1
Chapter 7. Creating a certificate
7.3 Certificate creation process complete
This completes the creation of your OpenPGP or X.509 key pair. You now have a unique electronic key.
During the course of this compendium, we will always use an OpenPGP certificate for sample purposes
– however, all information will also apply accordingly to X509 certificates.
You are now back in the Kleopatra main window. The OpenPGP certificate which was just created can be found in the certificate administration under the tab My certificates:
56

The Gpg4win Compendium 3.0.0-beta1
Chapter 7. Creating a certificate
Double-click on your new certificate to view all details related to the certificate:
What do the certificate details mean?
Your certificate is valid indefinitely, i.e. it has no “built-in expiry date”. To change its validity at a later point, click on [ Change expiry date ].
For more details about the certificate, see Chapter 15.
57
8 Distribution of public certificates
When using Gpg4win on a daily basis, it is very practical that for the purpose of encrypting and checking signatures you are always dealing with “public” certificates which only contain public keys. As long as your own secret key and the passphrase which protects it are secure, you have already gone a long way towards ensuring secrecy.
Everyone can and should have your public certificate, and you can and should have the public certificates of your correspondence partners – the more, the better.
Because:
To exchange secure e-mails, both partners must have and use the public certificate of the other person. Of course the recipient will also require a program capable of handling certificates – such as the Gpg4win software package with Kleopatra certification administration.
Therefore, if you want to send encrypted e-mails to someone, you must have their public certificate to encrypt the e-mail.
In turn, if someone wants to send you encrypted e-mails, he must have your public certificate and use it for encryption purposes.
For this reason you should now allow access to your public certificate.
Depending on how many people you corespond with, and which certificate format you are using, you
have several options. For example, you can distribute your public certificate ...
... directly via e-mail to specific correspondence partners – see Section 8.1.
... on an OpenPGP certificate server (applies only to OpenPGP) – See Section 8.2.
... via your own homepage.
... in person, e.g. with a USB stick.
Let’s look at the first two variants on the following pages.
58