

Chapter 3
Ten Problems |
▲ |
It has amused us, in the first chapter, to collect and classify some of the more common moves and shapes of the opening, and in the second, to try to organize the subject on strategic principles, but we have been aware all along that what the reader is going to have to do, when it comes down to actual play, can be best described as looking for the big points on the board and deciding which is biggest. Theoretical knowledge will help him, but for the most part he will have to rely on his own powers of visualization, which are best sharpened through experience. The following are ten opening situations that have confronted the author or his opponents at various times in the past. Each is presented as a problem, and you are invited to look at the game diagram and select your move. On the three pages following each problem will be found an answer diagram showing various reasonable choices, ranked from 10 points for the best move downwards, and some explanation of what the problem is all about.
There are many times in the game of go when it is impossible to decide which of two or more likely-looking moves is better, and there are many times when one move can be probably identified as the best, but several others are close behind in merit. There are also times when we simply do not have a clue; no one can pretend to say how the first four stones of the game should be played, for instance. This is why go admits so many different styles of play, and remains fascinating even to professional players.
The situations in the following problems, however, are not of this vague type. As the answer diagrams will show, there will always be several fairly good moves, (7 points or above), and the reader should congratulate himself for finding any of them, but the author does not have any great qualms in ranking the best choice well ahead of the others.
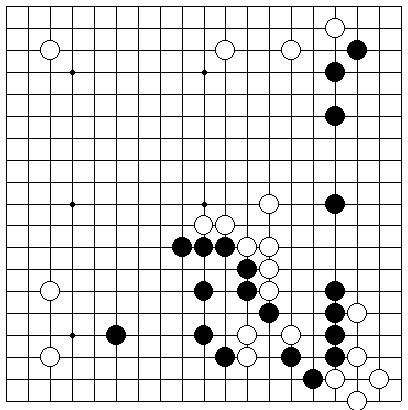
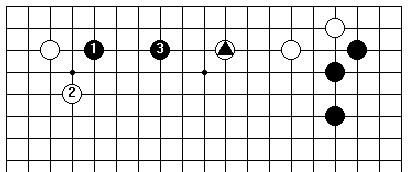
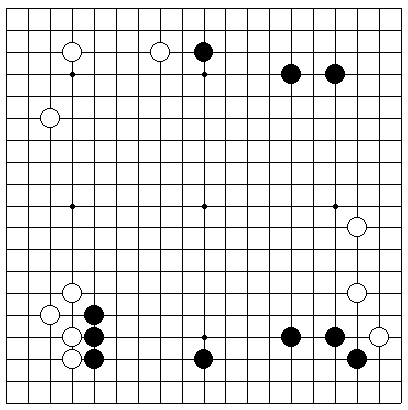
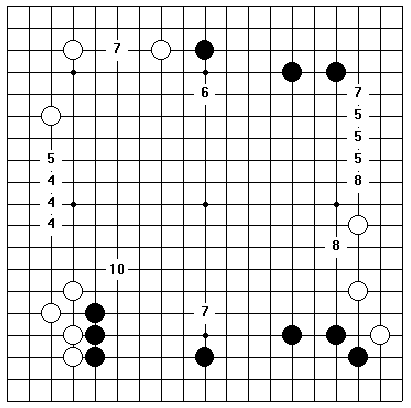
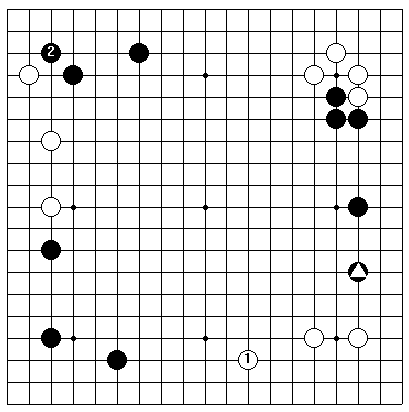
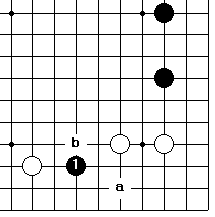
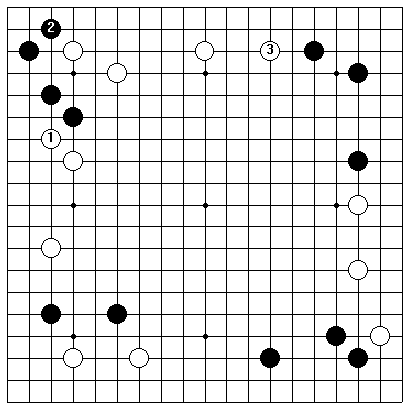
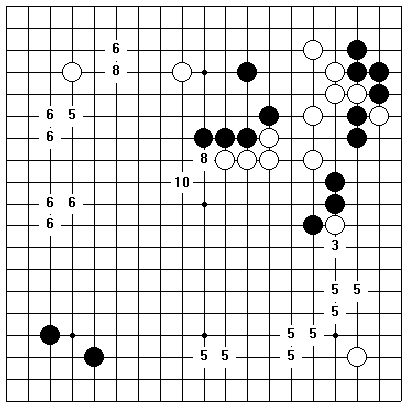
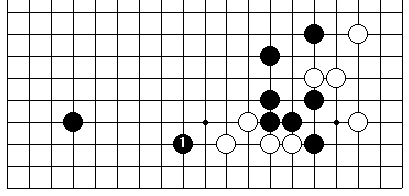
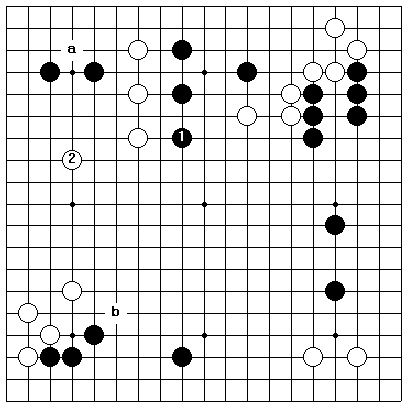
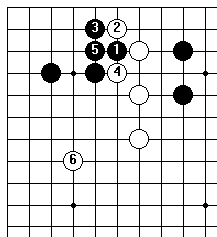
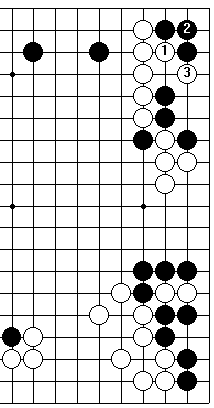
Problem 1 Black to play |
|
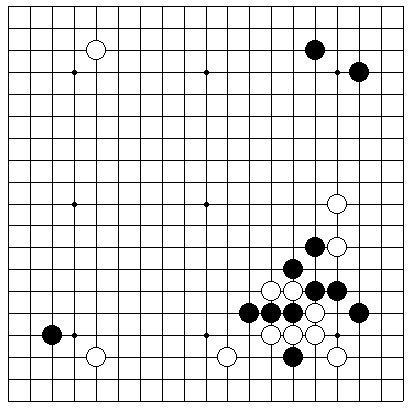
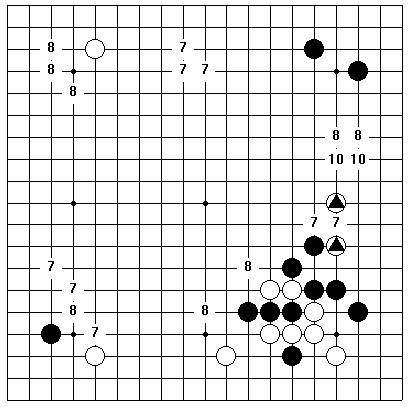
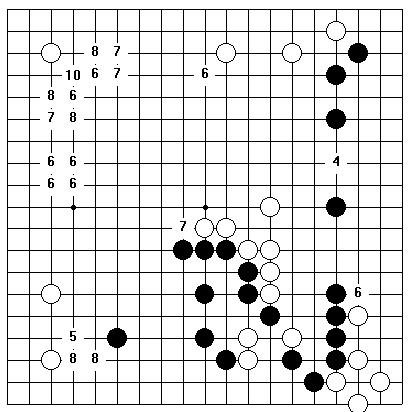
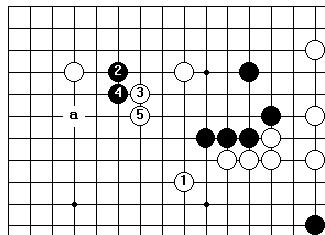
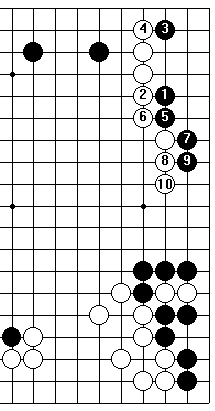
The focal point of the game as it stands now is the unsettled position on the right side. Black should make a pincer play at either of the two points marked 10, attacking the white stones marked . while forming territory in front of his shimari. If you chose to play one line higher, at one of the points marked 8 in the upper right, you can take credit for finding the right direction of play, but you are being too timid.
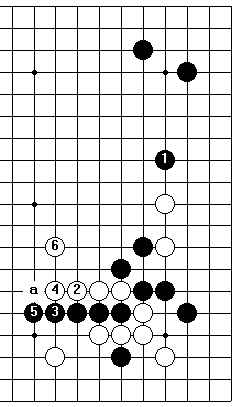
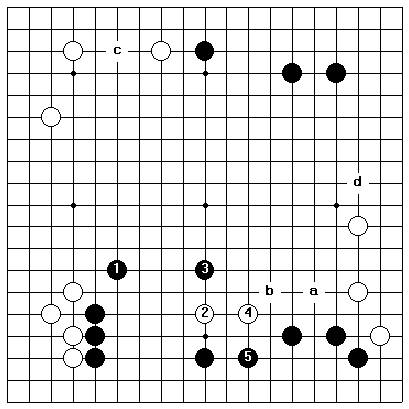
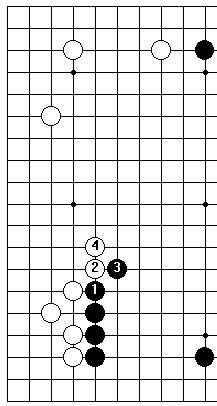
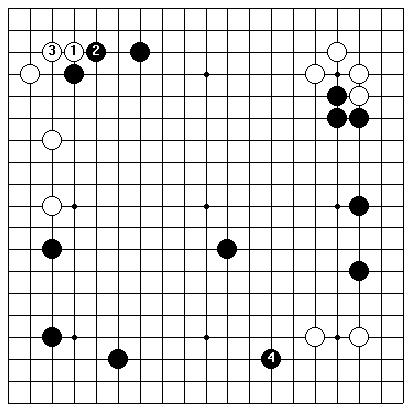
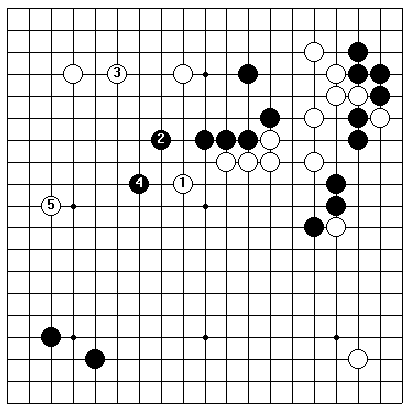
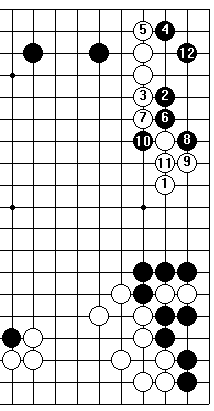
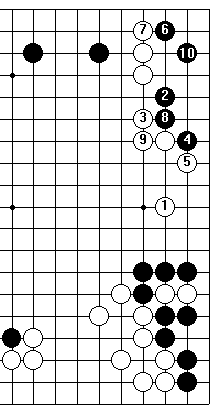
Dia.1 After Black 1, White should push out into the center with 2 and 4, then jump to 6, (or, if he prefers, keep pushing at a). This starts a four-way fight between two weak black groups and two weak white ones. It will be difficult, but Black has already staked out his claim on the best ground by playing 1.
|
Dia.1 |
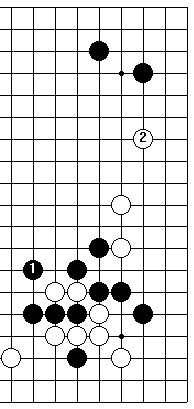
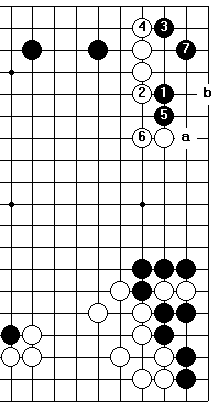
Dia.2. Black 1, capturing two stones and tieing Black's forces together, is an important point, but White 2 makes White's position safe, too, and robs Black of territory on the right side.
Dia.3. Similarly, if Black plays 1 and 3, White will extend to 4, with nothing to fear from Black's cutting at a.
|
|
|
Dia.2 |
Dia.3 |
|
|
|
|
Dia.4 |
Dia.5 |
|
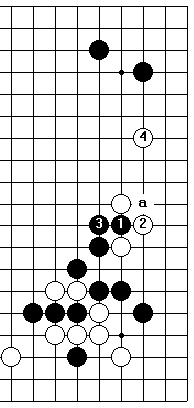
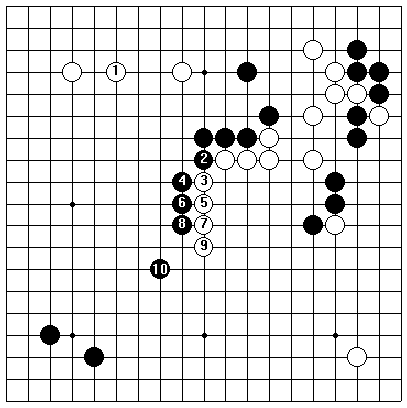
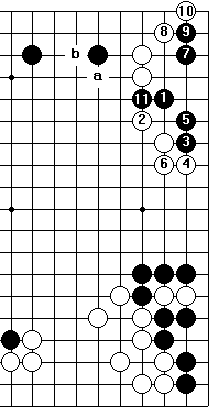
Dia.4. If White answers Black 1 directly by playing, say, 2, Black will capture at 3. White, his three stones on the right side sandwiched between two strong black positions, faces a dreary prospect. White cannot play this way; the fight in Dia.1 is inevitable.
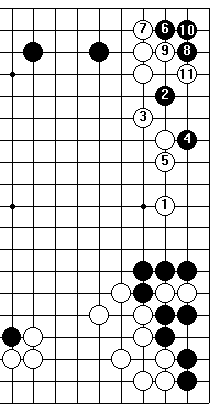
Dia.5. If Black plays on the left side, 1 looks best, but then White will play 2, 4, and 6, and be one move ahead on the right side of where he was in Dia.1.
Dia.6. For your reference, the position in the lower right corner arose from this pincer joseki.
|
Dia.6 |
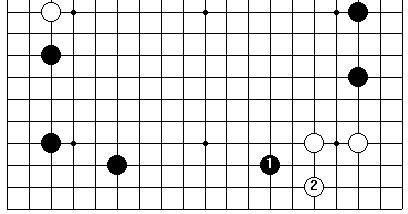
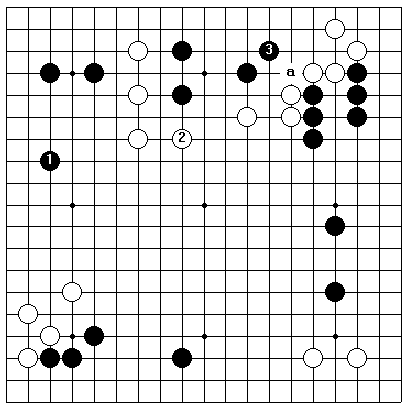
Problem 2 Black to play
|
|
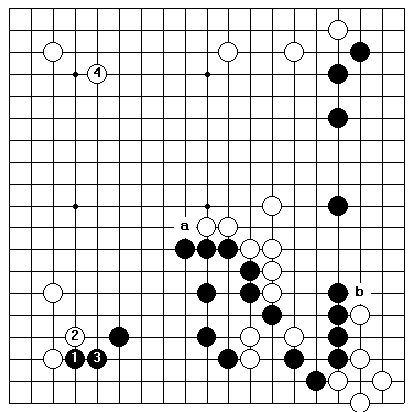
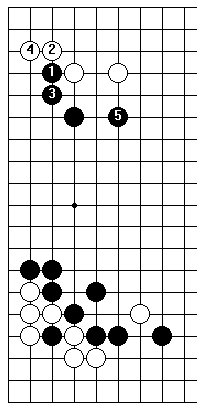
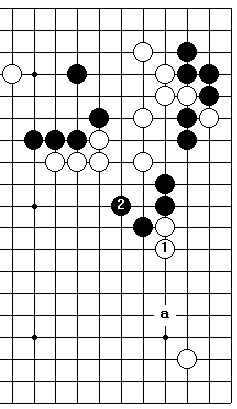
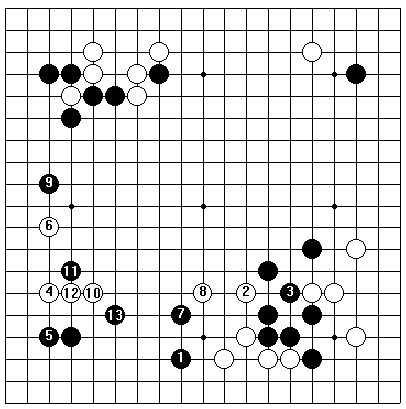
This game has started with some heavy action in the lower right. White has lost a couple of stones, but he has lived in the corner and made good shape in the center, and the fighting in that quarter of the board is over for the time being. Now Black needs to enter the huge open space in the upper left, which could rapidly become White's territory if left unattended.
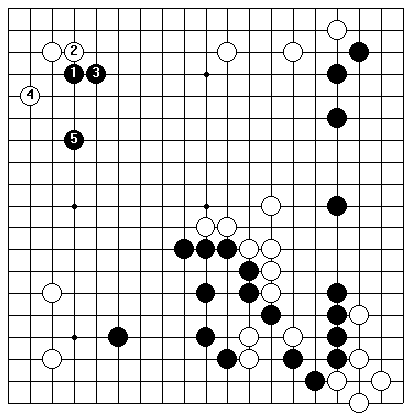
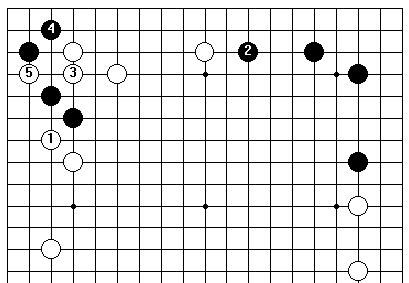
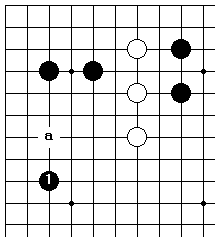
Dia.1. (correct) The joseki from 1 to 5 was made to order for this occasion. White's prospects for a large territory suddenly vanish in the face of Black's plays.
|
Dia.1 |
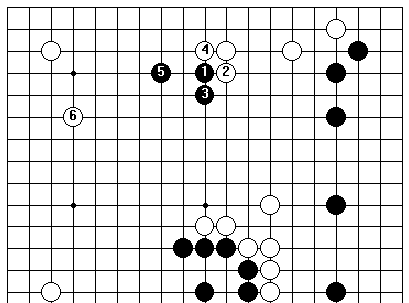
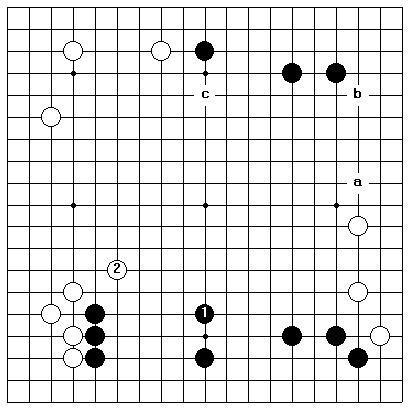
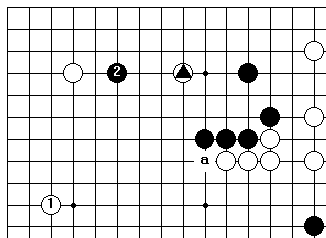
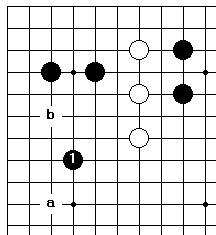
Dia.2. Black 1 here is a bit off the mark. Black does succeed in eliminating white territory on the upper side, but his own stones are weaker than in Dia.1, and White can build on the left side with 6. Black has made the mistake of playing against a strong white group, when he should have put his pressure on the weaker stone on the three-three point.
|
Dia.2 |
|
Dia.3 |
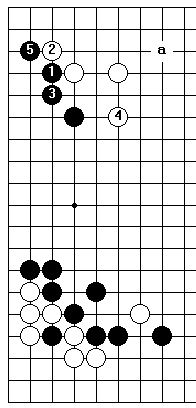
Dia.3. There are various other ways of playing kakari against a stone on the three-three point, which have been given credit in the diagram on page 116. To take one of them, if Black plays 1 here, (8 points), White will answer at 2, making territory on the left side. Black 3 has little effect on the white group to the right, where White . is standing rock-steady on the third line. If . were on the fourth line, however, Black 1 and 3 would be good plays.
Dia.4. Black 1 here is a large play as regards the lower side, but White will take sente and make a larger play on the upper side. Similarly, if Black played a or b, White would answer at 4.
|
Dia.4 |
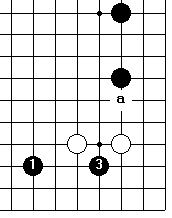
Problem 3 Black to play
|
|
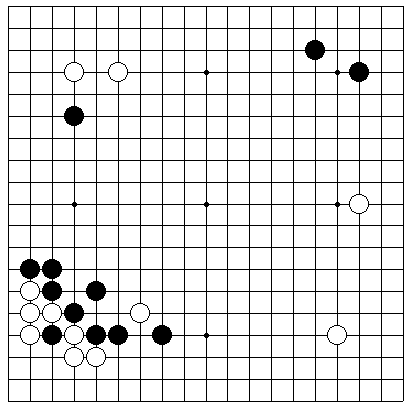

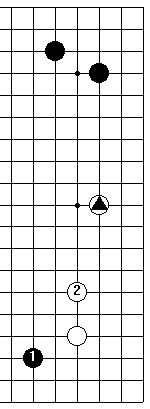
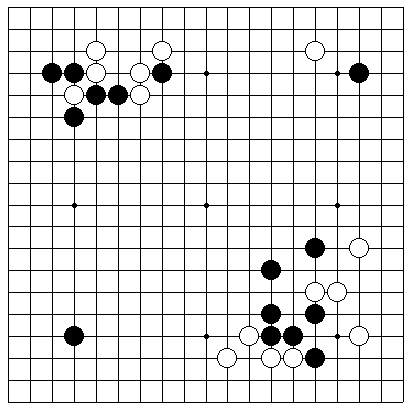
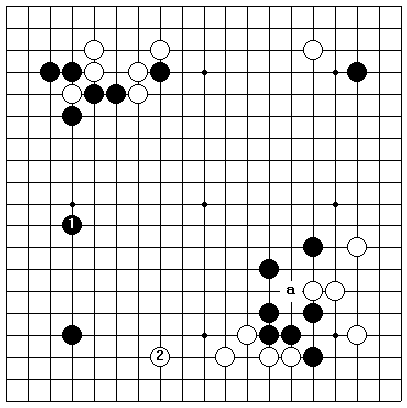
The obvious feature in this problem is the massive wall Black has made in the lower left corner. What should he do with it? He has already started correctly by playing kakari at , ; now he should keep on by making a one-point jump, (10 points), setting his sights on a really large area. A more conservative extension down the left side, (5 points), would be too close to the wall to be efficient.
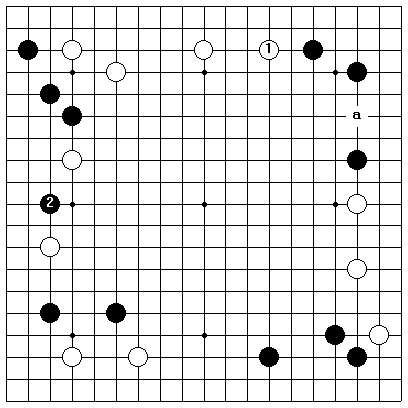
Dia.1. (correct) When Black plays 1, White should respond immediately with 2 and 4. Black can afford to play 5, aiming at the invasion at a. Black 5 at b would be an over-concentration of strength in relation to the lower left corner.
Dia.2. This position confronted the author in one of his games. The move he actually played was 1 here, and when his opponent answered at 2 and 4, Black got a better result than in Dia.1.
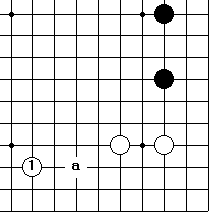
Dia.3. But if White had foregone the usual play at 4 in the previous diagram, and siezed the key point with 4 in this diagram, keeping Black from making adequate use of his wall, he would have had the lead.
If you appreciate the value of White 4, then you can see that Black 1 at a, (6 points), provoking an immediate reply at 4, would be bad strategy.
|
|
|
Dia.1 |
Dia.2 |
Dia.3 |
|
|
|
Dia.4 |
Dia.5 |
Dia.6 |

Dia.4. Perhaps you are worried about White's playing 1 here. This may become a serious threat in the future, but for the present White is only committing himself to the defense of a heavy group of stones while reducing his own corner territory, (assume Black a, White 6, Black c, etc.). Accordingly, for Black to play 2 before White gets the chance to play 1 is only a fifty per cent move right now.
Dia.5. Coming to the right side of the board, notice that Black 1, even though it is the usual idea after White has played ., is not appropriate here, because Black's position on the lower left is open at the edge of the board.
Dia.6. It would be better for Black to attack in this way, for with his outward-facing power in the lower left, he need not be afraid of getting into a running fight. But Black 1 in Dia.1 is more important than these moves.
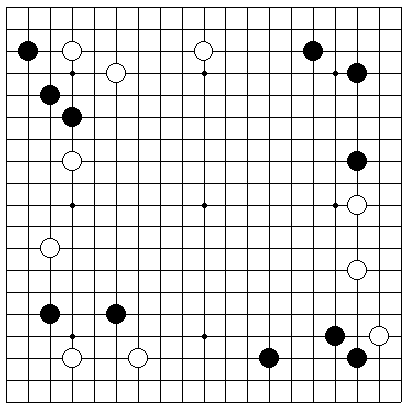
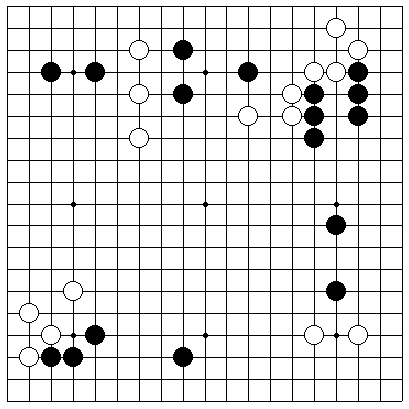
Problem 4 Black to play
|
|
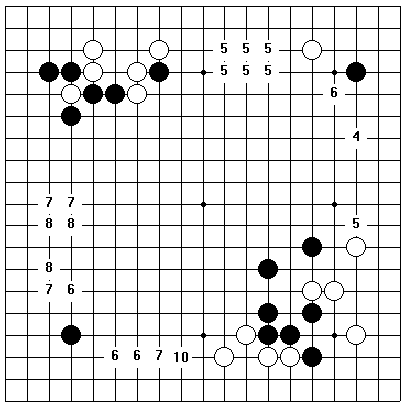
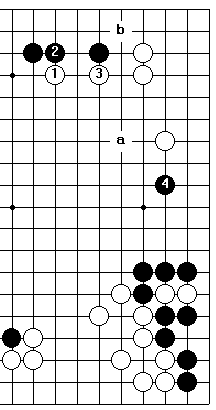
In this game Black is developing a large territory on the lower side, while White is doing the same on the left side. The pivotal point in regard to both of these areas is the keima marked 10 points. The invasion on the upper side, (7 points), is a big move, too, but if Black plays it now, and starts a running battle, he is likely to end up by helping White to make sure territory out of the left side. Conversely, if he invades the left side, (4 or 5 points), White should be able to secure the upper side while attacking him.
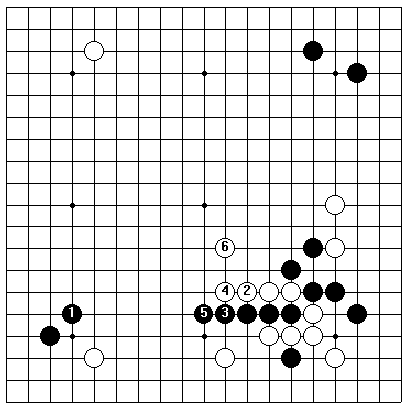
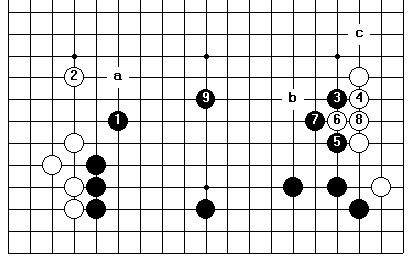
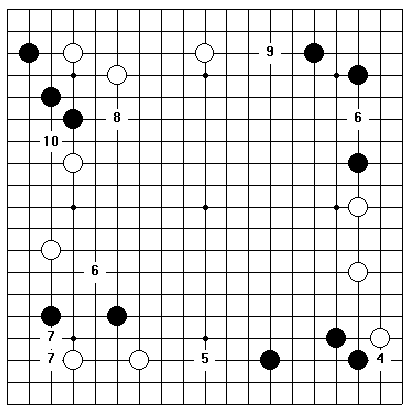
Dia.1. (correct) Black 1 threatens to make so much territory on the lower side that White is almost forced to do something about it. White a would not be enough: Black would answer at 6. It is hard to be sure of the best entry point, but White 2 seems likely, and the moves up to 5 are a possible development. By attacking, Black is taking the initiative in the game. If he becomes strong in the center, he can invade effectively at c. If he gets some stones in place to the left of White's group on the right side, then Black d may assume some attacking force.
|
Dia.1 |
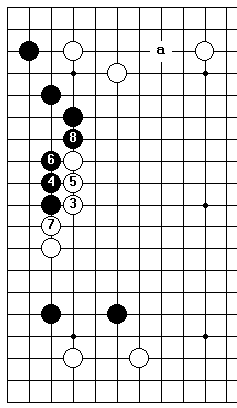
Dia.2. If White answers 1 this way, Black will play 3, 5, and 7, followed by 9, a, or 6, which would be more than White could bear to see. Black should not, however, play 3, 5, and 7 before 1, since they reduce the value of Black c.
|
Dia.2 |
|
|
Dia.3 |
Dia.4 |
Dia.3. Black 1 here is an example of bad technique. Although it does build up Black's territory, it builds up White's to an even greater extent. If Black had played 3 first, (the correct move), and White played 2, Black would not then play 1.
Dia.4. If Black plays 1 here, or at a, b, or c, White will get the key point with 2. This aims into Black's lower side, and more important, see what it does for White's prospects on the left and upper sides.
Problem 5 White to play
|
|
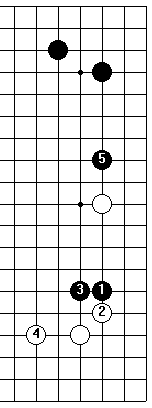
It should be fairly clear that the biggest play lies somewhere on the lower side, so the issue becomes what kind of extension White should make there. To begin with, since there is nothing much for White to aim at on the right side, there is no point in extending on the fourth line. That leaves the third line, and for reasons to be explained, the ogeima, (10 points), is best. One point to the right would be too meek. Farther to the left would be too adventurous.
Dia.1. (correct) Since Black has gotten well dug in front of White's shimari with ,, White must think about defending his rear. White 1 settles things nicely. Black will then take the large point in the upper left corner.
|
Dia.1 |
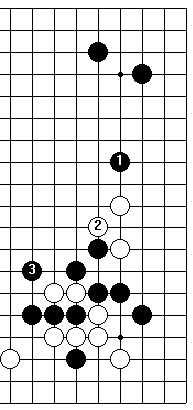
Dia.2. If White fails to extend on the lower side, Black will play 1. White has to defend at 2, or at the point directly above 2. Black is expanding on a large scale, while White's corner is clearly cramped.
Dia.3. If White dares to ignore Black 1, Black 3 will follow, and White will have to resort to emergency measures —starting with a—to make some kind of living shape.
|
|
Dia.2 |
Dia.3 |
|
b elsewhere |
|
|
Dia.4 |
Dia.5 |
Dia.4. White 1 here is in the right direction, but it goes a little too far. Considering the black stones nearby, White cannot afford to leave the opening at a. If White played 1, Black would play at the three-three point in the upper left corner, just as in Dia.1, but later. . .
Dia.5. Black could come crashing in at 1. If White answers at a, he is back where he was in Dia.2. If he answers at b, however, Black can live underneath White's stones. Having already lost his chance to extend up the right side, White cannot afford to lose his territory on the lower side, too.
|
Dia.6 |
Dia.6. The attachment at 1 is a big play, enabling White to take the corner, strengthen his own group, and weaken Black's, but Black will leave his group weak and play 4.
Problem 6 White to play
|
|
White's two stones on the left side need reinforcement badly, and the diagonal play, (10 points), which simultaneously attacks Black's upper left corner, is best. The one-point jump, (8 points), is another good point, but it has more to do with the upper side than with the left. The keima, (6 points), would cause an over-concentration of strength after White made the correct diagonal play. The right way to attack the two black stones in the lower left would be from underneath, (7 points).
Dia.1. (correct) White 1 transforms White's frail, vulnerable three-point extension into a robust, invasion-proof position, and at the same time forces Black 2, giving White the chance to take the large point at 3.
|
Dia.1 |
Dia.2. If Black lets White 1 go unanswered, White attacks in earnest at 3. Now Black 4 does not work so well. White plays 5, and there is no way for Black to emerge whole and healthy from his troubled position.
|
Dia. 2 |
|
|
Dia.3 |
Dia.4 |
Dia.3. White 1 is so large a move that we have awarded it 9 points. It expands White's territory, prevents Black from extending, and aims at White a, but it does not stop Black 2.
Dia.4. This is the sequel to Black's invasion in the previous diagram. Besides making territory, Black is strengthening himself so that he can invade again, at a. At the same time, White has a serious cutting point between 3 and 7, and lacks room for two eyes on the side.
Problem 7
|
White to play
|
|

A pushing battle is going on in the center, and White's next move should be the keima, marked 10 points. Another push, (8 points), would show the right thinking, but would be too slow.
Dia.1. (correct) After White 1, the natural flow would be for Black to jump out to 2 and for White to defend the upper side at 3. Next Black 4 is correct, but White 1 has made the center group strong enough that White can afford to play 5 on the left side.
Dia.2. If White defended at 1 immediately, Black would push him with 2, etc., gaining great strength over the left side. White 3 to 9, while necessary, would be nearly valueless because of Black's strong stones on the right side.
|
Dia.1 |
|
Dia.2 |
|
|
Dia.3 |
Dia.4 |
Dia.3. White's extension to 1 here invites Black 2. Since Black has a etc. in reserve, White . is in some danger.
Dia.4. But after the correct White 1, Black 2 is not so good. White divides Black's two weak groups with 3 and 5. If next Black protects the group on the right, White a captures the one on the left.
Dia.5. Hopefully none of our readers chose White 1 here, a heavy move that just provokes Black's connection at 2. White's center group is greatly weakened by this exchange, and Black can now attack two stones on the right side, with a, for instance, instead of just one.
|
Dia.5 |
Problem 8 Black to play
|
|
Weak stones are the key to this problem. Black wants to find some way of strengthening his group coming up from the lower right into the center. Taking note of the weak white group adjacent to it, he should make the full extension on the lower side, (10 points). Lesser extensions in the same direction, (6 or 7 points), would not do the trick.
Dia.1. (correct) Black 1 puts White's group on the lower side in an uneasy position. This automatically takes some of the pressure off the black group to its right.
|
Dia.1 |
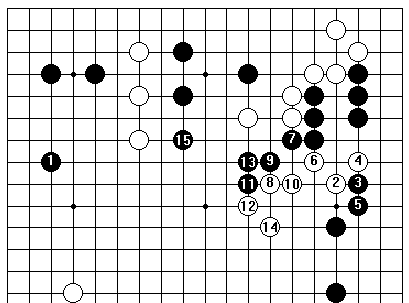
Dia.2. The author was White in this game. He could see that he needed to invade the left side, so against Black 1 he played kikashi with 2 to get his group out of immediate danger, even though that provoked a strengthening of Black's position with 3, then made a base for himself with 4 and 6. But Black continued to attack with 7, 9, and so on, keeping White weak while enlarging his own territories.
|
Dia.2 |
|
Dia.3 |

Dia.3. White cannot afford to let Black 1 go unanswered. If, for example, he plays 2 here, Black will shut him in with 3. Now there is nothing for White to do but play 4 and 6 to live on the lower side, but this has a distressing effect on the white group on the right side.
Dia.4. If Black plays 1 to make territory on the left side, White will gratefully extend to 2. Now that his own weak group is out of danger, he can aim to attack Black's weak group, (starting with a, perhaps), and can easily enter one of the gaps on the left side.
|
Dia.4 |
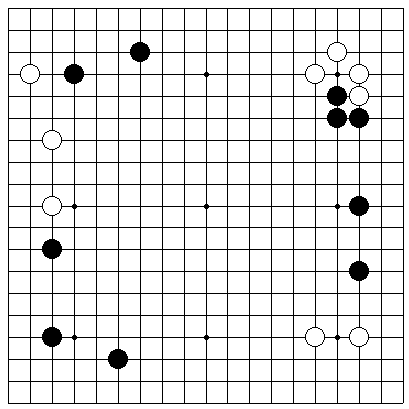
Problem 9 Black to play
|
|

Here it is important for Black to extend down from his shimari, and the three-point extension on the third line is best.
Dia.1. If Black does not extend—if he runs out into the center at 1, for example—White 2 is enormous. Now White is threatening to wreck Black's corner with a, and on the lower side he can swell his territory with 6.
Dia.2. After playing 1, Black need not be afraid of White 2; in fact, he should thank White for giving him a good chance to play 3, threatening the cut at a. On the other hand, if White played 3, Black could play 2.
|
Dia.1 |
|
Dia.2 |
|
|
|
Dia.3 |
Dia.4 |
Dia.5 |
Dia.3. A four-point extension is just a bit too far, since a white invasion at <z could easily materialize in the future. On the other hand, Black 1 at a would be unnecessarily cautious and too narrow.
Dia.4- And Black 1 here would leave White a good point at a. There would also be the lingering possibility of an invasion at 6.
Dia.5. Black 1 here defends the corner, but White still gets the big point at 6.
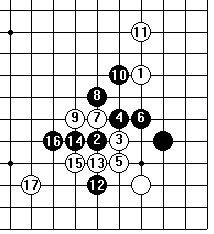
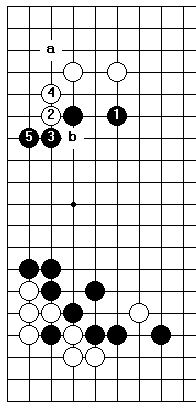
Dia.6. Here is what followed when the author played Black 1 in this position White went into action on the right side with 2. Even though Black 3 would have been better played at 6, the result on the whole board up to 15 was in Black's favor.
|
Dia.6 |
Problem 10 White to play
|
|
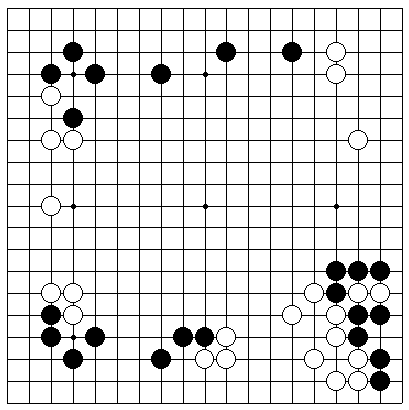
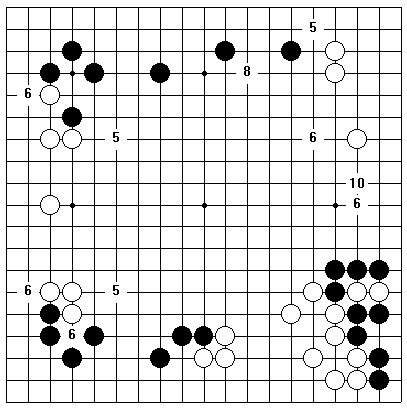
The board has already been pretty well divided up, all the black and white groups are strong, and it is time for White to make the last move of the opening. The one-point extension on the right side is best. It may seem narrow, but it follows the principle of keeping away from thickness.
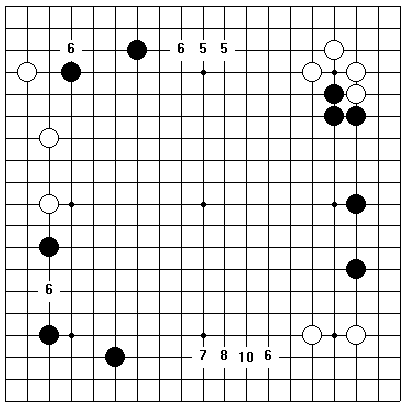
Dia.1. If White made one of the moves in the left-hand half of the board, (5 or 6 points), his upper right corner would be invaded. Black 1 and 3 challenge White's defenses. If White lets Black connect to the left, he takes a big loss, but if he stops Black with 4, Black can live with the moves from 5 to 11.
In some circumstances this would not be so bad for White. He becomes solid and strong on the outside, and if there were any weak black stones around, he could recover his loss by attacking them. But in this game all the groups are safely settled, and White cannot afford the loss of his corner territory.
Dia.2. A variation. This time White plays 6 differently, but Black still lives. If White plays a next, Black answers at b.
Dia.3. Another variation. Now White has made a diagonal play with 2, and Black has carried on through 9. White 10 keeps Black from making two eyes, but Black pushes out at 11, and White cannot win the coming fight.
White 10 at a would be better, to be followed by Black 10 and White b, but the possibility of Black 11 would remain, and the exchange would be in Black's favor.
|
|
|
Dia.1 |
Dia.2 |
Dia.3 |
|
|
|
Dia.4 |
Dia.5 |
Dia.6 |
Dia.4. (correct) After White 1, the invasion at 2 does not work. White 3, 5, and 7 are as before, but now White can block Black 8 at 9. Black plays atari at 10 and tries to live with 12, but. . . .
Dia.5. White kills him.
Dia.6. White 1 and 3 here, (8 points), would also keep the corner safe, but Black would get to extend to 4. Besides taking valuable territory along the side, Black 4 aims once more at a corner invasion.
White 1 at a, (6 points), or b, (5 points), would suffer from the same disadvantages.
Dia.7. We suspect that a lot of our readers chose White 1 in this diagram, but this is one of those times when even a two-point extension is going too far. For one thing, there is not much to be gained by getting this close to Black's strong group in the lower right corner. More important, Black can still invade at 2. White 3 offers the strongest resistance, but Black plays 4, and against White 5 he lives easily with 6, 8, and 10.
Dia.8. If we read this life-and-death problem out closely, something we do not have to do to realize that White 1 is a bad move, it gets just a bit hard. What if White plays 5 this way? After Black 6 and 8, White can attack with 9 and 11.
Dia.9. Up to 19, White is very close to making the kill, but Black saves himself with 20. If White blocks at a, Black will play 6 and win the race to capture by one move, a fact that you can verify for yourself.
|
|
|
Dia.7 |
Dia.8 |
Dia.9 |

OTHER BOOKS ON GO
G2 Basic Techniques of Go, by Haruyama 9-dan & Nagahara 6-dan
G6 Strategic Concepts of Go, by Nagahara Yoshiaki 6-dan
G17 Kage's Secret Chronicles of Handicap Go, by Kageyama 7-dan
G19 The Breakthrough to Shodan, by Miyamoto Naoki 9-dan
G24 Enclosure Josekis, by Takemiya Masaki 9-dan
G26 The Direction of Play, by Kajiwara Takeo 9-dan
G27 Kato's Attack and Kill, by Kato Masao 9-dan
G28 Lessons in the Fundamentals of Go, by Kageyama 7-dan
G29 Reducing Territorial Frameworks, by Fujisawa Shuko, 9-dan
G30 An Introduction to Go, by James Davies & Richard Bozuuch
G31 The Second Book of Go, by Richard Bozulich
G32 The Power of the Star-Point, by Takagawa Shukaku 9-dan
G33 The Chinese-Style Opening, by Kato Masao 9-dan
G41 The Magic of Go, by Cho Chikun 9-dan
ELEMENTARY GO SERIES
G10 Vol. 1: In the Beginning, by Ishigure Ikuro 9-dan
Gil Vol. 2: 38 Basic Josekis, by Kosugi 6-dan & Davies
G12 Vol. 3: Tesuji, by James Davies
G13 Vol. 4: Life and Death, by James Davies
G14 Vol. 5: Attack and Defense, by Ishida Akira 9-dan & Davies
G15 Vol. 6: The Endgame, by Ogawa Tomoko 4-dan & James Davies
G16 Vol. 7: Handicap Go, by Nagahara Yoshiaki 6-dan & Bozulich
DICTIONARY OF BASIC JOSEKIS, by Ishida Yoshio, 9-dan
G21 Vol. 1: 3-4 Point Josekis
G22 Vol. 2: 3-4 & 5-3 Point Josekis
G23 Vol. 3: 5-4, 4-4 & 3- Point Josekis
GRADED GO PROBLEMS FOR BEGINNERS, by Kano 9-dan
Vol. 1: Introductory Problems
Vol. 2: Elementary Problems
Vol. 3: Intermediate Problems
Vol. 4: Advanced Problems (April 1989)
GO WORLD
A quarterly magazine with complete coverage of the world go.
Free catalog of books and go equipment available on request.
Order from:
The Ishi Press, Inc. Ishi Press International
CPO Box 2126 1400 North Shoreline Blvd.
Tokyo, Japan Building A7
Mountain View, CA 94043 USA