Part One
The Production of Speech
Chapter 1. THE ORGANS OF SPEECH AND THEIR WORK
In any language people speak (if they have no physical defects) using their organs of speech (Fig. 1).

The air stream released by the lungs goes through the windpipe and comes to the larynx, which contains the vocal cords. The vocal cords are two elastic folds which may be kept apart or brought together. The opening between them is called the glottis. This is the usual state of the vocal cords, when we breathe out. If the tense vocal cords are brought together, the air stream forcing an opening makes them vibrate and we hear some voice. Let us pronounce the Russian sound [3]. Put your finger on the larynx and produce a long [3] sound. You will feel the vibration of the vocal cords and hear voice. Such sounds are called voiced. Now produce a long Russian sound [c]. No vibration is felt, no voice is heard. This is a voiceless sound, which is made with the vocal cords kept apart.
There is one more state of the vocal cords which results in the glottal stop. When the vocal cords are brought close together and then opened suddenly by the air stream there comes a sort of coughing noise, a kind of the 'click' of the vocal cords. This sound is called the glottal stop.
On coming out of the larynx the air stream passes through the pharynx.
The pharyngal cavity extends from the top of the larynx to the soft palate, which directs the air stream either to the mouth or nasal cavities, which function as the principal resonators.
The soft palate can be easily seen in a hand mirror. Now open your mouth wide and say the vowel [a]. Looking into the mirror you will see the soft palate, the very end of which is known as the uvula. The soft palate can easily move. When the soft palate is in its lowered position the air goes up into the nasal cavity and then out through the nose. This is the usual position of the soft palate when we breathe through the nose. This is also the position for the nasal sounds [m, n, rj]; [m, m', h, h']. If you nip your nose you cannot pronounce these sounds. But as soon as you release the nose the air will continue its way and you will hear the sounds again. When the soft palate is raised the uvula forms a full contact with the back wall of the pharynx and the air stream goes through the mouth cavity. This is the most typical position of the soft palate for most of the sounds of many languages.
The soft palate is the furthest part of the palate from the
teeth. Most of the palate is hard. This hard and fixed part of the palate is divided into two sections: the hard palate (the highest part of the palate) and the teeth ridge or alveolar ridge (the part immediately behind the upper front teeth). You can touch the teeth ridge with the tongue-t i p. The teeth ridge is very important in English as many consonants are formed with the tongue touching or close to it. If you still move the tip of the tongue forward you will feel the teeth.
The lower teeth are not very important for making speech sounds, while tile upper teeth take part in the production of many of them.
The most important organ of speech is the tongue. Phoneticians divide the tongue into four sections, the part which lies opposite the soft palate is called the back of the tongue; the part facing the hard palate is called the f r o n t; the one lying under the teeth ridge is known as the blade and its extremity the t i p . By the central part of the tongue we mean the area where the front and back meet. The edges of the tongue are known as the rims. The tongue may lie flat or move in the horizontal or vertical directions. It can also change its shape so that the sides are curved up forming a groove.
The lips can take up various positions as well. They can be brought firmly together or kept apart neutral, rounded, or protruded forward.
All the organs of speech can be divided into two groups:
(1) active organs of speech, movable and taking an active part in the sound formation: (a) the vocal cords which produce voice; (b) the tongue which is the most flexible, movable organ; (c) the lips affecting very considerably the shape of the mouth cavity; (d) the soft palate with the uvula, directing the stream of air either to the mouth or to the nasal cavity; (e) the back wall of the pharynx contracted for some sounds; (f) the lower jaw which movement controls the gap between the teeth and also the disposition of the lips; (g) the lungs providing air for sounds;
(2) passive organs of speech: (a) the teeth, (b) the teeth ridge, (c) the hard palate and (d) the walls ©f the resonators.
QUESTIONS AND TASKS –
Now make sure that you can speak on these items:
1. The direction of the air stream released from the lungs.
2. Three different states of the vocal cords.
3. The position of the soft palate which influences the direction of the air stream.
4. The parts of the palate.
5. The parts of the tongue.
6. The position of the movable organs of the mouth, i.e. the shape of the lips and tongue.
7. The active and passive organs of speech and their role in the sound formation.
Chapter II. ARTICULATION AND BREATHING PRACTICE
In order to acquire correct pronunciation, to manipulate the organs of speech one is to be taught breathing technique. The first and the most important thing in any system of voice exercises is the formation and control of the breath. We never breathe out completely in speech. Complete exhalation takes place only in breathing exercises. In normal breathing there is some reserve breath remaining in the lungs. The exercises given below will help you to control your breath, as breath control is the keynote of all that is necessary for speaking.
The mass of air breathed in is kept in the lungs. The lungs are inclosed in the region covered by the ribs, and extending upward, they fill the chest cavity except for the space for the heart. While breathing we fill only the upper part of the lungs with air, but for speaking and singing it is necessary to fill the lower part of the lungs. This is reached with the help of the diaphragm.
The diaphragm is a large muscular membrane lying just above the waist line. It forms the floor of the chest cavity and in
correct breathing increases its capacity, filling the lower part of the lungs with air as well. That is 'deep breathing', so necessary for correct speaking. To master it you should do the following exercises properly every day for two weeks until the normal capacity of the lungs has been reached. Make progress slowly.
EXERCISES ON DEVELOPING DEEP BREATHING
1. [This exercise should be taken every morning and evening before an open window.] Stand straight with your hands on hips and shoulders back and down. Close the mouth. Now draw a slow full breath through the nose. You will feel that the lungs are full. Hold your breath counting mentally "one", "two", "three"; then exhale slowly and completely. When you breathe in deeply you see the expansion at the waist line first, then of the middle part of the lungs and at last in the upper part of the chest. When you breathe out you relax the diaphragm first (a movement which lessens the size of the waist line), then the lower ribs, and lastly let the chest sink.
Count "one", "two", "three" again and repeat the exercise.
Jf you find it difficult to hold your breath between breathing in and out, start by counting "one". The maximum number to count between should be "five", the maximum number of breaths is "ten".
2. While walking slowly somewhere (when you are not in a hurry) breathe in rhythmically with your steps. Inhale during three steps, hold your breath for three other steps, now exhale during three more steps, hold for another three steps. Continue doing the exercise as long as you feel no strain. If it is difficult to hold the breath for "three" at the beginning start with "one" or "two".
3. [This is all excellent exercise for speakers.] Stand at the end of a long room and try to hit the opposite wall with each word you read. Keep the pitch of the voice low and count slowly-
Stand erect with your hands on the hips. Take a full breath
'through the mouth, count "one", while breathing out count "one", "two". Breathe in through the mouth again counting "one", "two", "three". Breathe out through the mouth, count
"one", "two", "three", "four". Continue in this way until you count "ten". Be sure not to allow any breath to escape between counts. Repeat the exercise during the first week. For the second week reach 15 in counting, for the third week reach 20. If you find it quite hard for you to count 10, begin with counting 5.
4. [This exercise is also meant to develop your ability to control your "deep breathing".] Choose a long paragraph from a Russian book. Take a deep breath and begin reading the paragraph without stopping at punctuation marks. Read as many words as possible in one breath . Now mark the place where you have stopped and continue reading. Mark the next place you have stopped and so on until you come to the end of the whole paragraph. Read fairly loudly and at a normal speed.
Take the same paragraph each day for a week and gradually you will be able to speak a greater number of words with each breath.
5. [You may move on to this exercise only after you have reached good results with the previous ones. This exercise is meant to develop the ability to obtain the volume of the voice without raising its pitch.] Compose a list of words (of not more than two syllables). Standing in a long room about a meter from the farthest wall pronounce one of the words distinctly and within an ordinary conversational pitch of voice.
Now walk back two meters and read the same word in exactly the same pitch but increase the volume to cover the additional distance. Move back two meters and repeat the word again, this time with more force and more volume, but be careful to keep the same conversational pitch. Continue moving back and doing the exercise till you stand with your back against the wall.
Do not make haste while working at the exercises. Slow growth is permanent growth.
Now that you have achieved pretty fair results with the breathing exercises you may begin working at developing your active organs of speech.
Learners of English must be aware of the fact that each language is characterized by its own peculiar way of articulation. They should study the descriptions of English vowels and consonants very carefully because what seems a quite small difference may in fact be very important in recognizing and producing an
English sound correctly, and the small difference in the movement of the speech organs may make the main difference between the English and Russian sounds, thus:
(1) English voiceless consonants are produced more energetically than the Russian ones; the voiceless [p, t, k] are pronounced with aspiration (a slight puff of breath at the end of the articulation of the sounds).
(2) Forelingual consonants in English are produced with the tip of the tongue (apical articulation) o/itfie teeth ridge while the similar Russian consonants have dorsal articulation , i. e. they are pronounced with the blade of the tongue on the teeth, cf (t — t] in rip — mun; [n — h] in net — Hem.
(3) The English do not move their lips with much energy; the lips are never very far apart or spread very much; they are not very rounded or protruded as for some Russian sounds, cf [u — y] in put — nyg.
(4) English vowels are grouped not only according to the quality but also according to their quantity into long and short.
(5) Some vowels ([i:, u:j and the diphthongs) are characterized by a gliding articulation from one vowel element to another, while in Russian no diphthongs could be found, cf eye [ai] (one vowel) — au [aj] (two vowels).
(6) There are back open vowels in English while in Russian low position of the tongue is associated only with central vowel [a].
So the next important step before studying English sounds in detail is to master the work of your articulating organs of speech. The following exercises deal with articulation of sounds. For this purpose, take a mirror, put it in front of you that you can properly see your face. Now begin doing the exercises.
ARTICULATION EXERCISES
I. Exercises for the Opening of the Mouth
1. (a) Keep the mouth closed with the lips pressed together (Fig. 2).
(b) Drop the lower jaw as low as possible. The mouth should be wide open (Fig. 3).
(c) Come back to the (a)-position.
(d) Continue practising the exercise counting "two" (positions b, a).
2. (a) Keep the mouth closed with the lips pressed together.
(b) Open the mouth as wide as one third of the opening (Fig. 4).
(c) Open the mouth even one third wider. The separation of the jaws is considerable (Fig. 5).
(d) Drop the lower jaw as low as you can so that the opening of the mouth could be the widest (see Fig. 3).
(e) Come back to the (a)-position.
(f) Continue doing this exercise counting "four" (positions b. c, d, a).

3. (a) Open the mouth as wide as possible.
(b) Close the mouth gradually in three equal times.
(c) Practise the exercise counting "four" (see Figs. 3, 5, 4, 2).
4. (a) Keep the mouth closed with the lips pressed together.
(b) Push the lower jaw frontward.
(c) Come back to the (a)-position.
( d) Continue doing the exercise counting "two" (positions b, a).
5. (a) Keep the mouth closed with the lips pressed together.
(b) Push the lower jaw to the left.
(c) Now push it to the right.
(d) Continue practising the exercise counting "two" (positions b,
c).
II. Exercises for the Lips
1- (a) Keep your lips pressed together.
(b) Now open the mouth. The lips should be in their neutral position (Fig. 6).
(c) Come back to the (a)-position. Pronounce energetically [m, m, m].
(d) Continue doing the exercise counting "two" (positions b, a).
2. (a) Keep your lips pressed together.
(b) Open the mouth, so that the lips should be in their neutral position (see Fig. 6).
(c) Now round the lips (Fig. 7).
(d) Come back to the (a)-position.
(e) Continue practising the exercise counting "three" (see Figs. 2, 6, 7). Remember that the second position of the lips is neutral, the third is well rounded.

3. (a) Press the lips, then make them neutral. Now round them, (b) Now slightly protrude the lips as for the Russian sound [y]. (c ) Take the position of the lips pressed together.
(d) Continue practising the exercise counting "fcur" (see Figs. 2,
6, 7 and position b).
Use the mirror to make sure that the lips change from a neutral to a rounded position.
4. (a) Press the lips together.
(b) Spread the lips giving a smile without showing the teeth.
(c) Come back to the position of the lips pressed together.
(d) Now spread the lips giving a smile and showing your teeth.
(e) Come back to the position of the lips pressed together.
(f) Alternate these positions of the lips counting "four" (positions
b, a, d, a).
5. (a) Press the lips together.
(b) Spread the lips showing the upper teeth.
(c) Protrude the lips.
(d) Spread the lips again showing the upper teeth.
(e) Continue doing the exercise counting "two". Practise the exercise energetically.
6. (a) Press the lips together.
(b) Draw the lower lip inward and slightly upwards to touch the upper front teeth. Keep the upper lip out of the way altogether.
(c) Come back to the position of the lips pressed together.
(d) Continue doing the exercise counting "two".
7. (a) Take a deep breath.
(b) Repeat the 6b position.
(c) Give a strong breath out, pronouncing the sound [f]. Concentrate on the strong long friction (Fig. 8).
(d) Practise the exercise several times.
8. (a) Press the lips together.
(b) Move the upper lip upwards and the lower lip downwards to show the teeth.
(c) Come back to the position of the lips pressed together.
(d) Continue practising the exercise counting "two" (positions b, a).

(c) Now alternate the position of the lips from rounded to spread (Figs. 10. 11), from spread to rounded (see Figs. 10, 11).
(d) Continue doing the exercise.

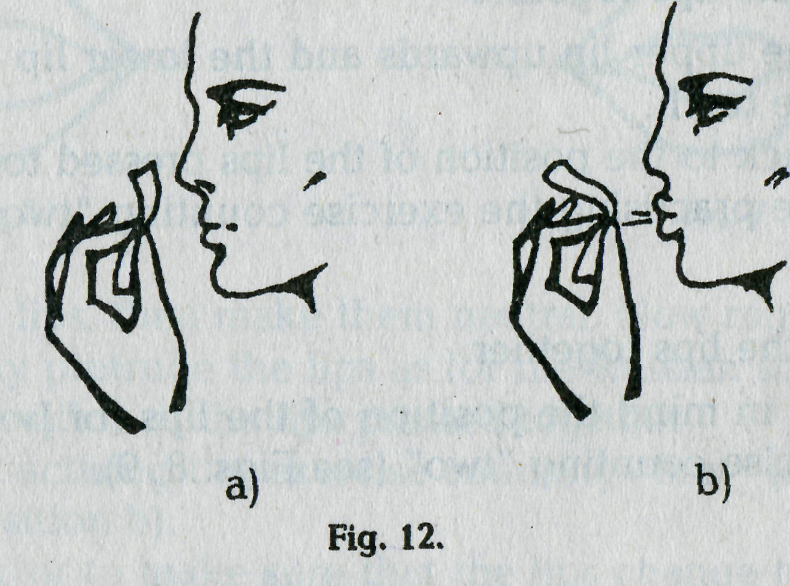
10. (a) Take a thin sheet of paper and put it before your lips (Fig. 12, a).
(b) Press the lips together.
(c) Push air through the mouth as strongly as possible, pronouncing the sound [p]. Make the sheet vibrate (Fig. 12, b).
(d) Practise doing the exercise several times.