

Do-It-Yourself Suzuki SV650 Carburetor Rejetting
by MickK Rev. 1.2 2005 http://www.svdownunder.com
/Firstly, please refrain from posting these notes to any other website because some of the text and pictures contained within have been plagiarized from material available on the internet which I haven't sought
permission to use (as yet).
To view the sources used to create these notes (including the plagiarized material), see References.
have no problem with you printing out a copy for yourself or linking to these notes from my site, just don't provide a “local” copy on another website please. This way, I can maintain some control over the updates and if asked to remove something (like a plagiarized picture), it will be an easy process.
would like to say upfront that I'm no motorcycle expert and that I compiled these notes for my own personal use and knowledge when working on my own motorcycle. If others find them useful, I'm glad they can be of use. I'm also happy to consider any revisions, corrections or additions to these notes and I can be contacted through the SVDownUnder website as MickK.
Table of Contents
Table of Contents 3
Throttle Position 9
Rejetting 16
Step 1 - Initial Test Ride 16
Exhaust: SuzukiStep 2 - Install your Exhaust System and Air Filter 17
Exhaust Systems 17
Air filter flow rates from highest to lowest 18
Desnorkelling your filter (aka Snorkelectomy) 18
Jet Needle 24
Wire 26
7.0 mm 26
NOTE: If there are low-end richness problems, even after lowering the fuel level in the bowl by more than 1.5mm from your initial settings (i.e. a Float Level Adjustment 8.5 mm or more), check for wear of jet needle and needle jet (part of the emulsion tube).Step 6 - Synchronise the Carburetors 27
Exploded view of Mikuni BDSR39 Carburetor 39
0Carburetor Jet Kits 44
FactoryPro Stage 1 (CRB-S36-1.0 Config 10) Carb Kit 44
FactoryPro Stage 2 (CRB-S36-2.0-APK Config 20) Carb Kit 59
DynoJet Stage 1 (3171) Carb Kit 69
Carburetor Backfiring 81
Exhaust Backfiring 84
Knocking (Predetonation) 89
Poor Mileage 90
Engine Misfiring at Full Throttle 91
.References 93
The basis of these notes have come from a series of website printouts I obtained over the last couple of years in my effort to understand how the Mikuni BDSR39 carburetors work on my Suzuki SV650. From these printouts, I've produced this document aimed at rejetting the SV carburetors yourself rather than taking your bike to a dyno shop and getting it done for you. While a dyno shop will probably produce a more accurate torque/power curve, the DIY wrench monkey will be satisfied in the knowledge that he/she has done it themselves and in doing so, has learned more about their bike as a result. Be aware that rejetting your bike on a dyno normally takes 1 - 2 days, however, doing it yourself is going to take much longer due to the number of times you have to strip down and rebuild your bike for the road tests. To makes things simpler and help you get it right, I've divided the rejetting procedure into steps which need to be completed in sequence or you'll simply compound any problems that you may come across in a later process.
Throttle Position
Remember, jetting is all about the throttle position, not the engine speed (although they are somewhat related). Also be aware that carburetion is effected by altitude, temperature, humidity and air density so try to complete the rejetting under similar conditions. If you can't, allow some latitude when comparing some of your end results.
Carburetor Parts Effected by Throttle Postion
F
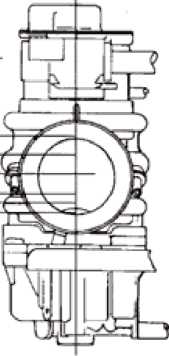
Mikuni Carburetor (not BDSR39)
 unctional
Rang« Effectiveness
of Tuning
Parts in
Relation
to the Throttle Valve Opening (Approximation)
unctional
Rang« Effectiveness
of Tuning
Parts in
Relation
to the Throttle Valve Opening (Approximation)
NOTE: Qpiional Power Jet will affect other luning components
T
u
hrotlle Valve Opening Full Open J.4 »m
i.-i
MAIN ufcT —
JET NEC Dir
NETrni.r .JET
fHHOr lit VALVt PILOT
PI LOT 5V5T1EM (P| LOT AIR JET. PILOT FJEL JET, PILOT fuel SCpew
j
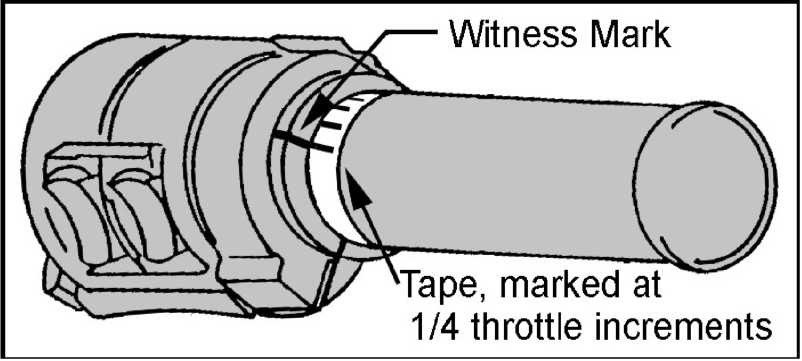
Marking the throttle will make tuning easier and your on-road tests a whole lot safer (less time being distracted by the “small” stuff). It also helps to take most of the guess work out of the tests and makes your results much more consistent.
Use a felt tip pen to mark the following positions on some white/coloured tape wrapped around the throttle grip: Closed, 1/8, 1/4, 1/2, 3/4, 7/8, Full
Example:
Rejetting
Step 1 - Initial Test Ride
Before doing anything else, read through this document to get a basic understanding of what it is you're trying to achieve by rejetting, then warm up your bike and take it for a test ride to get a feel for it's current setup. Although this is a very subjective test, the knowledge gained by taking your bike for a test ride can be used as a basis to gauge any changes you make to your carburetor.
Stock Power Tests
Your initial test ride should include the following tests:
Top End Power Test - do a couple of 4th gear full throttle runs from 6500 rpm to Redline.
Mid Range Power Test - do a couple of 3th gear full throttle runs from 4000 - 6000 rpm.
Low End Power Test - do a couple of 2nd gear full throttle runs from 1500 - 3500 rpm.
Cruising Test - do a couple of 2nd, 3rd and 4th gear 1/8th throttle runs at 2500, 5000 and 7500 rpm respectively.
If you experience any flat spots or hesitation in acceleration or any lean surging, take note of it. Hopefully, after the rejet is completed, you'll have removed these problems and have smooth throttle response throughout the entire throttle range.
Stock Australian 99-02 SV650 Setup
Mains: Mikuni 137.5
Pilots: Mikuni 17.5
Jet Needle: Mikuni #13383-20F30
Clip Setting: 3rd notch
Shim: Nil
Slide Hole: 1.0 mm
Air Screw: 2.5 turns out
Fuel Float Height: 7.0 mm
Idle: 1300 rpm
Airfilter: Suzuki
Tankrisers: Nil
Fuel: Regular ULP (91 RON)
Exhaust: SuzukiStep 2 - Install your Exhaust System and Air Filter
Carburetor settings are greatly effected by any changes to your exhaust system and your air filter, and somewhat by the type of fuel used. Before rejetting, install any aftermarket exhausts and air filters and fill up the tank with the grade of fuel you intend using.
Exhaust Systems
Changing exhaust systems is usually the primary reason for considering a rejet. Almost all aftermarket exhaust systems (including slip-ons) are less restricted than the stock Suzuki exhaust so you'll need to go up at least one Main Jet size to compensate for the better flow. If you install an aftermarket twin/dual exhaust system in place of the single stock exhaust, you may even need to go up at least two sizes from the stock settings. Having a better flowing exhaust changes the power curve so you may need to adjust other carburetor settings as well, not just the Main Jet size.
Air Filters
The air filter has the greatest effect on carburetor tuning. Any changes to the airflow will require a change in your carburetor settings. Some aftermarket air filters flow better than the stock Suzuki one, so you will have to adjust your carburation to allow for this. The induction hole size has the greatest effect on the filters flow capacity. There are several different types of aftermarket air filters and several mods that can be done to the stock and aftermarket filters to make them flow better. Here is an example of a BMC 205/10 Street Filter that has been “modified”:
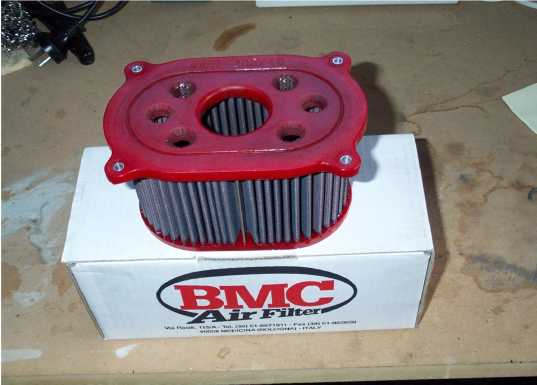
Notice the six additional 1” holes that have been drilled and recessed into the top of the BMC filter. They allow the filter to breathe slightly easier. Individual holes can then be covered/uncovered using race tape to compensate for changes in altitude, ambient temperature, fuel type etc.
Air filter flow rates from highest to lowest
Pods
BMC Race Filter
Desnorkeled Stock Suzuki Filter
Desnorkeled BMC Street Filter
New K&N Filter / Modified BMC Street Filter
Stock Suzuki Filter
BMC Street Filter / Pre-2002 K&N Filter
Desnorkelling your filter (aka Snorkelectomy)
Desnorkeled Filters are standard filters that have been modified by removing the snorkel and the top of the air filter. In effect, they become “open top” filters and air flow is improved quite significantly over the standard filter and converting your standard filter to an “open top” filter usually requires a big jump in the Main Jet size (can be an increase up to 10 sizes). See John Callahan's http://www.geocities.com/catpoopman/sv650_snorkel.html notes for a very good detailed explanation (with pictures) on how to perform a snorkelectomy on your stock Suzuki air filter.
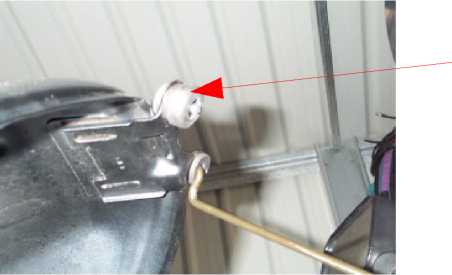
Raising the tank & removing the foam
Because of the way the SV650 airbox opening is located up under the tank, some owners like myself have modified their bikes slightly so the airbox breathes a little better. This is done by removing the sound deadening foam from under the tank and raising the tank up slightly through the use of spacers. This mod is very easy and will benefit all types of air filters. As you can see in the picture below (right tank mounting bolt), I used 10 mm rubber feet for spacers and drilled the center hole slightly larger to accommodate the stock bolts. I do not recommend using spacers bigger than 20 mm or it will lift the tank up too high (looks unsightly then).
Fuel
The type of fuel you intend using is important to jetting because different types of fuel have different densities, as well as, different additives so they all burn at different rates. Essentially, the higher the density, the slower the burn, the richer the fuel. Suzuki recommends the SV650 use an unleaded petrol with a rating of 91 RON or better.
Common Petrol abbreviations
HOULP - High Octane Unleaded Petrol (98+ RON)
PULP - Premium Unleaded Petrol (95+ RON)
ULP - Regular Unleaded Petrol (91+ RON)
LRP - Lead Replacement Petrol (96+ RON)
|
Simplified table of common fuels available in Australia NAME |
COLOUR |
OCTANE |
DENSITY |
BENZENE |
SULPHUR |
PHOSPHOROUS |
|
|
|
(kg/L) |
(%vol) |
(mg/kg) |
(mg/kg) |
CALTEX/AMPOL |
|
|
|
|
|
|
Vortex 98 |
Pale Yellow |
98 + |
0.74-0.785 |
< 5 |
? |
? |
Vortex Gold |
Pale Yellow |
95 + |
0.75 |
< 5 |
< 150 |
0 |
Unleaded |
Purple |
91+ |
0.74 |
< 5 |
< 500 |
0 |
LRP |
Red |
< 96 |
0.75 |
< 5 |
< 500 |
1.8 |
MOBIL |
|
|
|
|
|
|
Synergy 8000 |
Yellow |
98 + |
0.74-0.785 |
< 4 |
? |
0 |
Synergy 6000 |
Yellow |
95 + |
? |
? |
? |
0 |
Synergy 2000 |
Blue |
91+ |
0.78 |
< 5 |
? |
0 |
LRP |
Red |
96+ |
0.74 |
< 5 |
? |
? |
SHELL |
|
|
|
|
|
|
Optimax |
Yellow |
98 + |
0.76 |
3.3 |
< 150 |
0 |
Premium |
Yellow |
96+ |
0.74 |
4.1 |
< 150 |
0 |
Unleaded |
Purple |
91+ |
0.73 |
2.7 |
< 100 |
0 |
LRP |
Red |
96+ |
0.74 |
3.3 |
< 150 |
25 |
BP |
|
|
|
|
|
|
Ultimate |
Pale Yellow |
98 + |
0.75 |
< 1 |
< 150 |
0 |
Premium |
Yellow |
95 + |
0.75 |
< 5 |
< 150 |
0 |
Regular |
Purple |
91+ |
0.735 |
< 5 |
< 500 |
0 |
LRP |
Red |
96+ |
0.75 |
< 5 |
< 500 |
25 |
When choosing a fuel remember that you should aim for fuel that gives you the best engine performance. Usually this is the least dense fuel that doesn't “knock” (pre-detonate) in the engine. Realistically, you should try all brands of fuel, however, this is not always practicable and you should choose the fuel that your bike and your wallet seem to like the most.
should point out that sometimes minor rich/lean problems can be overcome by choosing a different grade of fuel. Minor lean problems may be solved by choosing a slightly richer fuel (e.g. changing from ULP to PULP) and minor rich problems may be solved by going down a grade of fuel (e.g. from HOULP to PULP)
.The Main Jet has a progressively greater effect after 1/2 throttle range. After 3/4 throttle, it controls your top end power band and as such has the most effect on the carburetor. I've seen tuning manuals that recommend leaving the Main Jet selection until last, however, it took me seventeen fine-tuning adjustments to my carburetors before I learned that if you don't get the Main Jet right, you'll have to re-do everything because selecting the best Main Jet initially, eliminates the need to continually tweak the mid and lower tuning ranges to compensate for a "wrong" Main Jet. FactoryPro state this in their kits and I wholeheartedly agree with them.
How to remove the carburetors
If you are going to do any maintenance on your bike, I highly suggest you at least get a Suzuki Service manual, and if you can afford it, the Haynes and Clymer manuals too (you can never have too many manuals). To keep the size of this document manageable, I'll assume you know how to strip your bike and get access to your carburetors. If you need a refresher, check out John Callahan's http://www.geocities.com/catpoopman/sv650 rejet.html notes because they provides a very good detailed explanation (with pictures) on how to remove your carburetors and gain access to your Main Jet.
Location of Main Jet

General starting points for Main Jet sizes
As a guide, you can use the Main Jet sizes listed below to get you started. At almost $10 per jet, the closer you can get to the “correct” size the happier your wallet will be. These jets will be within a size or two of being correct for the Australian SV650. Remember, you need at least two jets of the same size.
Stock pipe + BMC Street Filter (Mikuni 135.0)
Stock pipe + Stock Suzuki Filter (Mikuni 137.5)
Stock pipe + Modified BMC Street Filter (Mikuni 140.0 - 142.5)
Stock pipe + Desnorkeled BMC Street Filter (Mikuni 150.0 - 155.0)
Stock pipe + Desnorkeled Stock Suzuki Filter (Mikuni 152.5 - 157.5)
Stock pipe + BMC Race Filter (Mikuni 155.0 - 160.0)
Aftermarket pipe + BMC Street Filter (Mikuni 137.5 - 140.0)
Aftermarket pipe + Stock Suzuki Filter (Mikuni 140.0 - 142.5)
Aftermarket pipe + Modified BMC Street Filter (Mikuni 142.5 - 145.0)
Aftermarket pipe + Desnorkeled BMC Street Filter (Mikuni 152.5 - 157.5)
Aftermarket pipe + Desnorkeled Stock Suzuki Filter (Mikuni 155.0 - 160.0)
Aftermarket pipe + BMC Race filter (Mikuni 157.5 - 162.5)
As far as jet kits go, the FactoryPro and Dynojet kits usually come with several ranges of Main Jets, a pair of Jet
Needles, sometimes a pair of Pilot Jets and an air filter plus a few other bits and pieces (see Kits). It may be
cheaper to buy the kits if they have the jet ranges you are after rather than buying all the items individually. My advice is shop around and do your homework FIRST before jumping in and buying anything.
NOTE: Some owners use split mains (one size larger Main Jet on the front carb) so it may be cheaper to buy several, single size jets rather than pairs of jets, however, split mains is normally only done on bikes with Desnorkeled or Race filters.