

Barenziah's Book
Shortly after reaching 9th level, having completed Helseth's Blackmail Quest and assuming you are still in the good graces of the nobility of Wayrest (not an easy task since almost everything you do seems to offend them), Queen Barenziah will send you a letter asking you to visit her to discuss some business of mutual interest. Her business is needing you to retrieve a chapter of an unauthorized biography ("correct wayward revolutionaries," as she so euphemistically puts it). She promises you information and a few GP's if you will take care of the matter for her.
If you move quickly, the book will be somewhere in the depths of Orsinium, normally in the eastern chamber under the big pyramid. There is a trick to getting to this room. Unlike similar set-ups in other dungeons, there are no chains hanging down from the platform to cast levitate on you. You will either need your own Levitate, a "Slowfall" spell/potion/device or be willing to take the damage from jumping down.
|
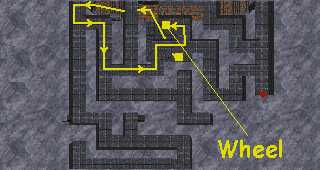
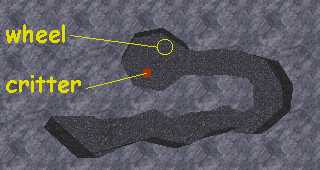
Once you've jumped into the northeastern fountain and gone up the stairs to the left, you need to get into the maze above the pyramid chamber. Take the first left (east), ignore the next left, and take the third left (north). Around the corner you will find a wheel on the wall. Click it to unlock the doors below the pyramid. |
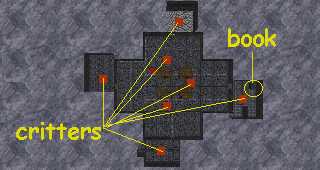
Go back to the platform and Levitate, Slowfall or jump down into the pyramid. If you choose Levitate or Slowfall, be cautious of the three critters (usually Orcs of some kind) at the bottom. They have a very bad habit of moving right under you, making it impossible for you to land (they can hit you, but you can't see to hit them - this is especially true of Slowfall). There are also critters in each of the four rooms and the doors to these rooms are now unlocked. This could get a little hairy.
|
The book will be in the eastern chamber. Pull the lever in the small closet to raise a platform that will allow you to access a wheel on the side wall. Clicking on the wheel will teleport you back on to the platform above the pyramid. You get out of Orsinium the same way you came in unless you have a "Recall" anchored. |
If you don't feel like messing with the wheel, you can attempt to open the doors yourself. You will need an "Open" spell, some item "of Undeniable Access", an outrageous lockpicking skill, or the Skeleton Key artifact (all four wouldn't hurt). Cast your spell or use the item until the door opens. The cheapie "Open" spell you probably made to practice your Mysticism skill will work if you have patience. By this point your odds of success are fairly good if you are persistent and the extra skill practice never hurts.
If you do not move quickly, the book will be moved to the depths of Scourg Barrow.
Instead of heading for the King of Worms, you want to head for the Rift. There are no stairs leading to the bottom of the Rift, so you will either need to Levitate, Slowfall or Jump. The floor of the rift has occasional critters on it (mostly animals at the end where you start and humans farther down), but the real danger comes from the Humans who populate the upper ledges. They like to shoot arrows at you and it’s at least moderately difficult for you to return the favor. The ledges connect, but it is a long, tedious process to get from ledge to ledge without levitating or using the floor of the Rift.
|
Go all of the way to the end of the Rift. You will be looking for a secret panel on the south wall when you get to the end. Clicking on the panel will open it. |
|
At the bottom you will find a round cave that has a single critter in it and a wheel set in the floor. Turn the wheel and go back up to the floor of the Rift. |
|
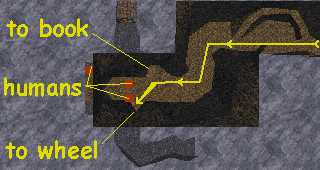
The wheel raised a portcullis that blocked the passage on the other side of the Rift. Go down the passage to the bottom. You will find a room similar to the Necromancers Headquarters. There will be two mummies and a lich in the room. The lich can't come down off of the platform at the end, but he can still sling spells at you. The book should be on the black altar at the back of the room. |
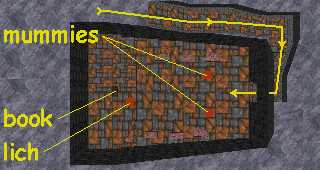
The two mummies are no great shakes, but the Lich’s ranged spells are killer. He never seems to run out of magica, so either have some sort of Spell Resistance/Reflection up or be willing to take the damage while making a frontal assault.
The information that you gain from this little excursion is that Barenziah and the Emperor were lovers, she became pregnant and he had the pregnancy terminated against her will. It sort of explains why there is no love lost between Wayrest and the Empire. Since you do not need to have this information to complete the Main Quest, this particular quest is entirely optional.
Scourg Barrow is probably the largest of the Main Quest dungeons. It is disappointing to see all of that effort wasted on a couple of short excursions to the Necromancers and a "maybe" trip to fetch a book. If you have the time and inclination, Scourg Barrow is worth an explore all on its own. Stock up on drinks and munchies because you will be at it for a while.