Medora's Tower (shortcut)
The standard walkthru has been around for so long that I don't even remember where it came from. I think Bethesda came up with it and everyone has been following it blindly (including me) for what seems like forever. I finally got tired of getting spelled by all of the liches and vampires and looked for a shorter (translate: easier) way to get to Medora. I found it and here it is:
|
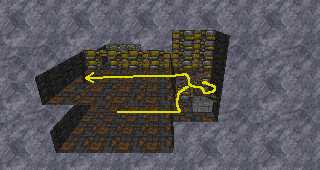
Run down to the end of the entrance hallway to draw the Skeletal Warriors away from the door. Wait until you hear them on the other side of the wall and then go back to the door. Levitate (or walk) across to the landing diagonally across from you (something will probably come through the door) and turn the wheel. This moves a stone plug farther down the entrance hallway. |
|
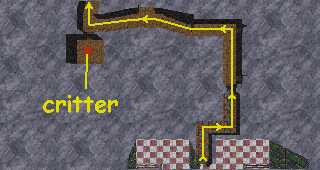
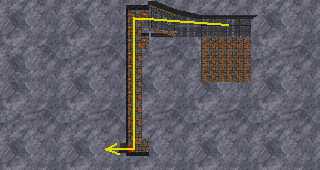
Go back to the entrance and down the hallway. Go through the door and turn right (north). There will be a random critter in the corridor. Go to the door at the end and through it. You will find a teleporter in this room. Use it. |
|
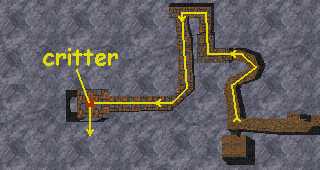
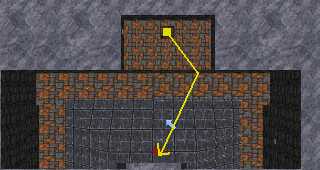
From where you appear (there will be a random water critter in the room with you), go through the door and up the stairs. Behind the door at the top (there will be a random undead in the room) is another teleporter. Turn slightly to your left so you are looking at the teleporter almost edge-on and click on it. |
|
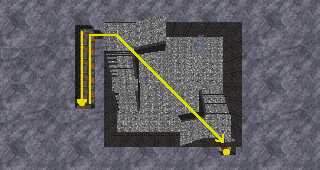
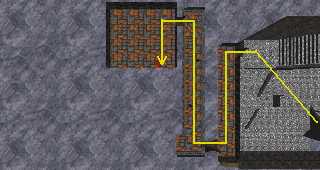
You appear on top of a closed trapdoor (there is another random critter in the room -- if you turned before clicking, it will be in front of you). Go through the door in the south wall and up the side of the pyramid. Click on the hanging chain to cast "Levitate" and fly up to the top of the platform directly above you. |
|
There will be a random critter near the wall at the back of the platform. Go up the west (left) stairs. Something will come get you from the opening to your left (another random critter). Go through the door on the right at the end of the corridor. |
From this point you follow the standard walkthru. There will be three wraiths in the room behind the door, a vampire on the ramp going down on the other side (it doesn't matter which ramp you take -- there is a vampire on each of them), a ghost in the room with the levers (pull the ones facing the tapestries), two wraiths on the stairs going up and a lich right outside of Medora's room. To get out, just go back the way you came and follow the chain of teleporters until you get back to the entrance hallway.
Unicorn Horn (Shedungent)
|
Getting to the Unicorn Horn is a pretty quick trip (unless you really feel like exploring Shedungent again). Go into Nulfaga's chamber (remember to say "shut up" to the banner to get in). Nulfaga is still nuttier than a fruitcake, so ignore her and go out the door on the other side. |
|
The first door on your right has three levers in it. These raise and lower portcullises (portcullisi?) in another part of the dungeon and will allow you to get back out by the long route. The second door on the right is where you would come in if you had taken the long route to get to Nulfaga. Follow the passage up the stairs and down the other side. There is a random critter in the small room to the left. If it is capable of opening doors, it will try to come out and play with you (isn't it nice to be popular?). |
|
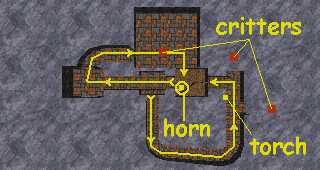
Keep following the corridor until you get to a set of stairs on the left. There is a critter a short way past the stairs that will sometimes come out to play, but this does not always happen. At the top of the stairs you will find a four-way junction (and a playmate). This whole area is a series of ramps and landings that you are welcome to explore if you are of a mind to do so. If not, you want to go south from this junction. |
|
Follow the corridor around until you see a torch on the left-hand wall (west). Clicking on it will open the passageway so you can get to the Horn. There is a critter directly in front of you, but it's the one at the end of the right-hand passage that usually manages to get in a good backstab before you know it's there. After getting rid of your friends, turn left and go up the ramp to another landing, where you will go north. In the room at the end of this passage is another critter (playmates all over the place, huh?). The door you need is in the south wall, but it's a "secret" door and difficult to see. The horn will be on the bed. Retrieve it and take it back to Medora. |