

Lich's Soul
You must be at least 7th level and have completed Morgiah's quest to be offered this quest. The summons will usually arrive as soon as you finish distributing your attribute points upon reaching 7th level. If the messenger arrives before you are 7th level, save the game and rest for about 6 hours and you will level.
The King of Worms will send you a letter via UPS (Undead Postal Service). After killing the delivery zombie, you'll find the letter stitched into it. The King of Worms wants you to run an errand for him. If you don't come quickly, you can count on his zombie reminder service to keep the matter fresh on your mind (this handy reminder feature was a bug that was fixed by one of the later patches, so if you don't get your daily reminder, don't sweat it)
Go to Scourg Barrow and down to the King's office (taking potshots at the liches and vampires if it makes you happy). He'll tell you that there's a lich haunting the Castle Sentinel dungeon and he wants you to soul trap it. Your reward? Information.
|
You enter Sentinel Castle just as you did to take up Lhotun's Quest. He's still sitting there if you want to wave on your way to the dungeon. |
|
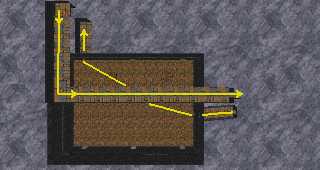
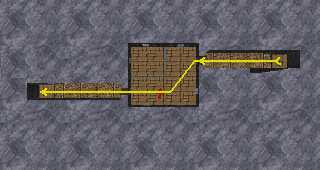
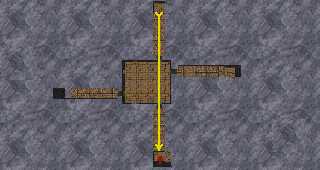
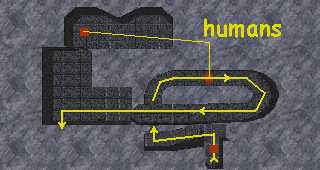
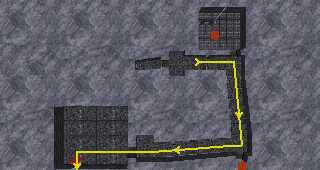
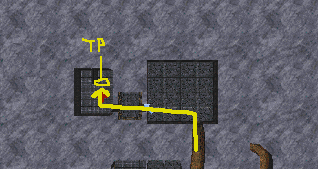
Go out the back door of the Grand Hall and to the back door on the north wall. You will find an elevator there that will take you up to the throne room. |
|
Go through the first opening on the right (south) wall and through the door at the end. At the end of this passage is another elevator. Use it. |
|
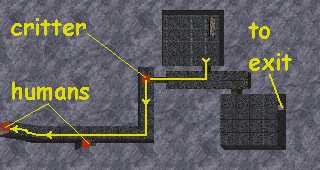
After a long walk down a seemingly endless corridor, take the first opening on the left wall and then the first passageway on the right wall (don't go through any doors). You will run into three human critters on your way. |
|
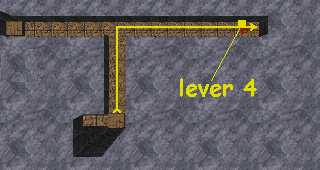
Go through the door at the end and follow the passage to an elevator. Go up and get off at the first opening. Pull the lever you find in the room at the end, then take the elevator all of the way up to the top. |
|
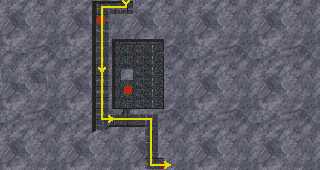
The lever lifted a set of blue bars blocking a doorway. Go across the room and take the elevator on the other side (it's the only unblocked doorway) all the way to the bottom. |
|
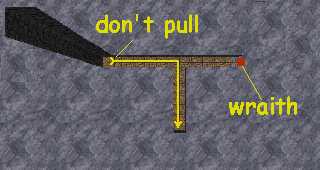
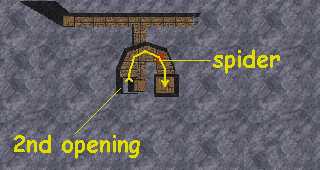
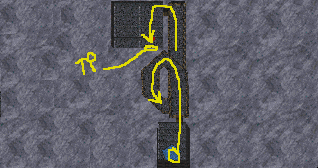
DO NOT pull the lever by the elevator. Instead, go around the corner and take that elevator to the SECOND opening. |
|
Kill the Spider and take the elevator to the top. |
|
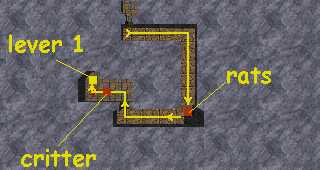
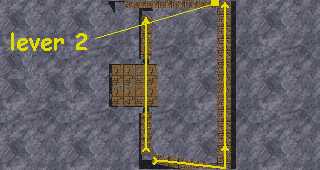
Go east from the top until you get to a lever. Pull it. Now go back to the elevator and north, across the room and take the elevator down to the bottom. |
|
Deal with the Ghost and pull the lever you find in the room at the end of the passageway. |
|
Take the elevator back up to the top, go across the room and take the elevator back down, past the spider, and down the bottom corridor again. |
|
The blue bars are gone and you can deal with the Wraith (if you didn't take care of him earlier). Pull the lever and ride the elevator all the way to the top. |
|
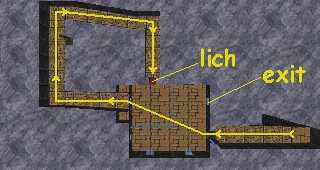
The doorway is now open and you can go deal with the Lich. Remember that you need Mithril or better weapons to hit him. If you wait at the corner, you can shoot him through the wall. The exit will be directly across from you when you come back to the room at the top. |

Assuming that your bones aren't keeping the lich company, go back to the King of Worms. He'll tell you about the Battlemage who helped the first emperor conquer Tamriel and was later betrayed by the emperor. The Battlemage eventually became the Underking. The King of Worms cautions you about what could happen if Zurin Arctus (the Underking) ever gets his mortal body back. You'll get a magical something-or-other for your troubles and you've gained a few brownie points with the King of Worms (now isn't that special?).
The Painting
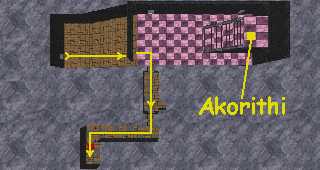
At some point after completing Lhotun's quest (usually about the time you reach 7th level) you'll receive a letter from Queen Akorithi "asking" you to come see her. This makes for some interesting story lines because her summons will usually show up at about the same time that you get the summons from the King of Worms. If you time it right, you can do his quest, talk to Akorithi on the way out, deliver the lich's soul to the King of Worms and then move on to Wayrest.
You will find the Queen in the Throne Room of Sentinel Castle. Go through the Door at the back of the Entry Hall, through the Arboretum to the Opening in the back of the Right Wall and take the Elevator up to the Next Floor. The Throne Room will be beyond the Door at the end of the Passage. Notice that everything related to the Queen is capitalized? That's because she's of Royal Blood and isn't about to let anyone forget it. Anyway, she wants you to retrieve an item from Wayrest Castle and is willing to give you a few hundred gold to get the job done.
This is a good spot to talk about dungeon preparation. Getting out of this dungeon is a lot tougher than getting in. If you don’t have a "Recall" spell, get it. If you can’t cast spells, go make an item that will cast the spell for you. If you can’t do that, get yourself a new pair of boots, because you’re going to be doing a LOT of wandering around before you manage to get out of Wayrest.
|
The dungeon is accessed from the hall behind the throne room in Wayrest. Use the door at the back, on the right (north). Unless you’re in the mood to redecorate the hallway in blood red and brain-matter gray, an “Invisibility” spell will get you past the guards at the door (you’ll probably have to kill one who’s blocking the hallway, but it’s possible to get by with a little creative maneuvering). There is a knight guarding the doorway and a couple of spell casters guarding the knight, so be prepared for a bit of a tussle. |
|
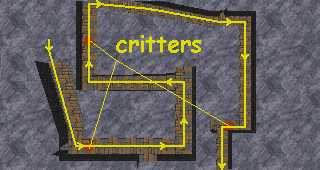
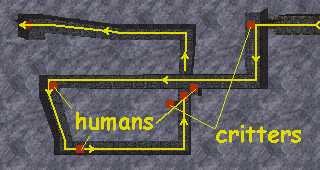
Once you’re through the door, take the stairs to the left. Use the teleporter at the top. You will meet one human in the passageway and there is another in the room behind you. |
|
What comes next is a series of three teleporters. The squares mark the spot where you appear. There will be critters in two of the rooms (I don't think the programmers could fit one in the second room, but they would if they could). |
|
From the last room, go out into the hall, through the door, turn left, and keep following the corridor until you see a door directly in front of you. There will be humans and critters to keep you company along the way. |
|
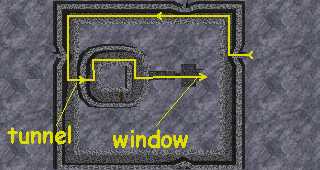
Behind the door is a sunken tunnel filled with water. I couldn't mark all of the critters on the map, but don't doubt for a moment that they will find you. On the west side is an underwater tunnel that will take you into another chamber. Go out the door on the east side, up the stairs and squirm your way through the window in the wall blocking the passage. |
|
It will take some wiggling to get through the window. Follow the passage beyond (there are a couple of humans that will come out to say "Hi") until you reach a door in the west wall. Go through it and use the door in the south wall in the room beyond. |
|
Go up the stairs; follow the corridor, taking the first left passageway. There is usually a knight in the first room on the left. From here it's pretty easy because there are no side doors or passages. |
|
Just keep following the passage down until you get to the big room at the end. No critters in this portion unless something randomly pops up. |
|
The painting is on the pyramid in the center of the room. Climbing up on it should unlock the doors on each wall. Except for the south wall, there are human fighter-types behind each door (2 each behind the northeast doors). Pick up the painting. "Use" it to find out what really happened to Lysandus. You can always lie about it to Akorithi when you report back to her. |
|
Getting out is a bit of a problem if you didn't anchor a "Recall" somewhere. Go all of the way back to where you last teleported and go through the secret door in the other room. |
|
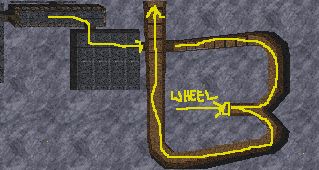
Follow the narrow tunnel until it forks. Turn the wheel at the base of the fork, then keep going and through the door at the end. |
|
Across the hall from this room there is another teleporter. Use it. |
|
Go through the door and follow the corridor until it ends with a door on the left. Go through that door and use the teleporter. This part was the tricky part. Getting the rest of the way out is just a matter of following directions. |


There will be a secret door in the south wall of the room where you appear. Take the tunnel to the end; turn left when you get out the door. Go through the door (watch out for the hole in the floor if you pulled the lever in the little teleporter room on your way in) and out the south door of the room. Turn east at the first 4-way intersection, take the first corridor to the left and you'll see the main hall at the end. Remember, if you didn’t kill the guards on the way in, they’ll be looking for you on the way out.
When you report back to Akorithi, she will ask you whether you looked at the Painting or not. If you say, "Yes," your rep will take a slight hit in Sentinel and she will fuss at you about sticking your nose into the affairs of Royalty. If you say, "No," (in other words, if you lie) you will probably get away with it. She will pat you on the head, give you your gold and send you on your way.