
- •Frame Relay – gns3 Lab
- •In this lab r1 will be configured as a Frame-relay switch so no ip address is required.
- •Configure nat – gns3 Lab
- •In this article we will demonstrate how to configure nat using gns3
- •(Ios used: c2600-bin-mz.123-6f.Bin but you can use other versions)
- •In this tutorial we will connect two routers via static route with gns3.
- •Configure Cisco Router Passwords – gns3 Lab
- •Eigrp gns3 Lab
- •If we use the “show ip route” on these routers we will only see directly connected link.
- •In this part, we created a faulty network and your task is to find out and fix the errors to make the network run perfectly. You can download the files here:Download faulty network
Configure Cisco Router Passwords – gns3 Lab
December 3rd, 2010Go to comments
In this tutorial we will use GNS3 to do a very basic task to secure your routers – apply a password so that users will be asked for this password when try to enter the privileged mode. For example:
Router>enable Password: ******* (enter that password here) Router# (this is the privileged mode)
Now let’s start!
First launch the GNS3, for this tutorial I use the IOS c2600-bin-mz.123-6f.bin but this is a very fundamental lab so you can use any IOS you have.
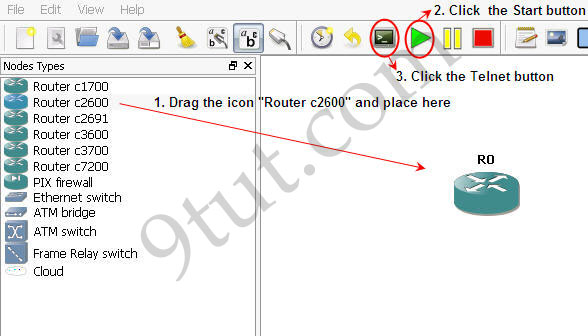
1. Drag the Router c2600 the place it onto the right-side box, 2. Click the Start button (the green triangle button) 3. Click the Telnet to all IOS button (the black button) to open the Telnet command line interface (CLI).
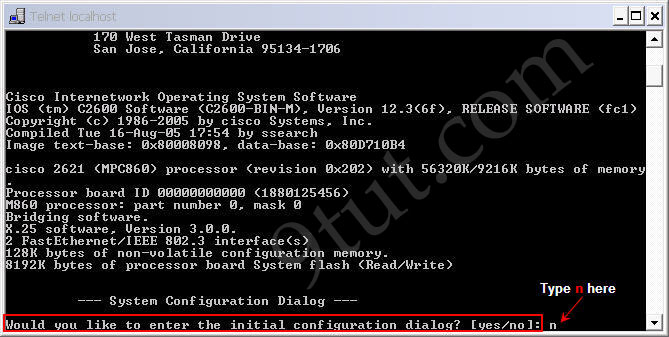
The CLI window will appear, asking “Would you like to enter the initial configuration dialog? [yes/no]:”. Type n here as we want to configure this router manually.
Wait for a few seconds and now the router will be ready for the configuration.
Router>enable Router#configure terminal (or type conf t as a shortcut) Router(config)#enable password digitaltut Router(config)#exit (or press Ctrl-Z) Router#exit (to exit privileged mode)
We logged out the router, notice that you will see two lines “Router con0 is now available” and “Press RETURN to get started.” Press Enter to enter the user mode (a line Router> will appear)
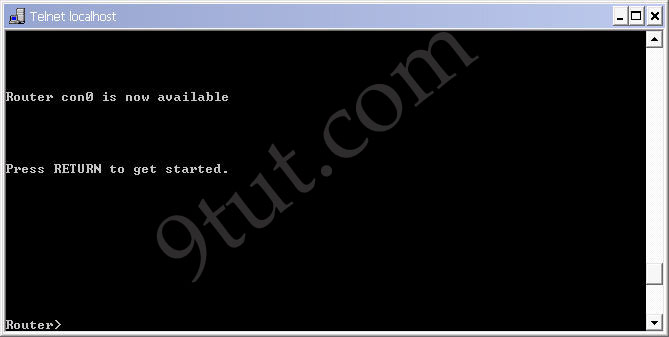
Now we can test if the password is working. Log in the privileged mode with the enable command
Router>enable
Now we can see the router is asking for a password. Type “digitaltut” as its password here and we can log in to the privileged mode
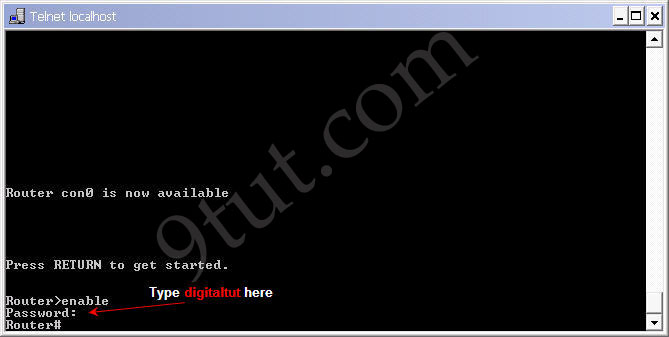
Notice that we with the “enable password” command, the router will save our password in plain text. It means if someone types show running-config on our router, they can see our password.
Router#show running-config (or show run)
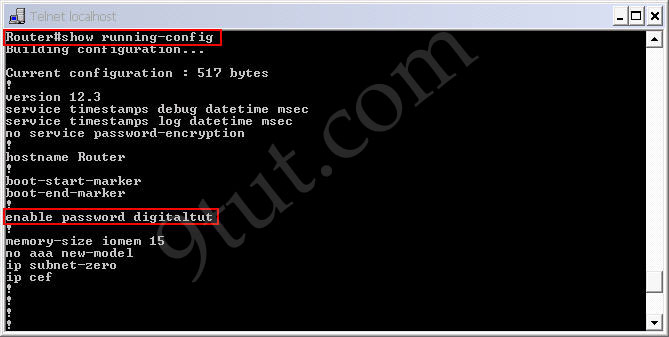
This is a thing we don’t want as our router is not secured completely. In fact, most of the administrators use the “enable secret” command nowadays. To do it, in the privileged mode type the following commands:
Router#config terminal Router(config)#enable secret digitaltutSecret (notice the letter “S” is capital) Router(config)#exit Router#exit
Now try to log in the privileged mode again (type enable in the user mode). First, try the password digitaltut again; the router will not accept this password anymore. Now type digitaltutSecret and we can login! (make sure you capitalize the letter S).
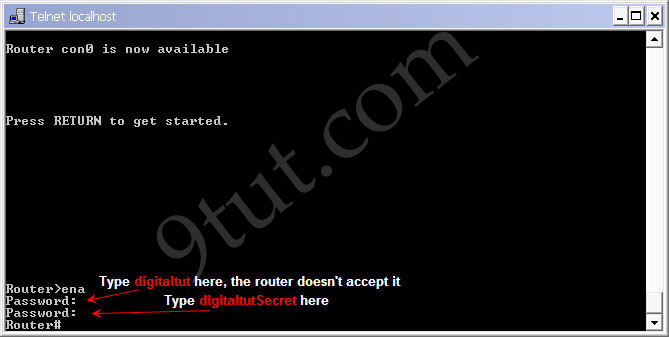
So notice that if you configure the enable secret command, it takes precedence over the enable password command. The two commands cannot be in effect simultaneously.
The enable secret command will encrypt the password so no one can see the password with the show running-config command. We can check it.
Router#show running-config

We can also set the password for console and vty (telnet) login with these commands:
Set console password: Router#config terminal Router(config)#line console 0 Router(config-line)#password cisco Router(config-line)#login Router(config-line)#exit
Set vty (virtual terminal lines) password: Router#config terminal Router(config)#line vty 0 4 Router(config-line)#password cisco Router(config-line)#login Router(config-line)#exit
By default, a Cisco router supports 5 simultaneous telnet sessions. By using the command line vty 0 4, the configuration below will be applied to all 5 sessions (line 0 to line 4).
Notice these passwords are not encrypted and we can see them with the “show running-config” command. We can encrypt all the passwords with theservice password-encryption command in global configuration mode
Router(config)# service password-encryption
Another notice is that we can’t login to a Cisco router via telnet if we don’t set a vty line password for it.
Configuring RIP – GNS3 Lab
December 3rd, 2010Go to comments
In this tutorial we will use RIP version 2 as the routing protocol so that the loopback interface of R0 can communicate with the loopback interface of R2.
A quick summary of RIPv2:
1) Routing Information Protocol (RIP) is a true distance-vector routing protocol 2) RIP permits a hop count of up to 15, so anything that requires 16 hops is deemed unreachable. 3) RIP sends the complete routing table out to all active interfaces every 30 seconds (RIP updates occur every 30 seconds) 4) RIP version 2 does send subnet mask information with the route updates. This is called classless routing. 5) RIP only uses hop count to determine the best way to a remote network (a hop is a router) 6) Administrative Distance is 120 7) Support VLSM & discontiguous networks
Note: If you are not sure about RIP, please read my RIP tutorial first
Below is the topology of this lab

Configuring interfaces for R0, R1 & R2:
R0(config)#interface s0/0
R0(config-if)#ip address 192.168.1.2 255.255.255.0 R0(config-if)#no shutdown R0(config-if)#interface lo0 R0(config)#ip address 12.0.0.1 255.0.0.0
R1(config)#interface s0/0 R1(config-if)#ip address 192.168.1.1 255.255.255.0 R1(config-if)#no shutdown R1(config-if)#interface f0/0 R1(config-if)#ip address 192.168.2.1 255.255.255.0 R1(config-if)#no shutdown R2(config)#interface f0/0 R2(config-if)#ip address 192.168.2.2 255.255.255.0 R2(config-if)#interface lo0 R2(config-if)#ip address 200.200.200.1 255.255.255.0
Before enable RIP we should check the routing table on these routers to understand what has been changed in these routers.
R0

R1

R2

Notice that these 3 routers only see the directly connected routers.
Now if you ping from the loopback (or any interface) of R0 to the loopback (or any interface) of R2 then the it will not successful because R0 doesn’t know which interface it should send the packets out to reach network 200.200.200.0.
Now enable RIPv2 on three routers
R0(config)#router rip R0(config-router)#version 2 R0(config-router)#network 12.0.0.0 R0(config-router)#network 192.168.1.0 R1(config)#router rip R1(config-router)#version 2 R1(config-router)#network 192.168.1.0 R1(config-router)#network 192.168.2.0 R2(config)#router rip R2(config-router)#version 2 R2(config-router)#network 200.200.200.0 R2(config-router)#network 192.168.2.0
Notice that with RIP protocol we just need to type the main network without subnet mask or wildcard mask. If you type a subnetwork, it will be auto summary into the main network.
Check the routing tables of these routers we will see the differences
R0

R1
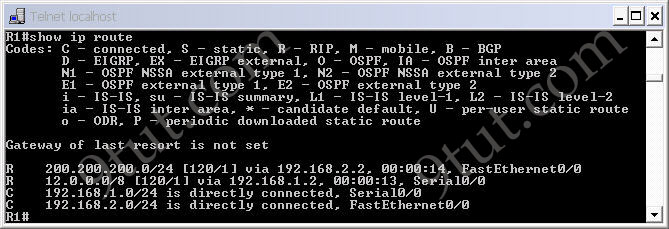
R2
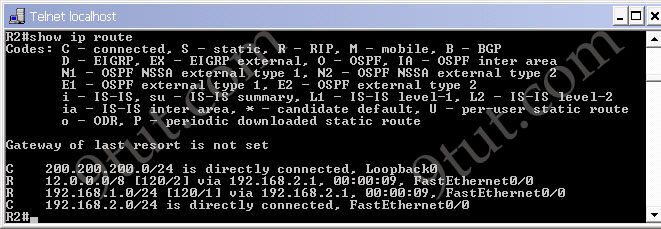
Now we can ping from the R0′s loopback interface to the R2′s loopback interface as the routing table of R0 has a path to R2′s loopback interface and vice versa.
If you want to check what is inside the update packet, use the command debug ip rip.
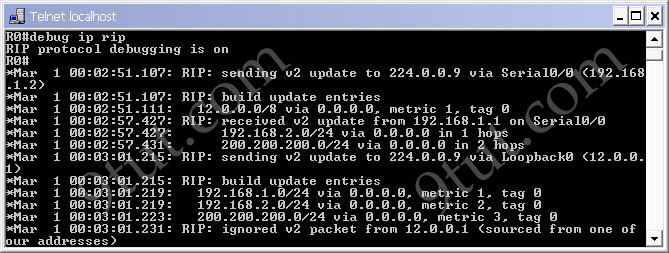
To turn off the debug ip, use the command undebug ip rip. If you want to disable all the debug processes, use the command undebug all.
