

Отметить
О Клапанный зазор должен быть проверен и приспособлен, когда двигатель холодный (комнатная температура).
Удалите покрытие головки цилиндра (см. Удаление Покрытия Головки цилиндра на Машинном Верхнем краю глава).
Удалите маслопроводы головки цилиндра (см. Удаление Нефтепровода Головки цилиндра на Машинном Верхнем краю глава).
2-20 Периодический ремонт
Правила технического обслуживания
Специальный Инструмент - Водитель Крышки заливной горловины: 57001-1454
CThheecpkistthoensvaal rvee nculemabraenrecde wbehgeinnnthineg pwisitthonthseareengaitnTeDleCf.t

○Measure клапанный зазор клапанов, для которых контур кулачка указывает далеко от коромысла.
• У каждого поршня есть два входных отверстия и два выпускных клапана. Измерьте эти два впускных или выпускных клапана в том же самом положении коленчатого вала.
Положение Измерения Клапанного зазора
#2 Поршня TDC в конце Хода сжатия →
Люфты впускного клапана #2 поршень, и
Люфты выпускного клапана #2 поршень
Отметить
○Check клапанный зазор, используя этот метод только. Проверка люфта в любом другом положении кулачка может привести к неподходящему клапанному зазору.
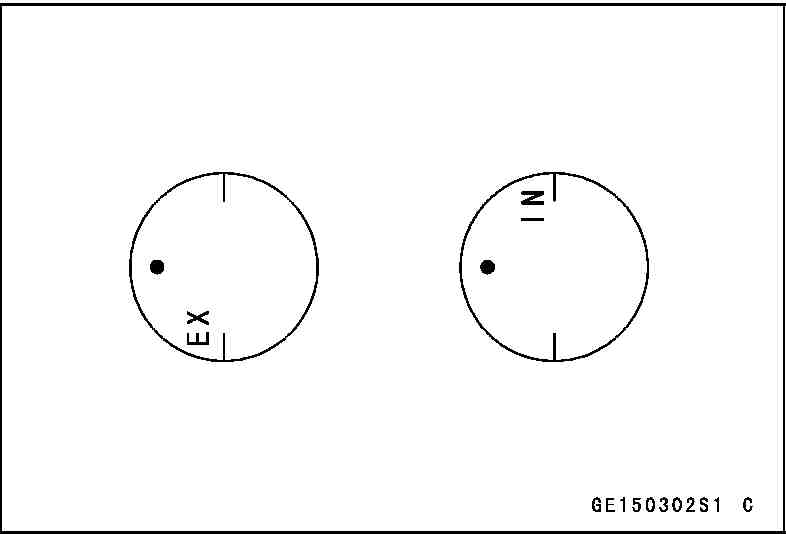
#1 Поршень TDC в конце Хода сжатия →
Люфты впускного клапана #1 поршень, и
Периодический ремонт 2-21
Правила технического обслуживания

Клапанный зазор (когда холод)
Входное отверстие 0.13 ∼ 0.18 мм (0.0051 ∼ 0.0071 в.)
Выхлоп 0.18 ∼ 0.23 мм (0.0070 ∼ 0.0090 в.)
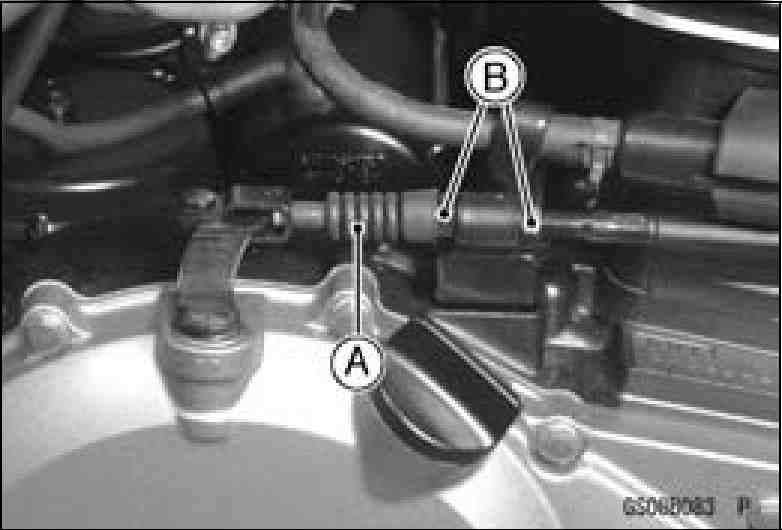
Регулирование Клапанного зазора
Если клапанный зазор является неправильным, ослабьте контргайку A и поверните регулировочный винт [B], пока правильный люфт не получен.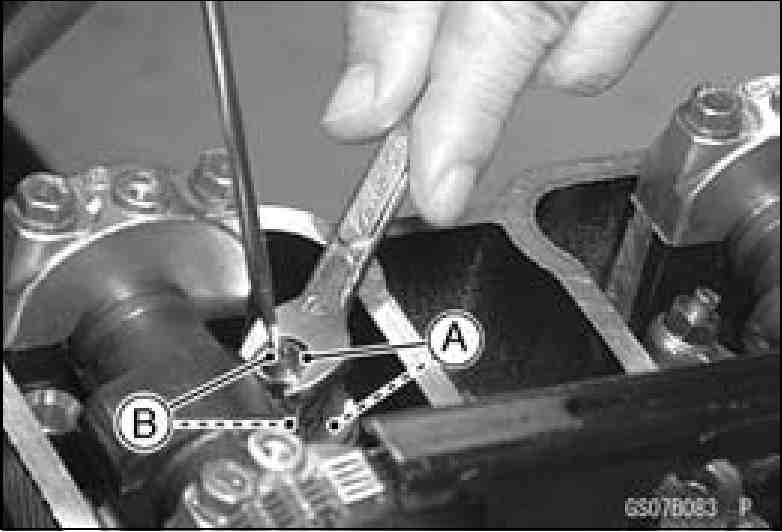
Сожмите контргайку.
Контргайки Регулятора клапана крутящего момента: 25 N · м. (2.5 kgf · м., 18 футов · фунт)
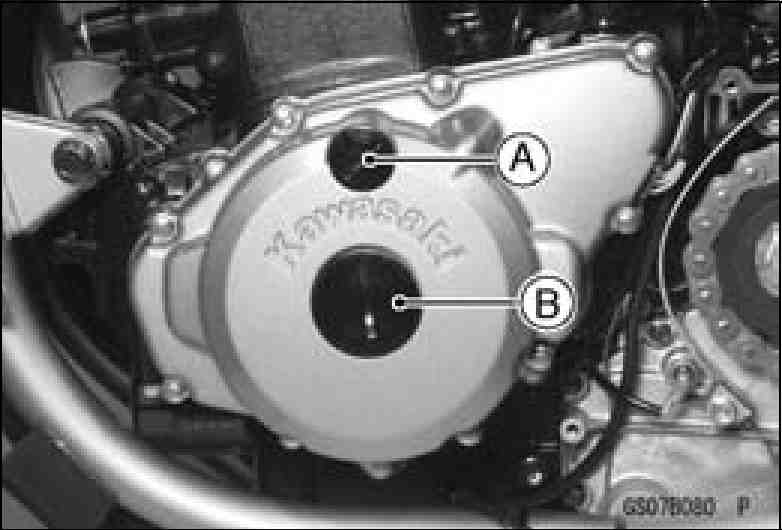
Установите эти две крышки на покрытии генератора переменного тока.
Сцепление
Чтобы избежать серьезного ожога, никогда не касайтесь машинной или выхлопной трубы во время регулировки хода педали сцепления
Операционный Осмотр сцепления
Операционный Осмотр сцепления
С машинным холостым ходом, удостоверьтесь, что нет никакого шума или неправильно тяжелого чувства при натяжении в рычаге сцепления полностью. Кроме того, удостоверьтесь, что рычаг переключения передач работает гладко.
При отъезде мотоцикл при выпуске рычага сцепления постепенно, удостоверьтесь, что сцепление не скользит и что сцепление участвует гладко.
Если операция по сцеплению - недостаток, осмотрите систему сцепления.
WARNING
При осмотре при управлении транспортным средством, отметьте окружающую транспортную ситуацию достаточно вместо безопасности.

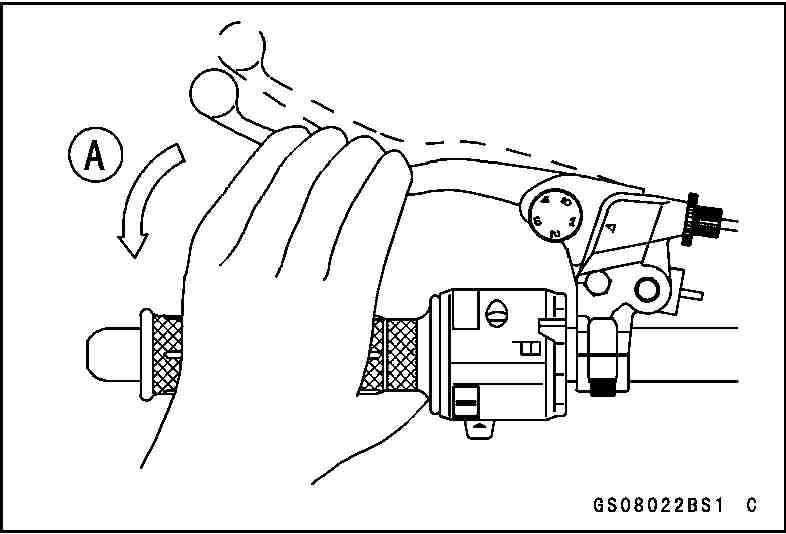
Потяните рычаг сцепления как раз, чтобы поднять люфт.
Измерьте промежуток между рычагом и держателем рычага.
Если промежуток слишком широк, сцепление не может выпустить полностью. Если промежуток является слишком узким, сцепление не может участвовать полностью. В любом случае, приспособьте сцепление.
Люфт Рычага сцепления Стандарт: 2 ~ 3 мм (0.08 ~ 0.12 в.)
2-22 Периодический ремонт Maintenance Procedure
Slide back the dust cover [A].
Loosen both adjuster nuts [B] at the right hand crankcase as far as they will go.
A WARNING
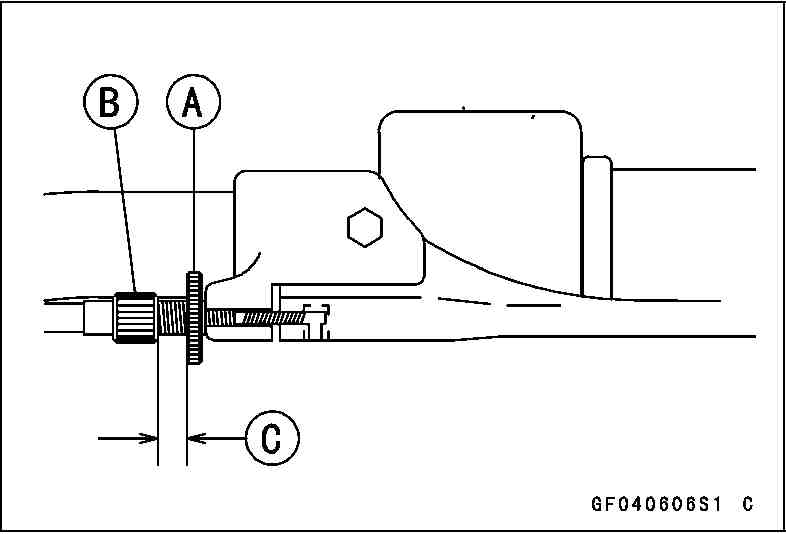
Loosen the knurled locknut [A] at the clutch lever.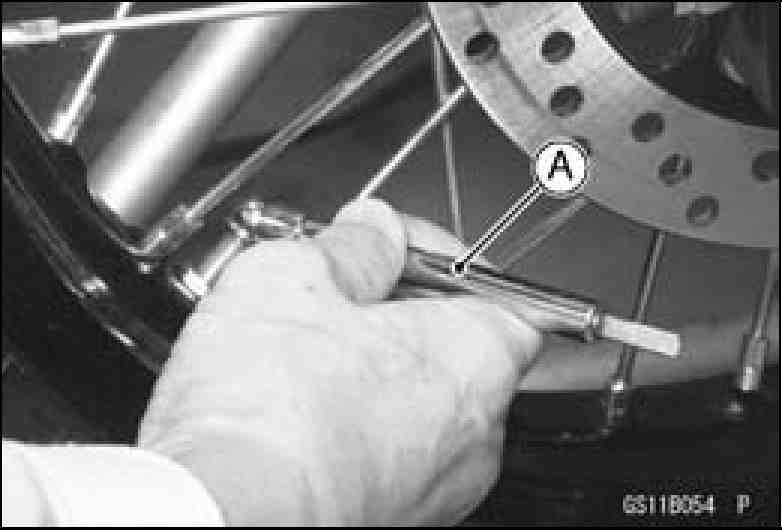
Turn the adjuster [B] so that 5 ∼ 6 mm (0.20 ∼ 0.24 in.) [C] of threads are visible.
Be sure that the outer cable end at the clutch lever is fully seated in the adjuster at the clutch lever, or it could slip into the place later, creating enough cable play to prevent clutch disengagement.
• After the adjustment is made, start the engine and check that the clutch does not slip and that it releases properly.
Wheels/Tires
Air Pressure Inspection/Adjustment
• Measure the tire air pressure with an air pressure gauge [A] when the tires are cold (that is, when the motorcycle has not been ridden more than a mile during the past 3 hours).
•Adjust the tire air pressure according to the specifications if necessary.
Давление воздуха (когда холод)
Передняя часть |
150 kPa (1.5 kgf/cm ², 21 psi) |
Задняя часть |
225 kPa (2.25 kgf/cm ², 32 psi) |
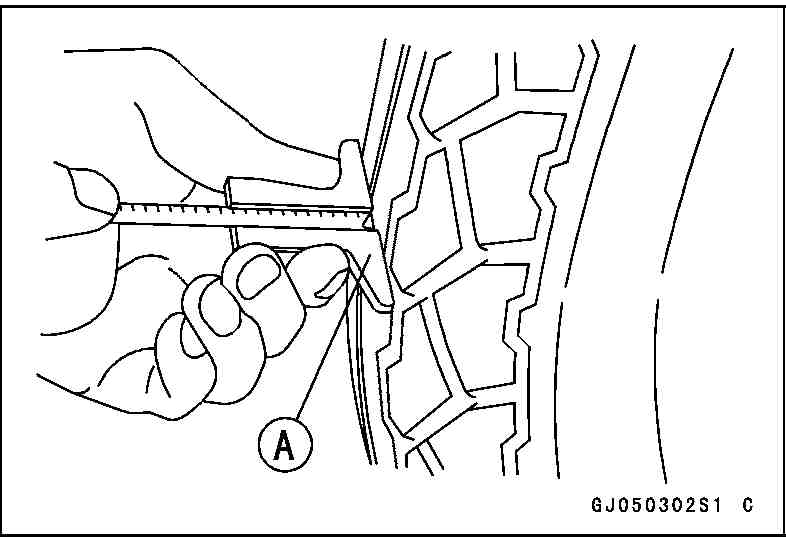
As the tire tread wears down, the tire becomes more susceptible to puncture and failure. An accepted estimate is that 90% of all tire failures occur during the last 10% of tread life (90% worn). So it is false economy and unsafe to use the tires until they are bald. • Measure the tread depth at the center of the tread with a
depth gauge [A]. Since the tire may wear unevenly, take
measurement at several places.
Периодический ремонт 2-23
Maintenance Procedure
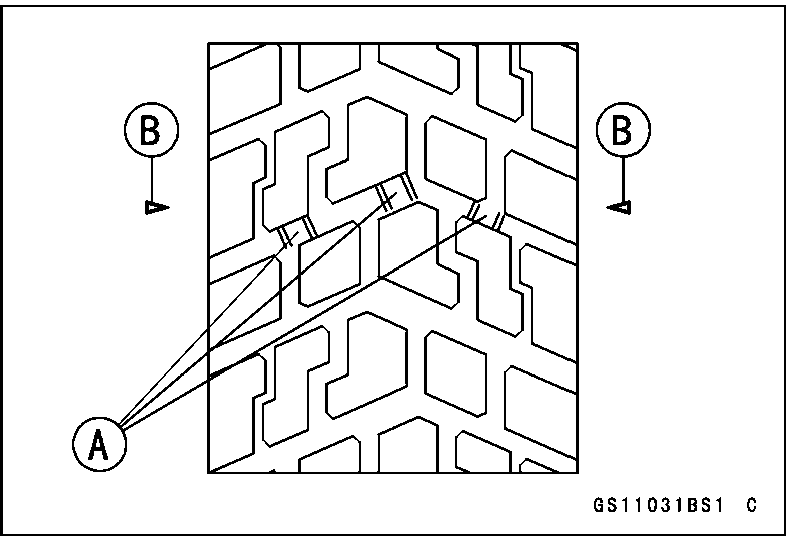
Wear Indicator Position Mark [B]
• If any measurement is less than the service limit, replace the tire.
Глубина рисунка протектора
Передняя часть |
DUNLOP |
BRIDGESTONE |
|
Стандарт |
6.9 мм (0.27 в.) |
6.0 мм (0.24 в.) |
|
Сервисный Предел |
1 мм (0.04 в.) |
||
Задняя часть |
DUNLOP |
BRIDGESTONE |
|
Стандарт |
8.8 мм (0.35 в.) |
8.5 мм (0.33 в.) |
|
Сервисный Предел |
2 мм (0.08 в.) (До 130 км/ч (80 миль в час)) 3 мм (0.12 в.) (Более чем 130 км/ч (80 миль в час)) |
||
H
WARNING
To ensure safe handling and stability, use only the recommended standard tires for replacement, inflated to the standard pressure. Use the same manufacturer’s tires on both front and rear wheels.
○Check and balance the wheel when a tire is replaced with a new one.
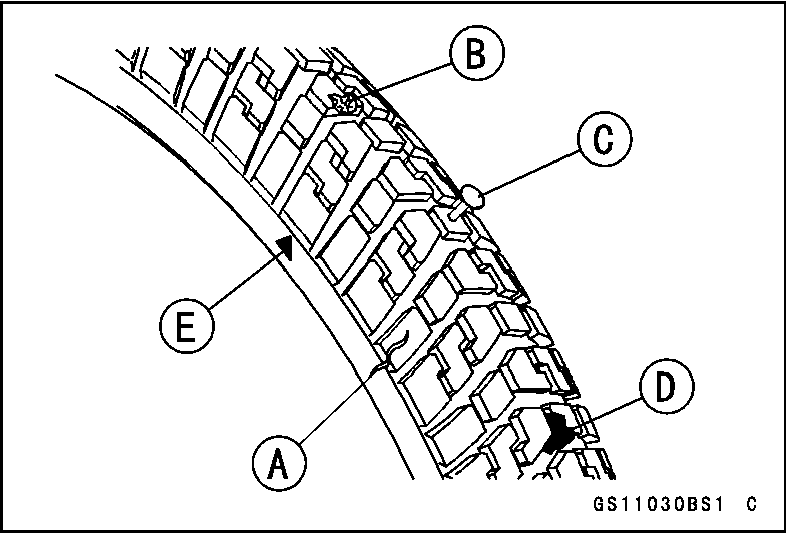
Wheel/Tire Damage Inspection
• Remove any imbedded stones [D], nail [C] or other foreign particles from the tread.
Wear Indicator [E]
Visually inspect the tire for cracks [A] and cuts [B], and replace the tire if necessary. Swelling or high spots indicate internal damage, requiring tire replacement.
Visually inspect the wheel for cracks, cuts and dents damage.
If any damage is found, replace the wheel if necessary.
2-24 Периодический ремонт
Maintenance Procedure
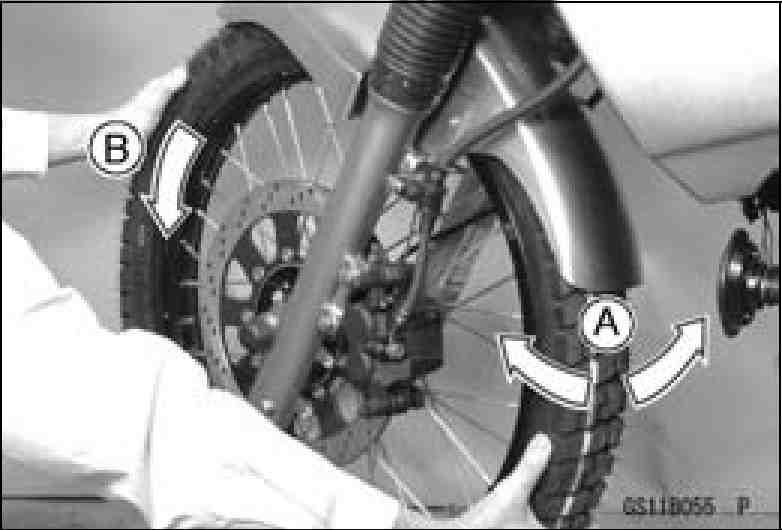
Using a jack and attachment, raise the front wheel off the ground (see Wheels/Tires chapter).
Turn the handlebar all the way to the right or left.
Inspect the roughness of the front wheel bearing by pushing and pulling [A] the wheel.
Spin [B] the front wheel lightly, and check for smoothly turn, roughness, binding or noise.
If roughness, binding or noise is found, remove the front wheel and inspect the wheel bearing (see Hub Bearing Inspection in the Wheels/Tires chapter).
Spoke Tightness and Rim Runout Inspection
Spoke Tightness Inspection
Check whether all the spokes are uniformly tightened.
Uniformly tighten the spokes if any spoke is loose or unevenly tightened.
Torque -Spoke Nipple: 3.0 N·m (0.3 kgf·m, 26 in·lb)
(On and after EJ650-A3/C3): 5.1 N·m (0.52 kgf·m, 45 in·lb)
Inspect the rims.
WARNING