

The redrawing problem decision
The subject of the problem: if program to output on the display have outputted some text and after that program window is overlaid by other window, that part, which was overlaid, is lost and the information disappears.
Every program has to update the contents of its window on WM_PAINT message receipt. So, there can be proposed three methods to struggle that redraw problem:
To computer all the time the outputted text position;
To store the list of events, linked to information output to the window, and, as it’s need, “to replay” the events sequence.
To support the virtual window and to copy simply its contents to real window on WM_PAINT message incoming.
The third method is most general therefore it’ll be used in the program implementation.
The virtual window implementation
In the virtual window implementation, first of all, you should to create the memory context, which is compatible to the main (or other) window context. After that, the output is directed through memory context. Every time your program receives WM_PAINT message, the content of that context would be copied to the window context and will displayed on the screen.
So, as the whole output is directed to memory, the program always has the physical window current written content. When the physical window is overlaid and activated, the WM_PAINT message is sent to the program, also the virtual window content is copied to physical window, restoring that.
To implement the virtual window, there are used a number of functions:
CreateCompatibleDC(); SelectObject(); CreateStockObject(); BitBlt(); which are already used in our studies, also CreateCompatibleBitmap(), which creates the raster image, compatible to the device context and PatBlt(), which fills the rectangular area according to the color and the style of current brush. Their format:
BOOL CBitmap::CreateCompatibleBitmap( CDC* pDC, int nWidth, int nHeight );
Parameters:
pDC Specifies the device context.
nWidth Specifies the width (in pixels) of the bitmap.
nHeight Specifies the height (in pixels) of the bitmap.
BOOL CDC::PatBlt( int x, int y, int nWidth, int nHeight, DWORDdwRop );
Parameters:
x Specifies the logical x-coordinate of the upper-left corner of the rectangle that is to receive the pattern.
y Specifies the logical y-coordinate of the upper-left corner of the rectangle that is to receive the pattern.
nWidth Specifies the width (in logical units) of the rectangle that is to receive the pattern.
nHeight Specifies the height (in logical units) of the rectangle that is to receive the pattern.
dwRop Specifies the raster-operation code. Raster-operation codes (ROPs) define how GDI combines colors in output operations that involve a current brush, a possible source bitmap, and a destination bitmap. This parameter can be one of the following values:
PATCOPY Copies pattern to destination bitmap.
PATINVERT Combines destination bitmap with pattern using the Boolean XOR operator.
DSTINVERT Inverts the destination bitmap.
BLACKNESS Turns all output black.
WHITENESS Turns all output white.
The creation of virtual window
To create such virtual window, it’s need to create the memory context, compatible to the context of application main window (physical window) – which will exist during the all time of our program execution.
All variables to work are linked to virtual window:
CDC m_memDC; // the device context;
CBitmap m_bmp; // the virtual window image;
CBrush m_bkbrush; // the brush for the virtual window;
Also we need to reconstruct the main window constructor (see Listing 4.3 ) and to include the new elements.
Listing 4.3 The CMainWin constructor creates the virtual window.
CMainWin::CMainWin()
{Create(NULL,"MFC",WS_OVERLAPPEDWINDOW,rectDefault,NULL, MAKEINTRESOURCE (IDR_MENU1));
m_X=m_Y=0;
maxX=GetSystemMetrics(SM_CXSCREEN); // the screen dimension determination
maxY=GetSystemMetrics(SM_CYSCREEN);
CClientDC dc(this); // the device context reception
m_memDC.CreateCompatibleDC(&dc); // the compatible raster image
m_bmp.CreateCompatibleBitmap(&dc,maxX,maxY); // creation
m_memDC.SelectObject(&m_bmp); //
m_bkbrush.CreateStockObject(WHITE_BRUSH); // the standard background selection
m_memDC.SelectObject(&m_bkbrush); //
m_memDC.PatBlt(0,0,maxX,maxY,PATCOPY); // the virtual window background filling
}
So, yet one tome about sequence of our actions: At first the dimensions of screen are determined. After for a current window, there is prompted the device context, which is used to create the compatible memory context. Next step – the compatible raster image is created. That image enables to organize the bit-serial matching between the virtual and physical windows contents. The image dimensions are set the same as to general screen dimensions.
Next step is a standard brush creation. It is selected to the memory context, and after that the PatBlt() function fills the virtual window by that brush. Therefore, the virtual window background will be white, that matches to the physical window background color (see the next example). The colors are selected by programmer.
And the last: the device context, linked to the physical window is free automatically as CMainWin constructor finish. The memory context will exist until the program finish.
The virtual window using
Then virtual window is created the output is generally directed to it. The output to the screen is provided only on message WM_PAINT incoming. The Listing 4.4 illustrates the text output using virtual window.
Listing 4.4 The text output through virtual window.
void CMainWin::OnShow
{TEXTMETRIC tm;
CSize size;
memDC.SetTextColor(RGB(0,0,0)); // the black color for the text symbols
memDC.SetBkColor(RGB(0,255,255)); // the blue color for the background
memDC.GetTextMetrics(&tm); // the text metrics reception
wsprintf(t,"The font is %ld pixels high",tm.tmHeight); // The string output
memDC.TextOut(m_X,m_Y,t,strlen(t));
m_Y=m_Y+tm.tmHeight+tm.tmExternalLeading; // jump to the next string
strcpy(t,"This is on the next line");
memDC.TextOut(m_X,m_Y,t,strlen(t));
size=memDC.GetTextExtent(t,strlen(t)); // the string length calculation
wsprintf(t,"Previous string is %ld units long",size.cx);
m_X=size.cx; // jump to the end of previous string
memDC.TextOut(m_X,m_Y,t,strlen(t));
m_Y=m_Y+tm.tmHeight+tm.tmExternalLeading; // jump to the next string
m_X=0; // the X-coordinate reset
wsprintf(t,"Screen dimensions %d %d",max_X,max_Y);
memDC.TextOut(m_X,m_Y,t,strlen(t));
m_Y=m_Y+tm.tmHeight+tm.tmExternalLeading;
InvalidateRect(NULL); // the physical window updating
}
Every time on WM_PAINT message incoming, the virtual window contents is copied to the physical window. That is implemented by OnPaint() handler. See Listing 4.5.
Listing 4.5 The OnPaint handler
void CMainWin::OnPaint()
{CPaintDC DC(this);
DC.BitBlt(0,0,max_X,max_Y,&memDC,0,0,SRCCOPY);
// SCRCOPY is a simple coping of source region to the screen in unchanged form.
}
The full output information is stored in mem_DC and as a result of function execution is displayed to the screen. Therefore, as WM_PAINT is send to program every time when main window is overlaid, the OnPaint() handler automatically restores the main window contents. Listing 4.6 illustrates the program with virtual window.
Listing 4.6 The elements of program with virtual window using.
// virtwin.h - The class description
class CMainWin : public CFrameWnd
{
public:
int m_X,m_Y;
CBitmap bmp1;
CBrush mbrush;
CDC memDC;
CMainWin(LPCSTR);
char t[100];
afx_msg void OnPaint();
afx_msg void OnReset();
afx_msg void OnText();
DECLARE_MESSAGE_MAP()
};
class CApp : public CWinApp
{public:
BOOL InitInstance();
};
// virtwin.cpp The elements of the program
#include<afxwin.h>
#include<virtwin.h>
int max_X,max_Y;
CMainWin::CMainWin()
{Create(a,"MainWindow",WS_OVERLAPPEDWINDOW,rectDefault,NULL,
MAKEINTRESOURCE(IDR_MENU1));
m_X=0; m_Y=0;
max_X=GetSystemMetrics(SM_CXSCREEN);
max_Y=GetSystemMetrics(SM_CYSCREEN);
CClientDC DC(this);
memDC.CreateCompatibleDC(&DC);
bmp1.CreateCompatibleBitmap(&DC,max_X,max_Y);
memDC.SelectObject(&bmp1);
mbrush.CreateStockObject(WHITE_BRUSH);
memDC.SelectObject(&mbrush);
memDC.PatBlt(0,0,max_X,max_Y,PATCOPY);
}
afx_msg void CMainWin::OnPaint() // Current coordinates zero and window clearing
{m_X=m_Y=0;
m_memDC.PatBlt(0,0,maxX,maxY,PATCOPY);
InvalidateRect(NULL);
}
Some functions for a font changing
The inbuilt fonts using.
The inbuilt fonts are the ready objects, which are selected by MFC-function – CreateStockObject(int nIndex).
Here, nIndex is a constant specifying the type of stock object. For a fonts it has the following values:
ANSI_FIXED_FONT ANSI fixed system font.
ANSI_VAR_FONT ANSI variable system font.
DEVICE_DEFAULT_FONT Device-dependent font.
OEM_FIXED_FONT OEM-dependent fixed font.
SYSTEM_FONT The system font. By default, Windows uses the system font to draw menus, dialog-box controls, and other text. In Windows versions 3.0 and later, the system font is proportional width; earlier versions of Windows use a fixed-width system font.
SYSTEM_FIXED_FONT The fixed-width system font used in Windows prior to version 3.0. This object is available for compatibility with earlier versions of Windows.
To select the inbuilt font and to work with it, its need:
To create the object of CFont type.
To load (by object) the need font by CreateStockObject() function.
The font changing is provided by SelectObject() function with new font name.
The changes to do in the program are in the Listing 4.6:
Listing 4.6 The changes to the program for a font changing
Class CMainWin : public CFrameWnd
{public:
CFont m_SysFont, m_AnsiVarFont; // the font objects
afx_msg void OnFont(); // the handler to change the fonts
…………………………
};
CMainWin::CMainWin()
{ m_AnsiVarFont.CreateStockObject(ANSI_VAR_FONT);
m_SysFont.CreateStockObject(SYSTEM_FONT);
}
afx_msg void CMainWin::OnFont()
{static whichfont=0;
if(!whichfont)
{m_memDC.SelectObject(&m_AnsiVarFont);
whichfont=1;}
else {m_memDC.SelectObject(&m_SystemFont);
whichfont=0;}
}
To create the own fonts, there is used the CreateFont() function (the member of CFont class):
BOOL CFont::CreateFont( int nHeight, int nWidth, int nEscapement, int nOrientation, int nWeight, BYTE bItalic, BYTE bUnderline, BYTE cStrikeOut, BYTE nCharSet, BYTE nOutPrecision, BYTE nClipPrecision, BYTE nQuality, BYTE nPitchAndFamily, LPCTSTR lpszFacename );
Parameters:
nHeight the desired height (in logical units) of the font (0 – default value).
nWidth the average width (in logical units) of characters in the font.
nEscapement Specifies the angle of text.
nOrientation Specifies the angle symbol.
nWeight Specifies the font weight (in inked pixels per 1000, bold is 700).
bItalic Specifies whether the font is italic.
bUnderline Specifies whether the font is underlined.
cStrikeOut Specifies whether characters in the font are struck out.
nCharSet Specifies the font's character set (f.e. ANSI_CHARSET, DEFAULT_CHARSET so on).
nOutPrecision Specifies the desired output precision.
nClipPrecision Specifies the desired clipping precision.
nQuality Specifies the font's output quality
nPitchAndFamily Specifies the pitch and family of the font.
lpszFacename Specifies the typeface name of the font.
LOGFONT structure description
The structure LOCFONT has the contence similar to TEXTMETRIC structure.
The LOGFONT structure defines the attributes of a font.
typedef struct tagLOGFONT {
LONG lfHeight;
LONG lfWidth;
LONG lfEscapement;
LONG lfOrientation;
LONG lfWeight;
BYTE lfItalic;
BYTE lfUnderline;
BYTE lfStrikeOut;
BYTE lfCharSet;
BYTE lfOutPrecision;
BYTE lfClipPrecision;
BYTE lfQuality;
BYTE lfPitchAndFamily;
TCHAR lfFaceName[LF_FACESIZE];
} LOGFONT, *PLOGFONT;
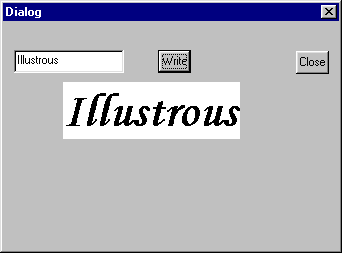
Pic. 4.1 The view of image for program Listing 4.7
In the next Listing 4.7, there is an example of LOGFONT structure using in the dialog window. Firstly, there is appeared a font selection dialog window, after setting the text in the edit box, there will be the text output (it’s pity, but only one time) (See also Pic. 4.1).
Listing 4.7 The example of program with font selection and output in the dialog window.
// App.h: interface for classes.
class CApp : public CWinApp
{public:
BOOL InitInstance();
};
class CSDialog : public CDialog
{public:
void OnWrite();
BOOL OnInitDialog();
CSDialog(UINT id,CWnd *Owner):
CDialog(id,Owner){}
DECLARE_MESSAGE_MAP()
private:
CEdit* ed;
};
// App.cpp: implementation of the CApp class.
#include <afxwin.h>
#include <afxcmn.h>
#include <afxdlgs.h>
#include "App.h"
#include "resource.h"
LOGFONT lf;
char str[255];
CFont font1;
BOOL CApp::InitInstance()
{CSDialog a(IDD_DIALOG1,NULL);
a.DoModal();
return TRUE;
}
BEGIN_MESSAGE_MAP(CSDialog,CDialog)
ON_WM_VSCROLL()
ON_COMMAND(IDC_BUTTON1,OnWrite)
END_MESSAGE_MAP()
CApp App;
BOOL CSDialog::OnInitDialog()
{ed=(CEdit*)GetDlgItem(IDC_EDIT1);
CFontDialog a;
a.DoModal();
a.GetCurrentFont(&lf);
return TRUE;
}
void CSDialog::OnWrite()
{ed->GetWindowText(str,sizeof(str));
if(str){CClientDC dc(this);
font1.CreateFontIndirect(&lf);
dc.SelectObject(font1);
dc.TextOut(60,60,str,strlen(str));
font1.DeleteObject();
}
}