

Create a New Archive
You can create a new archive by selecting New Archive from the WinZip File pull-down menu or by clicking the New toolbar button. This activates the New Archive dialog box.
First, you type the name of the archive you want to create, not the names of the files you want to compress. This dialog box works similarly to standard Windows file dialog boxes, so you can choose the drive and folder where the archive will be created. The names of any existing archives on the selected drive and folder are listed to help you choose a name that is not already in use.
Normally after creating an archive you will want to add files to the archive, so verify that the Add dialog check box is checked to automatically activate the Add dialog box.
Adding Files
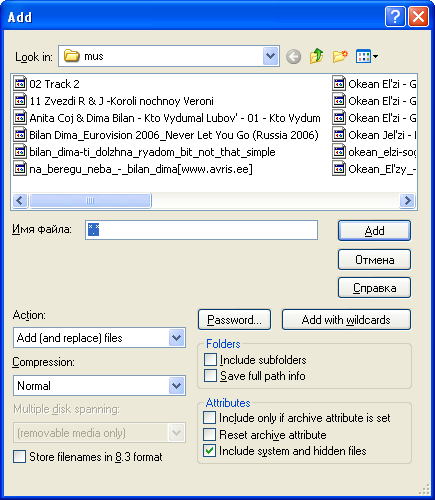
You can add files to an existing archive you've opened or to a new archive you've created, as in the previous section. If the Add dialog box is not displayed, select Add from the Actions pull-down menu or click the Add toolbar button.
In the Add dialog box, select the files you want to add to the archive. The easiest way to do this is usually to click on the desired files in the list near the top of the Add dialog box. You can select multiple files using normal Windows file selection conventions (for example, hold down the shift key while clicking to select multiple files).
Once you are done making your file selection, click the Add button to add the files. Once WinZip finishes, it will update the file list in the main window to reflect the new files in the archive.
You can also add files to an archive by dragging the files from My Computer or the Windows Explorer and dropping the files on the WinZip window.
Note: When you add files to an archive, the original files on disk are not deleted. If you want to delete the original files automatically after the Add operation completes, select Move from the Action combo box.
Deleting Files from Archive
WinZip can remove selected files from within an existing archive, or delete the entire archive. Delete from the Actions menu activates the Delete dialog box.
There are two ways to start the action to delete files from an archive:
Select entries from the list box in an open archive, then select the Delete entry from the Actions pull-down menu or press the Del key.
Select the Delete entry from the Actions pull-down menu to bring up the Delete dialog box. You can then specify the file names you want to delete (standard Windows wildcards are accepted, so you could use “*.doc” to delete all .doc files).
Note: these operations cannot be undone.
To delete an entire archive, select the Delete entry from the Actions pull-down menu to bring up the Delete dialog box. Then click the Entire Archive option button and the Delete push button. Alternatively, you can select Delete Archive from the File menu.
Other Characteristics
Many WinZip operations can be tailored using configuration options. For example, you can change the default folders for the Extract and Add dialog boxes. Most options are intended for advanced users.
Reminder: press the F1 key at any time while working with WinZip for context-sensitive help.
You may want to review the tutorial and explore some of the many links it contains by pressing the buttons above. You can return to the Help Contents page by clicking on the Contents button in the toolbar.