

The WinZip window
The WinZip window is where you start many of your operations. You can open it through the Start menu. The WinZip window also opens automatically if you double-click on an archive in My Computer or the Windows Explorer.
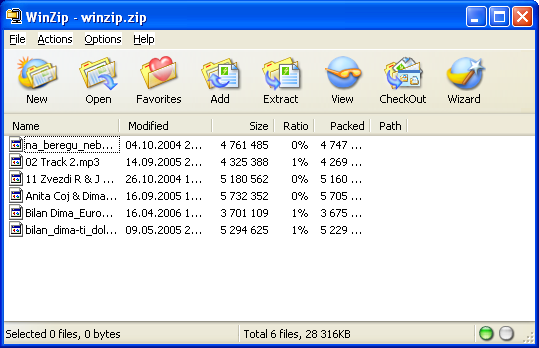
The WinZip window includes standard Windows components. Of particular interest:
The Title Bar displays not just the WinZip product title, but the name of the archive you are currently working with.
The Toolbar provides quick ways of performing the most common tasks.
The Main Window Area displays information about the files in the archive, and you'll find as we get further that many operations can be done directly with these files.
Finally, the Status Line displays the number and sizes of currently selected files, along with other archive information.
Opening Archive
The first step is to open an archive. Use the Open toolbar button or select Open Archive from the WinZip File pull-down menu to activate the standard Open Archive dialog box.
Then, select the archive you want to open in the Open Archive dialog box. This dialog box works just like the Open dialog boxes in other applications: just select the file you want to open from the list of files. (If you want to create an archive instead of working with an existing archive, see the section Brief Tutorial - Creating New Archives).
Once an existing archive is open you can extract or work with the files in the archive. The files in an archive are listed in a list box in the main WinZip window.
You can look at all the file names, with details, stored in the archive, using the scroll bar, arrow keys or usual Windows commands.
You can quickly sort the main window by clicking once on the header (e.g. click on “Name” in the header above the list of files to sort the list by filename).
Viewing Files
You can easily view any of the files stored in an archive by double clicking on the file in the main WinZip window. WinZip will open the file with the associated application. For example, a Word (.doc) file may be displayed in Word, and a text (.txt) file in Notepad. When you double click on a program file (.exe), it is run.
Or, you can view a file with the built-in viewer or a viewer of your choice by selecting View from the Actions pull-down menu.
Extracting Files
When you extract a file, WinZip decompresses it and places it in the folder of your choice. You can restore whole folders and retain the structure of any sub-folders.
If you select Extract from the Actions pull-down menu or click the Extract toolbar button, WinZip lets you choose the folder where you'd like to place the extracted files.
The Extract dialog box:
Use the Extract button on the toolbar or select Extract from the Actions menu to display the Extract dialog box. Use the Extract dialog box to extract or “unzip” files from the open archive to your disk.
WinZip extracts files from the archive to the folder specified in the Extract to field.
You can specify this folder in one of four ways:
Select a folder and drive in the Folders/Drives list boxes.
Type a folder name in the Extract to field.
Pull down the Extract to combo box and select a folder from the list of previous Extract to folders.
Press the New folder... button and create a folder.
The Extract dialog box provides the following options:
The Selected files option button instructs WinZip to extract only files that are selected in the main WinZip window. You can use conventional file selection methods to choose files. This option is disabled if no files are selected.
The All files option button instructs WinZip to extract all files from the archive.
The Files option button and edit field allow you to specify which files are extracted using filenames (standard Windows wildcards are accepted, so you could use “*.doc” to extract all .doc files)
The Overwrite existing files check box determines whether you are prompted before existing files are overwritten with files from the archive.
The Skip older files check box determines whether WinZip skips (does not extract) existing files when the date/time stamps of the file in the archive is older than the file on disk.
The Use folder names check box determines whether WinZip will use folder names (also known as path names) stored in the archive. You will probably want to check this option for most extract operations. If this option is checked any folder names stored in the archive will be appended to the Extract to folder when appropriate. If this option is not checked all files will be extracted to the same folder, regardless of any folder names in the archive. For example, assuming the Extract to folder is “c:\temp", the file “mydir\filename” will be extracted to the folder “c:\temp\mydir” if the Use folder names option is checked, or the folder “c:\temp” if the option is not checked.
The New folder button activates the Create Folder dialog box. Note that you can extract files and create a folder without this dialog box: simply type the name of the new folder in the Extract to field of the Extract dialog box and press the Extract button.
Note: You can change the default Extract to folder using the Configuration | Folders dialog box.
Note: if a Zip file contains a “setup” or “install” program, you can use the Install Feature to automatically extract the files, run the installation program, and clean up temporary files.