

Formatting
Pre-Prep
Making Microsoft Word Behave
Before you upload your book to Smashwords, follow the steps below to ensure proper formatting of your book. The first steps focus on making Word behave.
A note about all the different versions of Word: You can use any version of Microsoft Word, even the old versions like Word 2000 (my personal favorite), Word 2003 (I like this one too), Word 2007 (Steep learning curve, but a great program once you learn it), and the newer ones. Luckily, although the user interface changes (tell me, Microsoft, why do you make Word more difficult to use with every version?), the inner guts of Word are have remained remarkably similar across all versions for nearly 20 years. If, for religious reasons you’re hesitant to use Microsoft Word, please reconsider. If you plan to publish frequently with Smashwords, it’s a smart investment because you’ll gain better control over your ebook’s formatting and you’ll save yourself time. If you’re stubborn and want to use Open Office (a good free word processor popular with many Smashwords authors) or Apple Pages (also popular), you can still use the Style Guide if you’re careful to implement the intent of the instructions, though you should understand up front that you might be creating more work for yourself.
Step 1 - Make a Back Up
This goes without saying but I’ll say it anyway. Don’t make the formatting modifications below on your original document. Instead, open your final manuscript within Microsoft Word, and create a copy of it by going to File: Save As: and then enter a new file name, such as MySmashwordsMasterpiece, and save as a .doc file (the default in Word 2003 and earlier. In later versions, go to Save As: Word 97-2003). By making a backup, if you make any mistakes as you follow my advice you won’t screw up your original. Also make sure you’ve turned off Word’s “Track Changes” feature, also known as “markup mode.” This is what your book looks like in Markup Mode:

Back to top
Step 2 - Activate Word’s Show/Hide
Do this now, BEFORE you start formatting, otherwise you might as well blindfold your eyes. This is one of my favorite editing features in Word. The show/hide feature is designated by the “¶” mark in the toolbar (I’ve always thought of it as the “reverse P thingy,” but for you typography purists out there, you know it as a “pilcrow.”), as shown below.

The show/hide button helps you view the guts of your formatting
When clicked, it exposes your paragraph returns, extra spaces, tabs, field codes or strange formatting. It’s a great tool to help polish your document for the cleanest possible conversions. If it’s not in your toolbar, you can usually find it in Tools: Options: View and then under Formatting Marks click All.
Back to top
Step 3 - Turn off Word's AutoCorrect: AutoFormat As You Type and AutoFormat features
I’ve always found Word’s AutoCorrect and AutoFormat-As-You-Type to be Word’s most annoying features. If you have them engaged, Word will try to guess what type of formatting you want based on how you write the paragraph, how you manually format the paragraph, or by how you formatted something before it. If you upload a Word file to Smashwords with paragraphs formatted inconsistently, like some paragraphs formatted as “Body Text” and others formatted as “Normal Text,” the book will look horrible as an ebook. To turn off the features, in Word 2000 & 2003, go to “Tools”: “AutoCorrect,” then click on the “AutoFormat As You Type” tab and then uncheck most of the boxes, and then click on the “AutoFormat” tab and uncheck the four boxes under “Apply.”
The reason we want to turn off these AutoFormatting options is because later in the Style Guide, you’re going to try to simplify and normalize your text to prepare it for conversion. If you don’t turn off AutoFormatting, Word will cheerfully and automatically mess things up again as you make the corrections below.
![]() To
access the same screen in Word 2007, click on the round Microsoft
Office button (upper left) then click Word
Options,
then click Proofing,
then click the button at right for AutoCorrect
Options.
See the screen shot below, which is similar for most versions of
Word.
To
access the same screen in Word 2007, click on the round Microsoft
Office button (upper left) then click Word
Options,
then click Proofing,
then click the button at right for AutoCorrect
Options.
See the screen shot below, which is similar for most versions of
Word.

Back to top
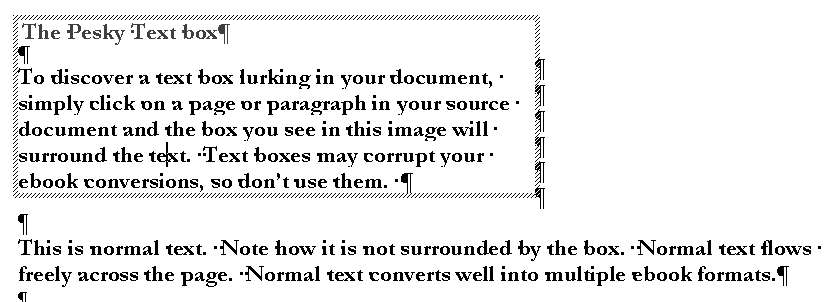
Step 4 - Eliminate Text Boxes
Text boxes can corrupt your formatting, and they’re often difficult to find. Unfortunately, Word doesn’t make it easy to find them. To learn if you have text boxes, from your Word menu choose View: Print Layout, then click on your pages and if the shaded dashy lines appear around your text, that’s a text box. Text boxes will corrupt your ebook conversions by inserting a paragraph return at the end of every line, or awkwardly shifting your text. Be sure to check your headers and footers, because you’ll often find text boxes hiding there, surrounding paragraph returns, or surrounding the auto-page-numbering. Remove them. We have seen instances where a simple auto-page-numbering textbox in the header will cause some file conversions to become corrupted.
Here’s a screenshot:
The most reliable method of eliminating text box is called the Nuclear Method, mentioned above, and described in greater detail in the next section below.
If you already suspect your formatting is screwed up, or if your manuscript originated from a PDF file, or if it has touched multiple word processors over the years, it’s not a bad idea to use the Nuclear Method now, because it gives you a fresh clean document. As you’ll see later when I discuss the topic of EPUBCHECK (an industry-standard validation your EPUB must pass in order for us to ship your book to Apple), the Nuclear Method is the last-resort solution to fix files that can’t pass EPUBCHECK. If you go Nuclear now, you won’t have to do it later.
Step 5 - THE NUCLEAR METHOD (HOW TO PURGE HIDDEN CORRUPTION)
Back to top
Your Microsoft Word document can become corrupted if it has been touched by multiple word processors, or if it originated in a program such as InDesign or WordPerfect, or if it originated in PDF and then was converted to Word.
The Nuclear Method purges all your formatting and allows you to start with a fresh Word document, free of hidden formatting or corrupted styling. The Nuclear Method is optional but recommended. Most formatting professionals on Mark’s List employ this method because it maximizes your odds of a good clean multi-format conversion.
The Nuclear Method is also recommended if previous versions of your manuscript failed to convert, or if you’re struggling with EPUBCHECK errors, text boxes or tables you can’t find, or if you suspect your book is corrupted.
First, make a backup of your manuscript (VERY IMPORTANT!) and set it aside in case the Nuclear Method fails you. Next, copy and paste your entire manuscript into Windows Notepad (usually found in Programs: Accessories) or any other text editor. This will strip out all your formatting. Close Microsoft Word. Then reopen Microsoft Word so it’s showing a fresh empty document. Next, in Notepad, type CTRL+A (press the CTRL key, hold it down, then press the A key at the same time) for “select all” then CTRL+C for “copy,” then paste into the empty Word document using either CTRL+V (for paste) or Edit: Paste (in Word 2000 and 2003) or Home: Paste (Word 2007). From here, reformat the book per the Style Guide. Remember to make sure you complete the previous steps, such as turning off “AutoFormat as you type” and “AutoCorrect as you type” covered above in Step 3.
***~~~***
Step 6 - Unify Manuscript around Normal Paragraph Style
In your raw Microsoft Word document, (especially if you didn’t use the Nuclear Method above) you probably have a mishmash of conflicting and inconsistent paragraph styles. You might have Normal paragraph style, or other paragraph styles such as Body Text, Plain Text, or multiple Heading styles. You probably don’t even know you’ve got these styles (often because of Word’s annoying habit mentioned above in Step 3 of changing your formatting to what Word thinks you want, rather than what you really want).
CHANGE EVERYTHING TO NORMAL PARAGRAPH STYLE: If you change your entire book the Normal paragraph style, right now, you’ll save yourself a lot of time and headache (you can add other styles back in later) and you’ll get a cleaner conversion.
***~~~***
Here’s quick sneak peek flash forward of where I’m taking you: You’ll change everything to Normal paragraph style, then you’ll modify Normal to define what you want it to define based on whether you want first line indents or the block method, then you’ll judiciously add in additional paragraph styles if necessary (such as maybe the Heading style for chapter headings), then you’ll add your bold and italics, then you’ll do clean up and then you’re done.
***~~~***
If you ignore the Normalization step, then you’ll receive complaints from customers that your font size and font style changes erratically from one paragraph to the next. Such inconsistent style usage can also prevent you from gaining access to the Premium Catalog, or, if your inconsistent styling slips past our reviewers, retailers will reject your book for the same reason.
![]()
To unify your text around the Normal paragraph style, in Microsoft Word press CTRL+A (press the CTRL key at the same time you press the “A” key, or choose Edit: Select All from the menu) to highlight all your text, and then select "Normal" from your option bar up above. This will allow you to standardize on a single font, single font size, the same line spacing, and the same text justification (we recommend left justified, a.k.a. “ragged right” by its detractors). Note that depending on your formatting, when you change the text to Normal you may lose some formatting (what was centered previously may become left justified or your italics may disappear, for example, as well as other changes, so be sure to carefully re-apply necessary elements later).
In Word 2007, if you're trying to make the pull down box pictured above appear in your Word 2007 menu, click the round Office button upper left, then click Word Options, then click Customize, then scroll down the left column and click "style," then click "Add" in the middle column and that will put in on your menu bar. Or, you can access via Step 7 below.
Although we recommend changing everything to Normal paragraph style at this step, you can still add additional styles later (in fact, we recommend you add additional styles later), and you can also modify the Normal paragraph style to reflect the font size, style and other paragraph characteristics you want (learn how in the next section!).
Back to top
Step 7 - Managing and Modifying Paragraph Styles, Fonts
Word comes with many pre-defined paragraph styles. You’ll see in this Style Guide we recommend you unify as much of your book as possible around the Normal style, at least to start, to minimize conflicts and complexity. Once you learn how to manage your Normal style (or any other style for that matter), you’ll gain much greater control over the quality of your ebook’s formatting. You’ll also save a lot of time and headache. For example, you can define special first line indents within your style, or you can define spacing around your paragraphs (more on this later in the section that follows).
You can even create your own custom paragraph styles. For example, it’s often a good idea to create a custom style you can apply to text or images you want centered. In Step 14a later, I’ll show you how to do this.
What You See is (not always) What You Get. Just because your manuscript on screen in Microsoft Word looks like it has a font of 12pt Times New Roman, the book may appear in some of the Smashwords ebook formats as 10 pt Courier or some other font (this happened to me with my own book, Boob Tube). How does this happen? The answer is in Word’s underlying paragraph styles. If Word thinks the default font size for the “Normal” paragraph style is 11pt Courier, even if you manually changed your document to be 12pt Times New Roman on screen, the book it passes on to Meatgrinder will be 11pt Courier if the underlying style defines Courier.
This has important ramifications. To control how your text behaves as an ebook, you want to learn to control your underlying definitions of your paragraph styles.
To ensure you pass to Smashwords what you intend to pass, follow these instructions: Within older version of Word (pre-Word 2007), click Format: Style, then on the left click “Normal” if it isn’t already highlighted. In the center pane of the window, under “character preview,” Word will show you sample text and tell you the default font style for “Normal” text. If it’s what you want, then you’re good. However, if it’s different (as it was in my case when I uploaded my novel), then click Format: Font: and then select the font and font size you want. We recommend Times New Roman. Don’t use exotic fonts because they will not translate well, and they could even cause your conversions to fail.
If you’re using Word 2007, click the Home tab, then click the little arrow under “Change Style” (see image below)

… then you’ll see…

… click Modify above, then the following will appear…

… click Format in the lower left, then click Paragraph to modify the paragraph style.
Back to top
Step 7a - Choose a Paragraph Separation Method: First Line Indent or Block Method
It's important you provide your readers visual cues to separate one paragraph from the next, otherwise paragraphs blend together and create a horrible reading experience. For the body of your book (everything after the title and copyright page), either use first line indents at the beginning of a paragraph, or use the block paragraph method. Don’t use both.
This Style Guide uses the block paragraph method, which is common for some non-fiction. The first line paragraph indent method is best for fiction and narrative non-fiction.
Don’t mix the two methods in the body of your book. For reference, pick up virtually any printed novel. Novels almost always use first line indented paragraphs, with no separation between one paragraph and the next. One paragraph ends on one line, then the next paragraph begins on the next line.
The image below further illustrates the difference between block and first line indent:

First line paragraph indents are preferable for fiction and also work well with a lot of narrative non-fiction. Block paragraphs work well for other non-fiction, especially if you’re managing multiple sections, or the layout is more complicated. DO NOT USE both first line indents and the block style. Use one or the other only. Yes, I know I’m repeating myself here (it’s one of the most common errors our authors make).
Also, avoid separating blocks of paragraphs using a paragraph return on an empty line. Instead, modify your paragraph style to define a trailing space. The next few sections below, along with their accompanying images, will help you learn how to modify your paragraph style to define a trailing space after each block paragraph
Back to top
Step 7b - How to Implement Your Chosen Paragraph Separation Method (First Line Indent or Block)
If you use Word 2000 or 2003, click Modify: Format: Paragraph, and then view the contents (see example below). Make sure the numbers under both left and right “indentation” are set to 0”.
For Word 2007, click the Home tab, then click the little arrow, as shown in Step 7 above, then click the down arrow for Normal style (assuming you’re using the Normal style for your body, as we recommend), then click Modify, then click Format in the lower left corner, then click Paragraph.
Back to top
Step 7b-a - HOW TO DEFINE A PROPER FIRST LINE INDENT
Once you’re at the screen to modify your paragraph style (this screen is essentially the same for all versions of Word), you can define a first line paragraph indent for the body of your book by selecting Special: First line: By: [enter .25 or .3 inch. Don’t do indents greater than .5 inch]. Make sure the Spacing section, marked by the red oval below, doesn’t define a Before or After space. They should be set to 0pt. Once your settings match the image below, click OK then Apply.

After you apply first line indents to the entire document, review your document to clean up any anomalies. If you apply the indent to the entire book, be sure to go back to your title and copyright page and remove the first line indents and then center the text for a good-looking title/copyright page. You may also need to manually remove the first line indent from other paragraphs or lines that don’t need them, such as chapter headings.
Kindle tip: The Amazon Kindle and its associated apps (Kindle for PC, Kindle for Mac) automatically insert a preceding first line indent, even on block paragraphs. If you want to enforce the block method across all formats and devices, including the Kindle, define a first line indent under “Special” above of 0.01”. The indent will be imperceptible to most eyes, and it should prevent Kindle and its apps from inserting the first line indent where you don’t want it.
Back to top
7b-b - HOW TO DEFINE TRAILING “AFTER” SPACE FOR BLOCK PARAGRAPH METHOD
Reminder: Do not follow this step if you already created a proper first line indent in step 7b-a above. Under “Spacing,” set the “after” spacing to 6pt or 10pt. For plays, scripts and screenplays, 4pt is pretty good. We generally don’t recommend less than 4pt or more than 10pt. Then click OK and then APPLY (or, OK for Word 2007)

Back to top
Step 7b-c - SPECIAL TIPS FOR POETRY, COOKBOOKS AND LEARNING MATERIALS
As we mention elsewhere in this guide, we recommend you don’t use paragraph returns on empty lines to create separation between two paragraphs. However, this isn’t a hard and fast universal rule, and there are times when exceptions make sense. For example, poetry has some special requirements. With poetry, you want your stanzas tight, yet you need each poem separate from the next. If you code your Normal paragraph style to define a trailing “after” space, the poem won’t look right.
Other content categories that might benefit from this exception include learning materials, such as the multiple choice example below, or cookbooks.
For poetry and non-fiction that require this more complex layout, below are two options for your consideration (IMPORTANT: You need to have Word’s Show/Hide feature activated so you can implement this formatting):
1. You can use paragraph returns (don't code them for trailing space. Instead, code them for single spaced lines).

The poem above uses simple paragraph returns at the end of each line, with the paragraph style coded for no trailing space.
2. Use manual line feeds plus a paragraph return coded for a trailing "after" space. This option is a little more complicated, but will get you great results. To create a manual line feed, click Shift and Enter at the same time. A manual line feed creates a line break without invoking the styling of your paragraph style, which in the example below is coded for a trailing 10pt space after each paragraph return. Note how only the question and the last answer have their lines terminated with a paragraph return (created by hitting the Enter key). Use this trick for poetry as well.

Back to top
7b-d - HOW TO DEFINE PROPER LINE SPACING
See how the line spacing in the image above in 7b-b is set to single and the “At:” field is blank? This is good. Line spacing of 1.5 is also acceptable. Don’t set it to double (will make your book look ugly), and NEVER NEVER NEVER set it to read “Exactly” or “At Least” followed by a point size specification under the “At:” box.
Line spacing of “at least at” or “exactly at” will usually render your book unreadable because it can cause lines to overlap on top of one another, or prevent an e-reading devices font size customization to work. The error is most commonly introduced when you use a word processor other than Microsoft Word (such as Open Office). More on the next item below on line spacing error.
AVOID THIS COMMON LINE SPACING ERROR: The image below shows an example of a common line spacing error mentioned above that will cause your sentences to overlap and become unreadable. Whether you use the first line indent method or the block method, make sure the “Line Spacing” is set to “Single” or “1.5” and under the “At:” heading it should always remain blank. As I mentioned in the paragraph above, NEVER NEVER allow any entry into the “At:” field, otherwise your book may become unreadable in the HTML reader and in the EPUB. If this error slips through our review process, retailers will remove your book when their customers complain. To determine if this error might be affecting your document, right mouse click on any paragraph, click Paragraph, and then you’ll see the box below. As mentioned above, this error is most commonly caused when you create your manuscript in a program other than Microsoft Word, and then the non-Word program fails to convert the file into a proper Word .doc.

Back to top
Step 8 - Check Your Normalized Text
After you have successfully changed everything to Normal paragraph style above, and you coded your Normal paragraph style for either first line indent or block, you'll need to go through and re-check the formatting. Some items may have shifted because of the steps above. Bolds may disappear, centered items may become left justified, font sizes may have changed, and spaces between paragraphs may have disappeared. Just go back and fix, but make sure everything is Normal paragraph style and make the font sizes, line spacing and text justification consistent. If you find you change the text and suddenly Word labels it something other than Normal style, then it means you didn’t successfully disable Word’s nasty auto-format features above in Step 3.
Back to top
Step 9 – Why you Should Never Use Tabs or the Space Bar to Create Indented Paragraphs
An indent is the space in front of the first line of every paragraph. As I mentioned earlier in this Guide, indents serve as an important visual cue to help guide the reader’s eye from one paragraph to the next. If you use tabs (created by hitting the Tab key) or space bar spaces (created by hitting your space bar) instead of a proper first line indent, you’ll generate an AutoVetter error and our HTML and Javascript online readers will automatically remove the leading spaces or tabs from your text, thereby causing the indent to disappear. To create a proper first line indent, follow the section above on How to Create a First Line Paragraph Indent. NEVER NEVER use tabs or space bar spaces. Always make sure you have “show/hide” activated, per instructions above, otherwise you won’t see these tabs and spaces. The image below will help you spot them.
-----------------------------------

-----------------------------------
How to automate the removal of tabs and spaces - If you try to manually remove, one by one, the tabs and space bar spaces that comprise your improper indents, it can take hours and you’ll make mistakes. Luckily, Word’s search-and-replace feature takes mere seconds (see image below). If you used tabs, press CTRL+H (hold down the CTRL key and the H key at the same time) to "find and replace,” or from the menu select Edit: Replace. Then for the “find what” line enter ^t (the “caret t” is the symbol for tab) and then in the Replace space don't enter anything (If instead of tabs you have multiple spaces, then determine the number of spaces you use, then click your mouse to the “find what” field, and hit your space bar by the same number of spaces you’re currently (improperly) using for your indents, and then hit “replace all”).

To eliminate all your tabs, enter ^t in “find what” and in the “replace with” line, leave it blank.
Then click the “Replace All” button. After you zap all your tabs, remember to modify your Normal paragraph style to define a “Special First Line Indent.” .2” or .3 inch is a good indent. Don’t go more than ½ inch.
Back to top
Step 10 - Managing Paragraph Returns
Make sure you only have paragraph returns at the end of a paragraph, not at the end of each sentence or every line (unless of course you’re doing poetry). A paragraph return, created by hitting the “Enter” key on your keyboard, tells the reading device it’s the end of the paragraph. They look like this: “¶” you have Show/Hide activated (see Step 2 above). If you do not have the show/hide feature activated now, stop what you’re doing and activate it, otherwise you’re editing blind.
Do not use multiple consecutive paragraph returns to force page breaks or to arrange text on the screen, because they’ll create a poor reading experience by creating blank pages or unsightly gaps in small-screened e-reading devices. They will also disqualify your book from distribution in the Premium Catalog. Never use more than four consecutive paragraph returns at a time to arrange text on the page.

Back to top
Step 11 - Managing Hyperlinks
Hyperlinks can point outside your book, like to a web address, or inside your book, using the bookmark feature (more on this later when I show you how to create a hyperlinked Table of Contents!). Web addresses become clickable hyperlinks in our HTML and Javascript readers, and in our EPUB, MOBI and PDF versions.
Use hyperlinks judiciously. If your book contains too many hyperlinks, the hyperlinks can backfire by becoming landmines if the reader accidentally touches them. This is especially true with mobile devices such as the iPhone or iPad, where the reader is most likely to scroll through pages by swiping the screen with their finger.
Also, short attention spans are common on the Internet, so if you give your reader too many chances to slip out of your story and read something else, you’ll lose them.
To place a proper external hyperlink within Microsoft Word, highlight the text you want to hyperlink, then right mouse click on the highlighted text, then click hyperlink, then enter a full web address such as http://www.smashwords.com. Be sure to include the http:// portion, otherwise your hyperlink won’t work and it’ll cause errors in EPUBCHECK (more on that later). After you add a link, click on it to test it.
To place an internal hyperlink to a bookmark, after you highlight the text and right mouse click and select hyperlink, select the “Place in this Document” option that will appear on the left pane of Word’s window.
NO AFFILIATE LINKS: If your hyperlinks link to affiliate marketing pages (common in “get rich quick” books), we will delete your account without warning because this is a violation of our Terms of Service.
Back to top
Step 12 - Designating Chapter Breaks, Page Breaks and Section Breaks
If you insert page breaks into your Word document (Insert: Break: [choose one]), the PDF and .RTF versions will honor them, but these commands will be lost in most other formats, which strip page breaks and section breaks. Loss of page breaks is okay in an ebook, because you can’t predict the font size or screen size the reader is using, and you want to have continuous reflowable text anyway. The worst thing that will happen is paragraphs may become artificially close or too separated.
If you use page breaks, be sure to enter a paragraph return or two before and after the break so that if your manually-inserted break disappears in some formats, your paragraphs don’t smash together.
Remove all section breaks from your document. For some reason, they create unnecessary blank space in your ebook.
If you want to separate chapters, insert a consistent number of paragraph returns (maybe three or four), or use a combination of a couple paragraph returns, followed by centered text characters such as “~~~~” or “* * * *” followed by a couple more paragraph returns and possibly chapter headings if you have them. Do not use solid separator bars.
The general rule for formatting is “simpler is better.” DO NOT use a long series (more than four) paragraph returns anywhere in your book to try to arrange words on a page, or to designate page breaks, because not only will this cause your book to be rejected from the Premium Catalog, it’ll also create a lot of awful looking blank space in your ebook. Many ebook reading devices such as the Kindle and iPad will add extra padding after each paragraph return, so if you add multiple paragraph returns this can create excessive spacing between paragraphs.
Back to top
Step 13 - Working with Images
If you have images, they should be embedded in your Word file with the Insert: Picture: As File option. If the images are critical to your book, then when you publish your book uncheck the checkbox ebook option for “Plain Text” because photos and charts don’t translate into plain text. If the images are a nice-to-have but not a need-to-have, then go ahead and allow the Plain Text option.
You can insert .JPEG or .PNG images. We find that .PNG works best.
File Upload Limit, 5MB. The source .doc file you upload must be less than 5 megabytes in size. To determine your file size, right mouse click on your Word .doc file and click properties. If your file is greater than 5MB, users of Word 2003 and later can use Word’s awesome Compress feature, which will dramatically reduce the file size without visibly harming quality. Simply right-mouse click on an image, click Format Picture, and then click the Compress button. Next, click the All pictures in document radio button, then click Web/Screen (selects the 96dpi compression), then click OK.
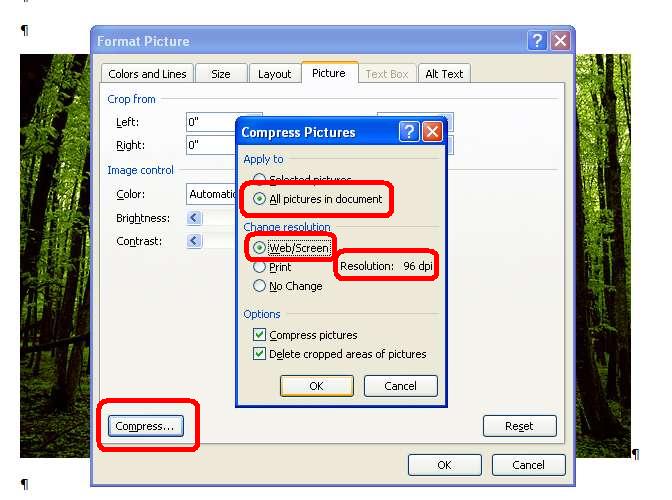
High resolution images? If your images are high resolution or print quality, this high resolution will be lost on e-reading screens because screens don’t support print resolution. When you downgrade to 96 dpi, you won’t visibly harm quality and you’ll create an ebook that downloads faster.
Resizing images: If you reduce the dimensions of an image by clicking the corner and dragging it inward, some ebook file outputs will respect the new dimensions, though Kindle may not. If this is an issue in your testing, resize the images before you import them into the Word .doc.
No floating images: Do not use floating images (if you can click on the image and drag it, it’s floating) because your image may appear in unpredictable places after the conversion. To anchor floating images, right mouse click on the image, then click Format Picture, then click Layout, then click In Line With Text, then click save, then click Word’s center button.
Images with embedded text: Avoid embedding text within the image, as is common with some children’s picture books. It’s best to remove text and place outside the image as reflowable text. This ensures that readers can resize the text to meet their reading preferences, and it also ensures that the text is readable and reflowable across all screen sizes.
Cover image inside Word .doc?: It’s not necessary to insert your cover image into the Word .doc. Meatgrinder automatically inserts your cover image into your .epub and .mobi files, so if you already insert the cover image it’ll cause the cover to appear twice in these file formats. For more instructions regarding cover images, see Step 23 later in this guide.
Open Office users only: Open Office users often have trouble with images, because OO defaults to floating. If you’re an Open Office user, try entering a paragraph return on a blank line where you want the image to appear, and then click in front of the paragraph return and go to Insert: Picture: From File, then select the image to import it, then right mouse click on the image in Open Office, then select Anchor: As Character, then click your mouse to the right of the image, then click OO’s center button to center the image.
We’ve also found that images work best if you keep their dimensions small. If your current image runs the length of a 6 inch wide page, it may not display properly on the smaller screens of some ereading devices. Restrict interior images to widths of around 500 pixels or less. Before you import images into your manuscript, use a photo editing tool such as Photoshop or a free utility such as Paint.net at http://www.getpaint.net/ or Picasa by Google at http://picasa.google.com, to reduce the dimensions and file size. If you insert an image that reaches beyond the left or right perimeter of your page margins, it may cause some of your conversions to fail, or your image may not display properly. Also be sure to remove first line indents on images, because the first line indent could cause your image to shift off of the page.
If you want a page break inserted before an image, try clicking on the image and coding it as a Heading style. This should insert a page break in EPUB and MOBI.
If you try to upload a 15 megabyte manuscript to Smashwords because you didn’t reduce the image sizes, Meatgrinder will not accept your book for conversion and you’ll receive an error message. Compress your images first.
Step 14 - Text Justification
I’ve found that text converts most cleanly if it’s all left justified. Centered text works well, especially for your title and copyright page. I don’t recommend using Word’s “Justify” command, which attempts to spread your words evenly from margin to margin without leaving spaces at the end of each line. The PDF conversion can sometimes look odd for justified text. If you love justified text, then go ahead and try it - the results may still be acceptable to you.
Back to top
Step 14a - Centering Text
You may notice that even after you use Word’s button to center text, such as the title and copyright page, or *** separators, the RTF conversion doesn’t preserve the centering. Here’s how to force it to stick: Try creating a new custom paragraph style, based on Normal, that defines centering. That’s how Brian S. Pratt [the formatting example above] managed to keep their title pages centered).
Here’s how to create a custom paragraph style. Option 1. If you have the Style box in your main Word ribbon, then click the down arrow, then click Add.

Option 2. In newer versions of Word, click Home: then under the “Change Styles” option, click the sideways down arrow.
… then in the lower left of the next screen,click the “AA” symbol

… After you do Option 1 or 2 above, the following screen appears. …

Give your custom style a name, such as “Centered”. Note that the style is based on “Normal”. This mean the style will inherit the default definitions of Normal unless you specify otherwise. Then click Word’s center button to define centered, and then click the box for “Automatically Update” if you want the changes you later make on screen to automatically modify the underlying paragraph style for usage of this style in your manuscript. Click OK when you’re finish. Later, to apply the style, simply highlight the text you want centered, and then select the style from either the style box in your menu.
Back to top
Step 15 - Managing Font Sizes
Minimize font size variation in your book, otherwise your book can look ugly. Some of the best-looking books on Smashwords use 12pt for the body and 14pt for the book title on the cover page, and for headings. If you must use different font sizes, minimize the range of their variance. For example, if your Normal paragraph style defines 12 point, don’t use a 20 point header. We recommend you keep your largest font size to 14. Frequent and/or dramatic font size variations are jarring to your reader’s eye and can reduce readership, because each time you change the font size their eye must refocus. Dramatic variations in font sizes can also cause unwelcome glitches in some of the conversions, such as causing the large point text to bleed onto the smaller point text. Most of our ebook formats support multiple font sizes, but our Javascript online reader makes everything the same font size (though it has other great online reading qualities so you’ll want to offer it to your readers).
Back to top
Step 16 - Style Formatting, Symbols and Glyphs
Italics,
underlines,
and strikethroughs
work well. Some symbols (such as é î ® © Ω ∑) may translate,
but test your book in EPUB to ensure they work properly. Rather than
using the © (circled c for copyright), just use the word
‘copyright’, because some e-reading devices and formats will turn
it into a question mark. As a general practice, avoid symbols
(created by “INSERT: SYMBOL”) because they may turn into question
marks in some ebook formats. If you observe what appears to be empty
vertical rectangle boxes in your Word file when you have Show/Hide
activated, this is often a form of corruption caused by bad
conversions from one word processor to another. Delete them,
otherwise these characters may turn into question marks.
![]()
Glyphs are little graphical touches used to separate sections of the book. Let’s say I like pigeons (because I do), and I’m writing a book about their amazing ability to find their way home. I might decide to separate my sections with a glyph of a pigeon (above, below).
If you decide to upgrade your book with glyphs, choose an image that fits the theme of your book. If you’re writing epic fantasy, it might be an image of a magical battle ax. Glyphs work best as small, simple black images or simple uniform illustrations. Use Word’s Insert: Picture: From File option to import your image. Use your custom centered paragraph style to ensure proper placement. Don’t go overboard with glyphs because you run the risk of ruining a perfectly good ebook. If your glyph distracts from the story, you’re overdoing it.
Back to top
Step 17 - Headers and Footers
These generally remain in the PDF and RTF versions but disappear in the other versions. We recommend you remove headers and footers. Definitely remove auto-page numbering because it can trigger a text-box error.
Step 18 - Margins, Page Sizes and Indents
Try to format your book to adhere to Word’s standard margins for printing, otherwise your PDF and RTF files won’t print well or present well on screen. Authors often ask if they should format for American-style pages (8.5 X11 inch) or A4. About 60% of Smashwords customers are American, so it’s really up to you.
HOW TO FIX WACKY INDENTS: If your indents are pulled too far to the left or right, it will cause your text to flow off the page and become unreadable in some e-reading devices. It helps to have your ruler bar activated to detect this problem. To fix, do a CTRL+A on your entire document, then right mouse click on Paragraph, then set the Left: and Right: Indentation to 0”.

Back to top
Step 19 - Add the Heading Style to Your Chapter Headings (Optional)
Word offers various Heading styles, usually for use with the start of chapters or sections. Some of our ebook formats such as EPUB and MOBI will automatically insert a page break before each Heading, which is a nice touch because it allows your chapter to start at the top of the page on the e-reading device.
Warnings! Be careful with the Heading style, though, because if you use it too often or in the wrong place, the beneficial page breaks I mentioned above will become an annoying formatting error that makes your book difficult to read because it’ll create one line pages (annoying). Only apply the Heading style to a single sentence, and NEVER across more than two paragraph returns in a row, otherwise you’ll have one paragraph per page (Bad). Also don’t use the Heading style for body copy, or for your front matter or table of contents at the top of the book.
Are Heading Styles for You? As mentioned in the heading for this step, the Heading Style is optional. One advantage of using a specially defined paragraph style is that it gives you more control over the look of the text. For example, your Normal paragraph style might define 12pt Times New Roman, but maybe you want your headings to be 14pt Helvetica Bold Italicsand centered. Although you could manually alter each Normal heading to reflect the formatting you want, it’s time consuming, and also prone to error if you forget to implement everything consistently. By defining each heading with the Heading style, you can automatically apply the style to that heading, and then if you decide you want to change the style later, you can do it just once and it’ll update all your headings.
How to Implement Headings: To implement, highlight your chapter headings and then select a heading style, such as Heading 2. This can make ToC-building easier in step 20 below. If you want to modify your Heading to have different characteristics, such as a different font size, or alignment, see Step 7above which shows you how to modify your paragraph styles.
Back to top
Step 20 - BUILDING NAVIGATION INTO YOUR MANUSCRIPT
Smashwords makes it easy to build navigational elements into your manuscript so your book becomes more accessible and more valuable to readers. I’ll review three primary navigation elements in this step: the NCX file, the linked Table of Contents (ToC) and Non-ToC intra-book links (Footnotes/Endnotes/other).
Step 20a - Creating the NCX File
NCX stands for NCfile for X. I like to think of the NCX as a meta-ToC, since the file and the navigation actually reside outside the book, but point back into the book (What you know as an EPUB file is really a zipped combination of multiple files of which the .NCX is only one).
A well-formed NCX file adds useful navigation for your reader. Kobo requires a working, two-part NCX. Apple also prefers an NCX, especially for books with multiple chapters, headings or sections. Your readers, regardless of e-reading device, will appreciate a good NCX.
You have three options for creating an NCX at Smashwords:
1. If you name your chapters starting with the word “Chapter,” Meatgrinder will automatically detect the word and build NCX navigation links into your EPUB file. See the screen shot below.

Simply by preceding your Chapter headings with the Word “Chapter,” Smashwords will generate useful navigation for your EPUB file
The book above is Raven Memory(a well-formatted book, by the way) from Smashwords author David G. Shrock, and the screen shot shows his book in Adobe Digital Editions, a popular and free e-reading app I encourage you to download so you can test your own EPUB files (Get it at http://www.adobe.com/products/digitaleditions).
On the left side of ADE’s screen above, you can see the automatically created table of contents (the NCX). Mr. Shrock used the Normal paragraph style and centered it for his chapter heading. Although he didn’t do it in this example, he could have easily named his chapter something such as, Chapter 2: The Joys of Ebook Formattingand this (more descriptive) text string would have appeared in the NCX file instead.
2. Your second option is to create a linked Table of Contents (Step 20b below). This is actually my favorite option, because it gives you greater control over the NCX entries. If you create a linked Table of Contents, then Meatgrinder will use the linked ToC to automatically guide its generation of your NCX. This is a good option if “Chapter” designations don’t work for your book. See the step 20b below to understand if the linked ToC is right for you, and how it’s different from the .NCX.
3. If Meatgrinder determines it cannot build you a working two-item NCX using one of the two methods above, then Meatgrinder will automatically create a two-item NCX for you. The first item on the NCX will be labeled the title of your book, and will point to the first line at the top of your book. The second item will be labeled “Midpoint,” and this will point to the approximate halfway point in your book. This third option, which was introduced the second week of May, 2011, was implemented to satisfy Kobo’s requirement for a two-part NCX.
Step 20b - Creating a Hyperlinked Table of Contents
A Table of Contents (ToC) makes it easy for your reader to see, at-a-glance, the major chapters and sections of your book. You will manually build your ToC inside your manuscript immediately following your title/copyright page and immediate preceding the start of your book. As mentioned in the preceding section, your linked ToC will assist Meatgrinder when it automatically generates your NCX.
Once you make your ToC a Linked Table of Contents, readers can click the links and jump straight to the linked section. This is a cool feature of ebooks not possible in print books.
Before you begin:
1. If you already have a ToC, make sure it doesn’t have page number references. Page numbers are irrelevant to ebooks because the page count of your book will change based on the size of the screen, the size of the font the reader selects, or even how the reader holds their ereading device (on the iPhone, for example, a book might be 200 pages in portrait mode [holding vertically] and 350 pages if they hold the phone horizontally in landscape mode).
2. For your Smashwords ToC, you’ll use the Insert: Bookmark feature, and the Insert: Hyperlink feature. Warning: Make sure you didn’t previously build your ToC using Word’s auto-ToC generation feature, found in Word 2007 at References: Table of Contents, because it utilizes field codes and that’s not the right approach.
Do you need a linked Table of Contents? Most books can benefit from a linked ToC. If you write non-fiction, then yes, you should probably do a linked Table of Contents, especially if your book is organized into named chapters or sections. By adding a linked ToC, you make it easy for readers to navigate to different parts of the book.
Fiction can benefit from linked ToCs, especially if you have named chapters or sections, or if you’re publishing a collection of short stories (link to each story), or if you have sections at the end of the book such as “About [Your Author Name],” “Connect with [Your Author Name],” or “Other Books by [Your Author Name]” (we recommend your book include these sections because they offer you powerful marketing benefit). However, if your chapters are only labeled, “Chapter 1, Chapter 2, Chapter XX” and you don’t have additional sections at the end, then there’s little need for a ToC inside your book. In this case, let Meatgrinder automatically generate the NCX from your “Chapter X..” headings.
Understanding Meatgrinder’s TOC Generation: Between October and December, 2010, and then again during May and June, 2011, Smashwords made a series of exciting enhancements to the Meatgrinder ebook conversion engine that allows it to automatically detect linked Tables of Contents for our EPUB and MOBI files. If you build your own linked ToC in your book, Meatgrinder will detect it and use it instead of its auto-generated ToC. This provides you increased control over the contents of the NCX and the internal ToC.
If you follow the instructions below, your linked ToC will work in our most important formats of EPUB, MOBI and PDF. Linked TOCs of any form don’t work in our other formats such as the online HTML and Javascript readers, and of course it won’t work in our .txt files either.
Planning your ToC: If your book has dozens or even hundreds of individual sections, avoid the inclination to link to every single item. A ToC with too many items creates a dizzying experience for your reader. Sometimes, less is more. Consider linking only to major section headings. Also consider how the reader will read your book. Fiction is read serially, from word one forward. Although an NCX listing chapter numbers is moderately useful, consider adding other worthwhile links pointing to the end of the book such as “About the author,” “Other Books by this Author,” or “Endnotes.” If you’re including free sample chapters of your other books at the end of this book (often a good idea), link to the start of your free sample from your Linked ToC.
How to create a linked Table of Contents.
First, create your table of contents where you want it by typing it out. The ToC goes at the start of your book, immediately following your title and copyright pages, and preceding the start of your prologue, preface or first chapter. As you type out your ToC items, make sure your text is in the Normal paragraph style, just like the rest of your Smashwords document. DO NOT create your ToC in Heading style. Avoid adding empty paragraph returns between the lines to build separation between the TOC items, and only add items you intend to hyperlink.
Here’s what your ToC might look like:

You can left-justify it (as I did above) or center it using Word’s center button (or better yet, follow the instructions in Step 14A to apply a custom paragraph style that defines centering). Never indent your ToC more than one inch.
Next, we are going to use Word’s Insert: Bookmark feature.
Think of the bookmark as your target – it’s what you want to link to. It’s the destination for the reader after they click the link in your ToC.
Later, after you add each bookmark you’ll link to it from somewhere else, and in this case that “somewhere else” is most likely the Table of Contents listing at the top of your book.
So, to review where I’m taking you here, first you’ll tag the chapter or section headings in your body as Bookmarks, and next you’ll return to your ToC and add the links to the bookmarks.
ADDING BOOKMARKS:
If prior to starting your ToC-linking adventure, you changed your chapter and section headings to one of the Heading paragraph styles, such as Heading 2, then these headings will probably appear as bookmarks with names starting with an underscore such as “_xxx” when you go to select a target during the hyperlinking process. Do not link to Word’s auto-generated Heading bookmarks. It’s better to create your own Bookmarks.
In Word 2000, 2003 and 2007 and later, the Bookmark function is under the Insert tab. Go through your document, and at each Chapter Start or section heading, you will highlight the words and then select Insert: Bookmark. Make sure you have show/hide activated so you can accurately apply the bookmark. As mentioned above, DO NOT place the bookmark above or below the target, and NEVER apply a single bookmark across multiple paragraphs.
Name your bookmark corresponding to the Chapter/Indexed item and then click add. Use the first word of your heading or section you’re linking to, because later on, when you add the hyperlinks to these bookmark targets, Word displays the bookmark shortcuts in alphabetical order.
Bookmark names cannot have spaces or odd characters. Use only alphanumeric characters (the letters a-z or the numbers 0-9).
With my bookmarks, I found I didn’t label them properly the first time, so it was tough to link to the correct bookmark. If you want to link to a chapter named How to Publish Ebooks, I’d recommend naming your bookmark something like “HowToPublishEbooks” or “How_To_Publish_Ebooks” to make it easy to locate. If you instead name it, “ebooks,” you’ll frazzle your brain and make mistakes, especially if you’re linking to a lot of bookmarks.
Repeat the process above for every Chapter heading or major section in your body as well as for other matter in the book like index, bibliography, epilogue, prologue, etc. I didn’t link to every section in the Style Guide, because otherwise the ToC would have been three pages long. This is your call.
Next, return to your table of contents at the top of your book and highlight the phrase “Table of Contents.” Click Insert, Bookmark, and label this last bookmark something like “ref_TOC” (by preceding the bookmark name with “ref_” you’ll help prevent Meatgrinder from duplicate NCX items). This will allow you to link all your Chapter headings in the body of your book back up to the top of the Table of Contents. DO NOT highlight your phrase, “Table of Contents” and link it to the bookmark of itself. This can cause problems, and it’s not necessary because there’s no value for the reader to link to where they’re already at.
LINKING TO BOOKMARKS (AKA “Targeting your bookmarks)
Next, you will create your hyperlinked ToC by linking your ToC items to your target bookmarks. Highlight the text of your ToC item, such as “Chapter Five: My Amazing Formatting Journey,” then right mouse click, click Hyperlink, then in Word’s Hyperlink menu on the left hand side, click “Place in this document.” You will now see your bookmarks listed in the main window. Remember, if you applied Word’s Heading paragraph style earlier, it will present you Word’s auto-generated bookmarks, which usually begin with an underline, such a “_X…” Don’t link to those.
Select your bookmark and then click ok. Repeat this procedure for every bookmarked chapter or item in the ToC for which you want to create a clickable link.
Tips: 1. All items in your TOC should be hyperlinked. 2. The text string you select and hyperlink in the ToC is the same text string that will appear in your NCX.
LINKING BODY PARTS BACK UP TO THE TOP
Now you can link your chapter and section headings in your body back up to the table of contents. This makes it easy for the reader to jump back up to the top of book.
Some authors prefer to link the text their chapter or section headings (such as “Chapter 6: How the Style Guide Made Me a Super Fabulous Formatter”) back up to the ToC. Other authors prefer to insert other text as their linkable item, such as, “back to top.” I chose the latter option for the Style Guide because the text string clearly tells the reader what will happen if they click the link. The former, however, is faster and simpler and more common.
Here are the steps to link back up to the ToC:
1. From your ToC, click on the link to jump to your chapter or section heading target. In Word 2000, you just click, but in later versions you must press on the CTRL key at the same time you click the hyperlink.
2. After you click from your ToC to the target item’s bookmark, highlight the text of item with your mouse (remember, don’t allow your highlight to span across multiple paragraphs. You want to highlight only a single word or phrase, whatever you want to appear like a clickable item).
3. Next, click Insert: Hyperlink, and then select “Place in this document.”
4. The bookmarks will appear in the main window. Select the bookmark labeled “ref_TOC,” assuming that’s what you named your Table of Contents in the step above.
5. Repeat the above for each and every location where you want to provide the reader a clickable path back up to the ToC.
Step 20c – Advanced Bookmarking: Footnotes, Endnotes and other Intra-book links
You can link any part of your book to any bookmark. Above, I showed you how to link from your ToC down to your target bookmarks in the body of your book. In this section, I’ll show you how to create other types of “intra-book” hyperlinks.
Warning: If you don’t name the bookmarks properly you can corrupt your NCX. This section will show you how to do intra-book links the right way.
Intra-book hyperlinks makes it possible to link between sections, or to manually create linked footnotes, endnotes or indexes, or to create “name your own adventure” books where the reader decides what happens next in the story. Don’t go overboard with bookmarks and internal hyperlinks. If you place too many links in your book, they can act like landmines if the reader accidentally touches them.
As mentioned earlier, when Meatgrinder sees hyperlinked text in your linked ToC, it places the highlighted text in your NCX file, and this what your reader will see when they view your NCX. However, if you create non-ToC intra-book links within your book, such as footnotes/endnotes in the body hyperlinked to down your footnotes/endnotes sections, Meatgrinder may misinterpret that link as something you want added to your NCX file (and you don’t want footnotes/endnotes and other non-TOC links showing up in your NCX). To prevent your NCX from picking up these elements, you can neuter the bookmark by starting the name of your bookmarks with “ref_” (remove the “ “ marks).
So, for example, let’s say your have several endnote references, and they link to endnote bookmarks named 1, 2, 3, 4, etc. By renaming the endnote bookmarks to ref_1, ref_2, etc, Meatgrinder will know to not to slurp the link into the NCX. Your endnotes or bibliography at the end of your book may also hyperlink back up to the origin of the referenced footnote/endnote, so be sure to name those bookmarks starting with “ref_” as well.
Bottom line, if you don’t want your NCX to include a link pointing to a specific bookmark, then neuter the bookmark by starting it with the “ref_” name.
In the ToC-building section above, I recommended naming your Table of Contents bookmark as ref_TOC. Why? We’ve noticed that in some instances, Meatgrinder will create corrupted NCX files that include duplicate NCX entries at the end of the NCX. In some cases, if your Table of Contents bookmark starts with ref_ it’ll prevent this problem.
Step 20d – Testing and Troubleshooting Linked ToCs and links
TESTING: WALKING THE WALK WITH YOUR TOC
After you finish the links, all your links will be underlined. Carefully test every link in your book to make sure they’re operating properly. As I mentioned above, in some old versions of Word you can just click your mouse on the link, and in other versions you press the CTRL key at the same time you click.
There are two good methods of testing:
1. Click on each linked item in your ToC. Does it go to the proper destination? If it jumps you to the top of your book and not to your Table of Contents, it means you’re not linking to a valid bookmark. Make sure it doesn’t link you above or below the target destination.
2. Click Insert: Bookmark, and the Bookmark window will appear. Click on a Bookmark item, then click GoTo. This is a fast method of ensuring your bookmarks go to the right destination and that they DO NOT span multiple paragraphs (make sure you have show/hide activated).
REMOVE HIDDEN BOOKMARKS
After you’ve completed your testing, do this step last. Word has the bad habit of inserting “Hidden” bookmarks into your document, and in some cases these hidden bookmarks can corrupt your NCX. Once you’re finished hyperlinking the guts of your book, and testing the accuracy of your links, check for and delete hidden bookmarks. To find them, click Insert: Bookmark, then try clicking and unclicking the checkbox beside “Hidden Bookmarks.” Hidden bookmarks start with an underline, such as, “_Hlt29XXXX” Click the name of the hidden bookmark, which always look like gibberish, then click the Delete button at right. See screen shot below.

Final Tips and Reminders:
Warning: After you create your bookmarks and link to them, if you edit the names of the bookmarks, or edit the linked text, you might damage the viability of your links (I made this mistake multiple times in earlier Style Guide revisions!). Even if the links work in your Word document, they may not work in the final ebook. If you discover this to be the case after you publish, then you may need to remove all your intra-document hyperlinks, delete your bookmarks, and then recreate the bookmarks and retarget your links to the bookmarks.
Troubleshooting Reminders: Did you delete your hidden bookmarks as your last step? If you click Insert: Bookmark to open the window above, and you click a link at left and then click “Go To” on the right, does it take you to the proper destination? Does it show your bookmark appropriately applied to only the target phrase, and not overlapping to paragraphs above or below?
Reminder: Word has an automatic ToC generation feature under the reference tab that uses field codes. Do not use this. It uses automated headings and formatting to generate the ToC and this will un-normalize your text and cause font conversion issues in your Smashwords files.
Tip: Just because your links work in your document doesn’t mean they’ll work in your ebook outputs. Be sure to test your EPUB version after you publish (use Adobe Digital Editions. Download it for free at www.adobe.com/products/digitaleditions/ .
Kudos: My thanks to Smashwords author Cheryl Anne Gardner for conducting the initial research which served as the foundation for our section above on how to create a Linked Table of Contents.
Back to top
Step 21 - Front Matter (Important!!!)
Front matter is stuff that goes on the first and second page of your book.
Step 21a - Blurbs (optional)
Note: Front-of-the-book blurbs (testimonials) are not required for inclusion in the Smashwords Premium Catalog. In fact, there’s a potential downside to this step. If you add too much testimonial content to the front of your book, it can actually decrease readership because the reader doesn’t want to flip multiple pages to start reading. If you add blurbs, keep them brief. Also remember that many retailers have less generous sampling percentages than Smashwords, so if you add too much blurb content up front, a sample of your book won’t include any of your book.
If you add blurbs, put them at the very front of the book, before the Title & Copyright page (see below). If your book has received rave reviews from readers, consider adding a couple short snippets on the first page, so readers who sample your book will feel more inclined to purchase it. These should be real, honest reviews. If you falsify the reviews and your reader feels tricked, they may seek retribution by giving you a bad review on Smashwords or at the retailer’s store. Nothing kills a book faster than bad reviews.
Here’s how self-publishing guru Dan Poynter begins his Smashwords book, “Dan Poynter’s Self-Publishing Manual Volume 2” (view it at https://www.smashwords.com/extreader/read/607/1/the-self-publishing-manual-volume-2):