Entering Data into Worksheet
Excel
provides many ways to enter and edit data in a cell easily and
quickly. The data you enter in the cell is formatted automatically.
For example, when you type a date 1/1/03 in a cell, Excel
automatically format the cell as a date.
How To Enter Text (Label) Into A Cell
TIPS
|
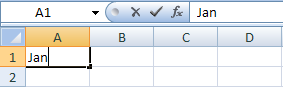
Click
the cell
A1.
Cell
A1 becomes the active cell. You will enter text in the active
cell.
Type
Jan.
The
text appears in cell A1.
Press
<Enter>
to confirm the entry.
You
can also press <Tab> to confirm the entry.
|
How To Edit The Contents Of A Cell
SUMMARY
How
to enter text into a cell:
Click
the cell.
Type
the text.
Press
<Enter>.
How to edit the
cell:
Click
the cell.
Press
<F2>.
Type
the changes.
Press
<Enter>.
|
|
Click the cell
A1.
You
are going to edit `Jan’ to `January’ in cell A1.
Press
<F2>.
The
blinking insertion cursor appears at the end of the cell content.
Type
uary.
This
is to add text after the word `Jan’.
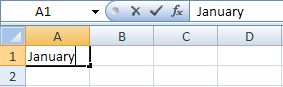
Press
<Enter>.
The
cell is now updated.
|
How To Edit Text In A Cell Using The Formula Bar
SUMMARY
How to edit text
using formula bar
Click
the cell.
Click
the contents in the formula bar.
Type
the changes.
Press
<Enter>.
How
to replace the contents of a cell
Click
the cell.
Type
the new entry.
How
to delete the cell contents of a cell
Click
the cell.
Press
<Delete>.
|
|
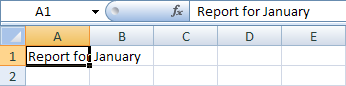
Click the cell
A1.
You
are going to change `January’ to `Report for January’.
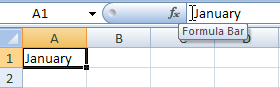
M ove
the mouse over the formula bar and click at the left of the word
January.
When
you position the mouse pointer over the formula bar, the pointer
changes to a text editor, also know as I-beam, as shown below.
ove
the mouse over the formula bar and click at the left of the word
January.
When
you position the mouse pointer over the formula bar, the pointer
changes to a text editor, also know as I-beam, as shown below.
Type
Report
for and press <Enter>.
You
have just added text before the word `January’. You can use
the arrow keys to move the cursor to the right and the left.
|
How To Replace The Contents Of A Cell
|
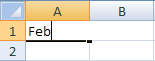
Click the cell
A1.
You
are going to replace `Report for January’ with `Feb’.
Type
Feb
and press <Enter>.
The
text in cell A1 is replaced.
|
How To Delete The Contents Of A Cell
|
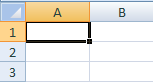
Click the cell
A1.
You
are going to delete `Feb’ in cell A1.
Press
<Delete>.
The
content is deleted.
|
How To Undo And Redo Changes
SUMMARY
To
Undo, click
 .
.
To
Redo, click
 .
.
|
TIPS
|
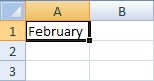
Click the cell
A1, type February
and press <Enter>.
The
text appears in cell A1. The active cell is now A2.

Click
the
Undo
button on the Quick Access Toolbar.
Your
active cell returns to A1. The previous action, which was typing
the word February in the cell A1, is undone. The word
`February' is removed.
Click
the
Redo
button on the Quick Access Toolbar.
The
action that you reversed previously is carried out again. The
word February reappears in A1.
.
|
How To Enter A Number As A Value In A Cell
SUMMARY
Click
the cell.
Type
the number.
Press
<Enter>.
|
|
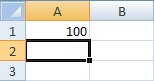
Click the cell
A1.
You
will enter a number into this cell.
Type
100
and press <Enter>.
The
value is aligned to the right instead of the left for labels or
text.
|
How To Enter A Number As A Label In A Cell
SUMMARY
Click
the cell.
Type
an apostrophe (‘), then type the number.
Press
<Enter>.
|
|
Click the cell
A2.
You
will enter a number as a label into this cell.
Type
‘200.
The
apostrophe is a label prefix that will not appear on the
worksheet.
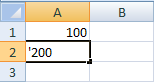
Press
<Enter>.
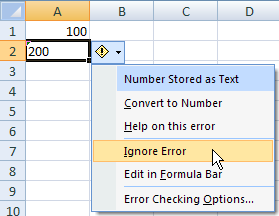
Click the cell
A2 again.
A
SmartTag appears to let you know the cell is formatted as text.
You can convert the text to a number if you want.

Click
the SmartTag drop-down arrow and click Ignore
Error from the list.
The
SmartTag indicator disappears, as you have chosen to ignore it.
|
How To Enter Date Into A Cell
SUMMARY
Click
the cell.
Type
the date with the slash (/)
as the separator.
|
TIPS
|
Click the cell
A3.
You
want to enter a date into this cell.
Type
6/20/07.
If
the date aligned to left, your computer date is probably set to
DD/MM/YY instead of MM/DD/YY. You should then enter the date as
20/6/01 or change the date format in your control panel.
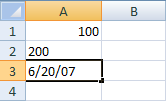
Press
<Enter>.
The
date format changes automatically, as shown below:
|
How To Use AutoFill To Enter Text
SUMMARY
Type
a data in any cell.
Click
and drag the AutoFill Handle.
|
TIPS
|
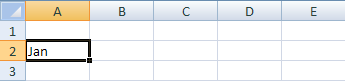
In the cell
A2, type Jan.
This
is the first cell of the series of data.
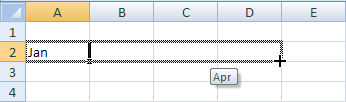
P lace
the mouse pointer over the AutoFill
Handle.
The
pointer changes to a `+’ sign.
lace
the mouse pointer over the AutoFill
Handle.
The
pointer changes to a `+’ sign.
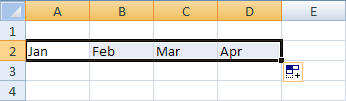
C lick
and drag to the right until cell
D2.
You
can also drag down to fill the cells below it.
lick
and drag to the right until cell
D2.
You
can also drag down to fill the cells below it.
 The
cells are filled, as shown below.
The
cells are filled, as shown below.
.
|
How To Use AutoFill Options
SUMMARY
Click
the
 AutoFill Options.
Click
the option from the list.
|
|
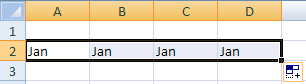
Click the
AutoFill
Options.
The
options list appears, as shown below.

Click
the Copy
Cells option from the
list.
AutoFill
copies the cell content instead of filling the data series, as
shown below.
.
|
How To Use AutoFill To Enter A Sequence Of Numbers
SUMMARY
Type
the first and second numbers in the cells.
Select
both cells.
Click
and drag from the AutoFill handle
of the selection.
|
TIPS
|
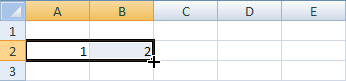
In the cell
A2, type 1.
In the cell
B2,
type
2.
You
need to enter data in the first and second cells.
Select
both of the cells
A2 and B2.
To
highlight the cells, click and drag from the center of cell A2 to
cell B2.
M ove
the mouse pointer to the AutoFill
Handle
The
pointer changes to a `+’ sign.
ove
the mouse pointer to the AutoFill
Handle
The
pointer changes to a `+’ sign.
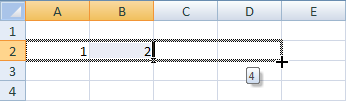
 Click
and drag to the right to fill the contents until cell
D2.
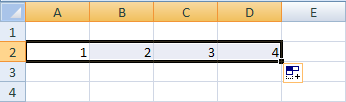
The
subsequent cells are filled with a series of numbers, as shown
below.
Click
and drag to the right to fill the contents until cell
D2.
The
subsequent cells are filled with a series of numbers, as shown
below.
|
How To Customize AutoFill
SUMMARY
Click
the Office Button.
Click
the Excel Options
button.
Click
Popular.
Click
the Edit Custom Lists
button.
In
the List entries
box, type the new list entries.
Click
the Add button.
Click
the OK button.
|
TIPS
|
Click the Office
Button, and then click the Excel
Options
button.
Excel
Options dialog box appears.
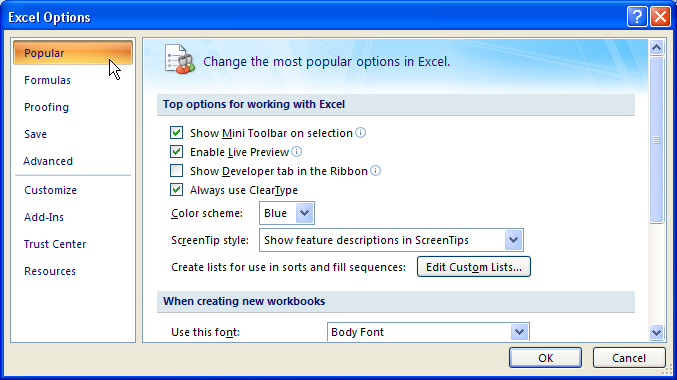
Click
Popular.
Then click the Edit
Custom Lists button.
The
Custom Lists dialog box appears.
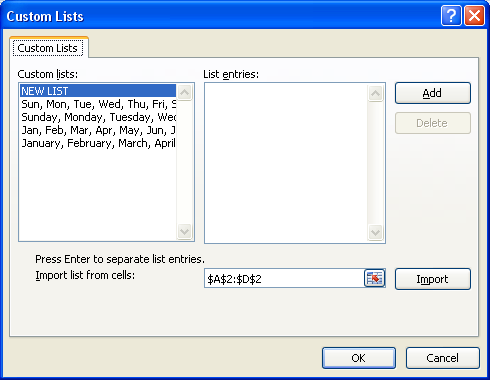
In
the List
entries box, type Spring,
Summer, Autumn,
Winter.
You
can also press <Enter> to separate the list entries instead
of using commas.

Click
the Add
button. Then click the OK
button.
The
new list is created.
|
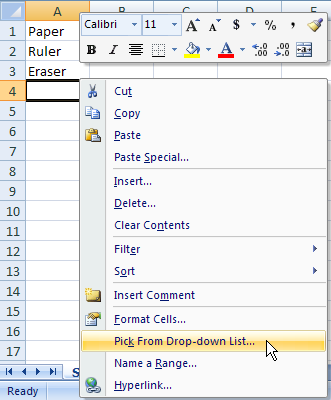
How To Use A
List To Enter Data
SUMMARY
Right-click
the cell below a list.
Click
Pick From Drop-Down List
from the shortcut menu.
Click
to select the item you want.
|
|
Right-click
the cell
A4.
The
shortcut menu appears.
Click
Pick
From Drop-down List from the
shortcut menu.
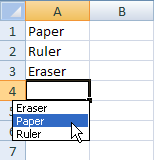
The
list of all the entries above the active cell appears, as shown
below:
Click
the item you want from the list.
The
item is entered into the cell A4.
|
How To Enter Data Into A Range Of Cells
SUMMARY
Select
the range.
Type
the data.
Press
<Enter> to move to
the next cell.
|
TIPS
|
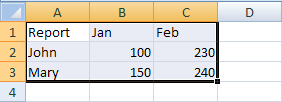
Select the range
A1:C3, in which you wish to enter
data.
The
range is highlighted.
Type
Report.
Press <Enter>
to move the cursor down to
cell
A2 and type John.
Press <Enter>.
When
the range is selected, the cell A1 as the first cell in the
selected range is the active cell, where the data entry begins.

In
the cell
A3, type Mary
and press <Enter>.
The
active cell moves to the top of the next column within the
selected range.
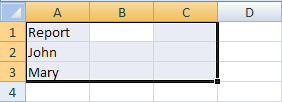
Enter
the remaining data as below.
Always
remember to press <Enter> to move to the next cell.
|
How To Fill
A Range Of Cells With The Same Data
SUMMARY
Select
the range.
Type
the data entry.
Press
<Ctrl>+
<Shift>+<Enter>
to fill the range.
|
|
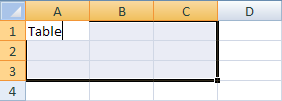
Select the range
A1:C3,
in which you wish to fill data.
The
range is highlighted.
Type
Table.
You
will fill the highlighted range with the word `Table’.
Press
<Ctrl>+<Shift>+<Enter>.
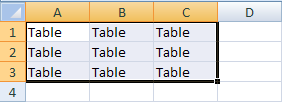
All
the cells in the range are filled with the word `Table’, as
shown below.
|
How To Document Workbook Properties
SUMMARY
Click
the Office button >>
Prepare>> Properties.
Enter
the information you want.
Click
the Close button.
|
TIPS
|
The
document properties (metadata) describe and identify a file or
workbook. Some of the properties are documented and updated
automatically (such as the file size, the last modified date, the
location of the file, etc) and some are editable (such as the
title, author name, subject, and keywords). You can even create
custom properties if you want.
These
properties help you to organize and identify your documents more
easily. You can even search for documents based on their
properties using the search tools.
Click the Office
button >> Prepare >> Properties.
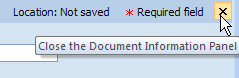
The
Document Information Panel appears at the top of the worksheet.
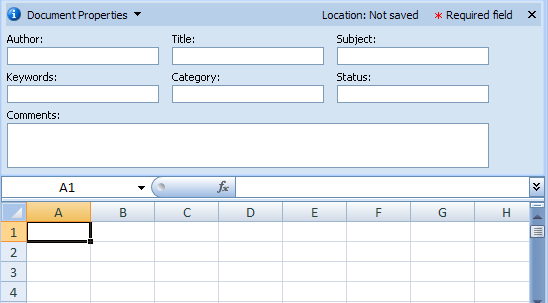
Enter
the information you want. Click the Close
button when you finish.
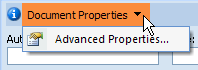
 You
can also add more advanced properties using the properties dialog
box. In the Document
Information Panel,
click the Document Properties drop-down arrow, and then click
Advanced
Properties.
You
can also add more advanced properties using the properties dialog
box. In the Document
Information Panel,
click the Document Properties drop-down arrow, and then click
Advanced
Properties.
|
How To Save A Workbook For The First Time
SUMMARY
How to save a
Workbook
Click
the Office Button >> Save.
Type
the file name.
Click
the Save button.
How to save another
copy of the Workbook
Click
the Office Button >> Save
As.
Type
the file name.
Click
the Save button.
|
TIPS
|
Click the Office
Button >> Save.
The
Save As dialog box appears.
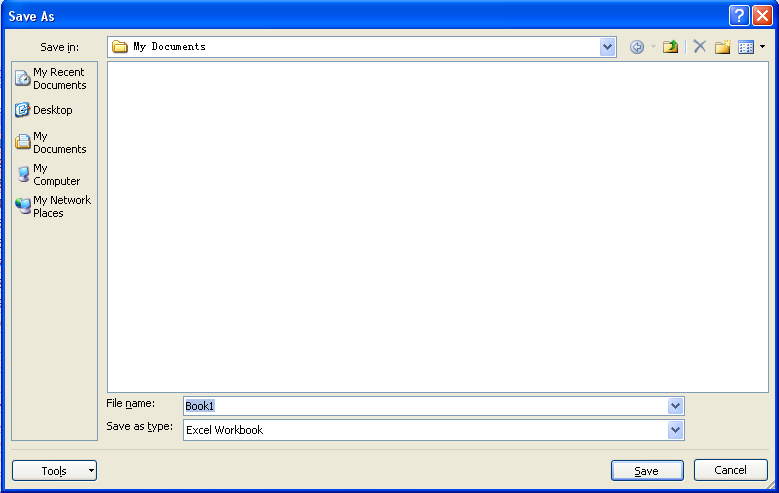
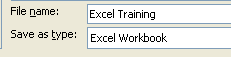
I n
the File
name box, type Excel
Training.
Excel
has already entered a placeholder name in the File name box
before you type your own file name. Since the name is
highlighted. You just need to type in the new file name to
overwrite it without having to click in the box.
n
the File
name box, type Excel
Training.
Excel
has already entered a placeholder name in the File name box
before you type your own file name. Since the name is
highlighted. You just need to type in the new file name to
overwrite it without having to click in the box.
Click
the Save
button.
The
file is saved in the default folder, My Documents.
|
|
|
How To Save Another Copy Using `Save As’
TIPS
|
Click the Office
Button >> Save As.
The
Save As Dialog Box appears.
You
can type in another file name.
You
can specify a new folder and/or a different file type.
Click
the Save
button.
Another
copy of the file is created.
|
How To Save With A Different File Format
SUMMARY
Click
the Office Button>>Save As.
Specify
the options.
Click
the Save button.
|
TIPS
|
Click the Office
Button >> Save As.
The
Save As dialog box appears.
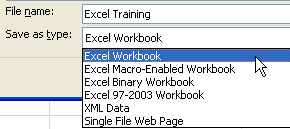
Click
the Save
as type drop-down arrow, and then
select the file type you want.
You
can select different Excel format as shown below. If you save a
workbook in a different file format, some of the formatting,
data, and features unique to Microsoft Office Excel will not be
retained. Use Excel help to get more information on the
formatting and features that are not transferred in Excel file
format conversions.
-
Format
|
Description
|
Excel
Workbook
(.xlsx)
|
The
default Excel 2007 XML-based file format with no VBA macro
code or Microsoft Office Excel 4.0 macro sheets (.xlm).
|
Excel
Workbook (code)
(.xlsm)
|
The
Excel 2007 XML-based and macro-enabled file format. It is
able to store VBA macro code or Excel 4.0 macro sheets (.xlm).
|
Excel
Binary Workbook
(.xlsb)
|
The
Excel 2007 Binary file format (BIFF12).
|
Template
(.xltx)
|
The
default Excel 2007 template file format with no VBA macro code
or Excel 4.0 macro sheets (.xlm).
|
Template
(code)
(.xltxm)
|
The
Excel 2007 macro-enabled template file format. It is able to
stores VBA macro code or Excel 4.0 macro sheets (.xlm).
|
Excel
97- Excel 2003 Workbook (.xls)
|
The
Excel 97 - Excel 2003 Binary file format (BIFF8).
|
Excel
97- Excel 2003 Template (.xlt)
|
The
Excel 97 - Excel 2003 Binary file format (BIFF8) for an Excel
template.
|
XML
Spreadsheet 2003 (.xml)
|
XML
Spreadsheet 2003 file format (XMLSS).
|
Excel
Add-In (.xlam)
|
The
Excel 2007 XML-based and macro-enabled Add-In, a supplemental
program that is designed to run additional code. It supports
the VBA projects and Excel 4.0 macro sheets (.xlm).
|
|
How To Save To Another Folder
SUMMARY
Click
the Office Button>>Save As.
Type
the file name.
Click
the
 Create New Folder
button.
Create New Folder
button.
Type
the new folder name.
Click
the OK button.
Click
the Save button.
|
TIPS
|
Click the Office
Button >> Save As.
The
Save As dialog box appears.
In
the File
name box, type the new file
name.
You
will save the file with a different name.
Click
the
Create
New Folder button.
The
New Folder Dialog Box appears.
In
the Name
box, type Training.
This
will create a new folder ‘Training’ in the C:\My Documents
folder.
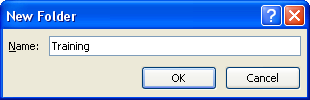
Click
the OK
button.
The
training folder is created.
Click
the Save
button.
The
file is saved in the Training folder.
|
How To Save On A Diskette
SUMMARY
Click
the Office Button>>Save As.
Type
the file name.
Click
the Save in
drop-down arrow and click 3½
Floppy (A:) from the
list.
Click
the Save button.
|
|
Click the Office
Button >> Save As.
The
Save As dialog box appears.
In
the File
name box, type the new file
name.
You
will save the file with a different name.
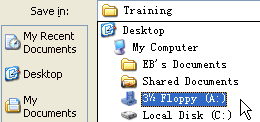
Click
the Save
in drop-down arrow and click 3½
Floppy (A:) from the list. Then,
click the Save
button.
The
file will be saved on the diskette.
|
|
|
How To Close The Current Workbook
SUMMARY
Click
the Office Button>>Close.
Click
the Yes button.
|
|
Click the Office
Button >> Close.
Excel
prompts you to save the changes you have just made.
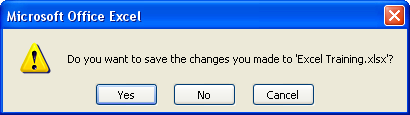
Click
the Yes
button.
The
changes are saved and the workbook closes.
|
How To Open A Workbook
SUMMARY
Click
the Office Button >> Open.
In
the Look in box,
select the drive or the folder that contains the file you want
to open.
Double-click
the file name.
or
click the file name, and then
click the Open
button.
|
TIPS
You
can use the shortcut key <Ctrl>+<O>
to display the Open dialog box.
You
can click the Open drop-down arrow to select whether you want
to open the file as read-only, open as a copy, open in browser
or open and repair.
|
|
Click the Office
Button >> Open.
The
Open dialog box appears.
In
the Look
in box, select the drive or
folder that contains the file you want to open.
This
is necessary only if the workbook is not saved in the default
folder.
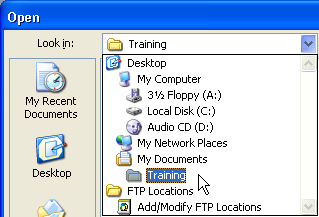
Double-click
at the file name Excel
Training.
This
is the workbook you saved in previous task.
|
|
|
How To Exit Excel 2007
SUMMARY
Click
the Office Button.
Then click the Exit Excel
button.
|
|
Click the Office
Button. Then click the Exit
Excel button.
If
you have not saved the existing file. Excel prompts you to save
before exiting the application.

|
Performing
Calculations
|
|
Objectives:
When
you have completed these lessons, you will be able to:
Understand
formulas
Resize
The Formula Bar
Use
simple calculations
Enter
A Formula Using The Keyboard
Enter
A Cell or A Range Reference Using The Mouse
Use
AutoSum To Calculate Totals
Use
Relative References
Use
Absolute References
Enter
A Function Directly
Use
AutoComplete To Create Formulas
Turn
Formula AutoComplete On Or Off
Insert
Other Functions Using AutoSum Button
Use
The Insert Function
Use
AutoCalculate To Do A Calculation Without Using A Formula
|


 o
undo multiple actions quickly, you can click the Undo
drop-down arrow to list the previous actions. Click on the
action until which you want to undo.
o
undo multiple actions quickly, you can click the Undo
drop-down arrow to list the previous actions. Click on the
action until which you want to undo.
