


Before we do, note that we can make immediate practical use of our caption in the MainForm class. The sbpnlFileName status bar panel has previously displayed the entire path to the file, which may not fit when the window is small. The photo’s caption seems like a much better choice here.
Set the version number of the MyPhotos application to 8.3.
DISPLAY THE CAPTION VALUE IN THE STATUS BAR
|
Action |
Result |
|
|
|
6 |
Locate the OnPaint |
protected override void OnPaint |
|
method in the |
(PaintEventArgs e) |
|
MainForm.cs source code. |
{ |
|
. . . |
|
|
|
|
|
|
|
7 |
Modify the |
if (_album.Count > 0) |
|
sbpnlFileName status bar |
{ |
|
panel to display the |
. . . |
|
// Update the status bar. |
|
|
caption. |
|
|
sbpnlFileName.Text = photo.Caption; |
|
|
|
. . . |
|
|
} |
|
|
. . . |
|
|
} |
|
|
|
8.3.2Preserving caption values
Our new caption values must be saved whenever an album is saved to disk, and loaded when an album is opened. To do this, we need to create a new version of our album file, while still preserving the ability to read in our existing files. Fortunately, we established a version number for these files in chapter 6, so the changes required are not too extensive. First, let’s look at the changes to our Save method.
UPDATE THE SAVE METHOD TO STORE CAPTIONS
|
Action |
Result |
|
|
|
1 |
In the PhotoAlbum.cs file, |
private const int _CurrentVersion = 83; |
|
modify the version |
|
|
constant to be 83. |
|
|
|
|
2 |
Modify our foreach loop in |
public void Save(string fileName) |
|
the Save method to store |
{ |
|
both the file name and |
. . . |
|
// Store the data for each photograph |
|
|
caption, each on a separate |
|
|
foreach (Photograph photo in this) |
|
|
line. |
{ |
|
|
sw.WriteLine(photo.FileName); |
|
|
sw.WriteLine(photo.Caption); |
|
|
} |
|
|
} |
|
|
|
Note that the rest of our Save method works as before. In particular, the current version number is written as the first line of the file. Since we updated the constant for this number, the value written to our new album files is updated as well.
Next we need to modify our Open method to read the new file format. We will also preserve backward compatibility with our older version. This can be done by handling
MODAL DIALOG BOXES |
239 |

our previous version number 66 in addition to our new one. We continue the previous table with the following steps.
UPDATE THE OPEN METHOD TO READ CAPTIONS
|
Action |
Result |
|
|
|
3 |
Modify the switch block in |
public void Open(string fileName) |
|
the Open method to |
{ |
|
recognize both the old and |
. . . |
|
switch (version) |
|
|
current version. |
|
|
{ |
|
|
|
case 66: |
|
|
case 83: |
|
|
{ |
|
|
string name; |
|
|
|
4 |
Modify the do..while |
do |
|
loop to read the caption |
{ |
|
when a newer version of |
name = sr.ReadLine(); |
|
|
|
|
the file is opened. |
if (name != null) |
|
|
{ |
|
|
Photograph p = new Photograph(name); |
|
|
if (version == 83) |
|
|
{ |
|
|
// Also read the caption string |
|
|
p.Caption = sr.ReadLine(); |
|
|
} |
|
|
this.Add(p); |
|
|
} |
|
|
} while (name!= null); |
|
|
break; |
|
|
. . . |
|
|
} |
|
|
|
Our data layer is complete. We can add individual captions to photographs, and these captions are preserved as the album is saved and opened. Next we turn our attention to the new Form required.
8.3.3CREATING THE CAPTIONDLG FORM
With our data layer ready, we can turn to the presentation layer. This requires the dialog previously shown in figure 8.5. In this section we create a new Form class to hold the dialog, and look at what settings should be set to turn the default form into a standard dialog box. In the next section we will add some properties to this class so that our MainForm class can interact with the dialog.
In previous Windows development environments, an explicit class such as CDialog created a dialog box directly. It would certainly be possible to create a
FormDialog class in .NET derived from the Form class for this purpose, and perhaps Microsoft will do so in the future. Until this happens, you will have to create your own dialog class or modify each dialog form separately to have dialog box behavior. The following table summarizes the properties required to turn the default Form into a somewhat standard dialog box.
240 |
CHAPTER 8 DIALOG BOXES |
Turning the default Form into a dialog box
Property |
Default |
Value for |
Comments |
|
Dialog Box |
||||
|
|
|
||
|
|
|
|
|
AcceptButton |
(none) |
OK button |
For a modal dialog, set to the OK or other |
|
|
|
instance |
Button the user will click when finished. |
|
CancelButton |
(none) |
Cancel button |
For a modal dialog, set to the Cancel or |
|
|
|
instance |
other Button the user will click to abort |
|
|
|
|
dialog. |
|
FormBorderStyle |
Sizable |
FixedDialog |
This creates a fixed-sized window with a |
|
|
|
|
thick dialog-style border, and no control box |
|
|
|
|
on the title bar. Assuming the ControlBox |
|
|
|
|
setting is true, the system menu is still |
|
|
|
|
available by right-clicking on the title bar. |
|
|
|
|
This value is based on the |
|
|
|
|
FormBorderStyle enumeration. |
|
HelpButton |
False |
True or False |
Set to true if you would like the question |
|
|
|
|
mark box to appear on the title bar. The |
|
|
|
|
HelpRequested event fires when this box |
|
|
|
|
is clicked. Note that the question box only |
|
|
|
|
appears if the MaximizeBox and |
|
|
|
|
MinimumBox properties are both false. |
|
MaximizeBox |
True |
False |
Removes the Maximize button from the |
|
|
|
|
title bar. |
|
MinimizeBox |
True |
False |
Removes the Minimize button from the title |
|
|
|
|
bar. |
|
ShowInTaskBar |
True |
False |
Does not display the dialog on the |
|
|
|
|
Windows task bar. |
|
StartPosition |
WindowsDefault- |
CenterParent |
Establishes the initial position for the form. |
|
|
Location |
|
Typically, a dialog box is centered over the |
|
|
|
|
parent window. |
|
Size |
300, 300 |
(varies) |
For a fixed size dialog, set the window to an |
|
|
|
|
appropriate size. |
|
|
|
|
|
Of course, you may need to modify other properties as well, but these settings establish the appropriate features for a standard dialog box. We can use this table to create a dialog in our application.
MODAL DIALOG BOXES |
241 |
CREATE THE CAPTIONDLG CLASS
|
|
Action |
|
|
Result |
|
|
|
|
|
|
|
|
1 |
Add a new form called “CaptionDlg” |
The new file is added to the MyPhotos project and |
||||
|
to the MyPhotos project. |
a CaptionDlg.cs [Design] window displays your |
||||
|
How-to |
|
|
|
new form. |
|
|
|
|
|
|
||
|
a. Right-click the MyPhotos project |
|
||||
|
in Solution Explorer. |
|
||||
|
b. Expand the Add menu. |
|
||||
|
c. Select Add Windows Form… |
|
||||
|
under the Add menu to display |
|
||||
|
the Add New Item dialog. |
|
||||
|
d. Enter “CaptionDlg” as the name |
|
||||
|
of the form. |
|
|
|
|
|
|
e. Click the Open button. |
|
||||
|
|
|
|
|
|
|
2 |
Modify the form’s properties to |
The form in the designer window should now look |
||||
|
make this create a somewhat |
something like this. |
||||
|
standard dialog. |
|
|
|
|
|
|
|
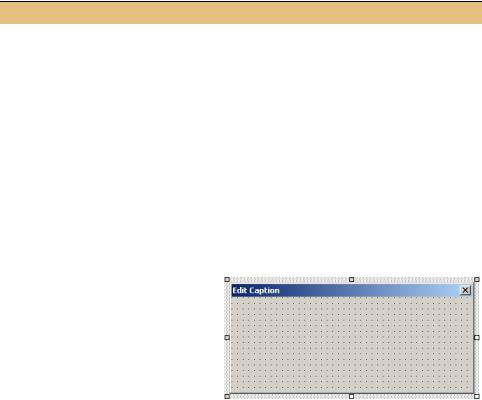
Settings |
|
|||
|
|
|
|
|
|
|
|
|
Property |
|
Value |
|
|
|
|
FormBorderStyle |
|
FixedDialog |
|
|
|
|
MaximizeBox |
|
False |
|
|
|
|
MinimizeBox |
|
False |
|
|
|
|
ShowInTaskBar |
|
False |
|
|
|
|
Size |
|
350, 160 |
|
|
|
|
StartPosition |
CenterParent |
|
||
|
|
Text |
|
Edit Caption |
|
|
|
|
|
|
|
|
|
If you compare these settings to the previous table, you will see that we have not set the AcceptButton and CancelButton properties yet. This is because the required buttons are not yet on our form. We will look at some of the code generated in the CaptionDlg.cs file in a moment. Before we do, let’s continue our changes to add the required controls to our form.
242 |
CHAPTER 8 DIALOG BOXES |