
- •brief contents
- •about this book
- •The Windows Forms namespace
- •Part 1: Hello Windows Forms
- •Part 2: Basic Windows Forms
- •Part 3: Advanced Windows Forms
- •Who should read this book?
- •Conventions
- •Action
- •Result
- •Source code downloads
- •Author online
- •acknowledgments
- •about .NET
- •Casting the .NET
- •Windows Forms overview
- •about the cover illustration
- •Hello Windows Forms
- •1.1 Programming in C#
- •1.1.1 Namespaces and classes
- •1.1.2 Constructors and methods
- •1.1.3 C# types
- •1.1.4 The entry point
- •1.1.5 The Application class
- •1.1.6 Program execution
- •1.2 Adding controls
- •1.2.1 Shortcuts and fully qualified names
- •1.2.2 Fields and properties
- •1.2.3 The Controls property
- •1.3 Loading files
- •1.3.1 Events
- •1.3.2 The OpenFileDialog class
- •1.3.3 Bitmap images
- •1.4 Resizing forms
- •1.4.1 Desktop layout properties
- •1.4.2 The Anchor property
- •1.4.3 The Dock property
- •1.5 Recap
- •2.1 Programming with Visual Studio .NET
- •2.1.1 Creating a project
- •Action
- •Result
- •2.1.2 Executing a program
- •Action
- •Result
- •2.1.3 Viewing the source code
- •View the code generated by Visual Studio .NET
- •Action
- •Result
- •2.2 Adding controls
- •2.2.1 The AssemblyInfo file
- •Action
- •Results
- •2.2.2 Renaming a form
- •Action
- •Result
- •2.2.3 The Toolbox window
- •Action
- •Result
- •2.3 Loading files
- •2.3.1 Event handlers in Visual Studio .NET
- •Action
- •Result
- •2.3.2 Exception handling
- •Action
- •Result
- •Action
- •Results and Comments
- •2.4 Resizing forms
- •2.4.1 Assign the Anchor property
- •Action
- •Result
- •2.4.2 Assign the MinimumSize property
- •Action
- •Result
- •2.5 Recap
- •Basic Windows Forms
- •Menus
- •Action
- •Result
- •Action
- •Result
- •Action
- •Result
- •Action
- •Result
- •3.3 Click events
- •Action
- •Result
- •Action
- •Result
- •Action
- •Result
- •Action
- •Result
- •Action
- •Result
- •Action
- •Result
- •3.5 Context menus
- •Action
- •Result
- •Action
- •Result
- •3.6 Recap
- •Status bars
- •4.1 The Control class
- •4.2 The StatusBar class
- •Action
- •Result
- •Action
- •Result
- •4.3.1 Adding panels to a status bar
- •Action
- •Result
- •Action
- •Result
- •Action
- •Result
- •Action
- •Result
- •4.5 Recap
- •Reusable libraries
- •5.1 C# classes and interfaces
- •5.2 Class libraries
- •Action
- •Result
- •Action
- •Result
- •Action
- •Result
- •Action
- •Result
- •Action
- •Result
- •Action
- •Result
- •Action
- •Result
- •Action
- •Result
- •Action
- •Result
- •5.3 Interfaces revisited
- •Action
- •Result
- •Action
- •Result
- •Action
- •Result
- •5.4 Robustness issues
- •Action
- •Result
- •Action
- •Result
- •Action
- •Result
- •Action
- •Result
- •Action
- •Result
- •Action
- •Result
- •Common file dialogs
- •Action
- •Results
- •Action
- •Result
- •Action
- •Result
- •Action
- •Result
- •Action
- •Result
- •6.3 Paint events
- •Action
- •Result
- •Action
- •Result
- •6.4 Context menus revisited
- •Action
- •Result
- •Action
- •Result
- •6.5 Files and paths
- •Action
- •Result
- •Action
- •Result
- •Action
- •Result
- •6.6 Save file dialogs
- •Action
- •Result
- •Action
- •Result
- •Action
- •Result
- •Action
- •Result
- •Action
- •Result
- •6.7 Open file dialogs
- •Action
- •Result
- •Action
- •Result
- •6.8 Recap
- •Drawing and scrolling
- •7.1 Form class hierarchy
- •Action
- •Result
- •Action
- •Result
- •Action
- •Result
- •Action
- •Result
- •Action
- •Result
- •Action
- •Result
- •Action
- •Result
- •Action
- •Result
- •Action
- •Result
- •Action
- •Result
- •Action
- •Result
- •Action
- •Result
- •7.4 Panels
- •Action
- •Result
- •Action
- •Result
- •Action
- •Result
- •Action
- •Result
- •Action
- •Result
- •Dialog boxes
- •8.1 Message boxes
- •Action
- •Result
- •Action
- •Result
- •8.1.4 Creating A YesNoCancel dialog
- •Action
- •Result
- •Action
- •Result
- •8.2 The Form.Close method
- •8.2.1 The relationship between Close and Dispose
- •Action
- •Result
- •8.3 Modal dialog boxes
- •Action
- •Result
- •Action
- •Result
- •8.3.2 Preserving caption values
- •Action
- •Result
- •Action
- •Result
- •Action
- •Result
- •Action
- •Result
- •Action
- •Result
- •Action
- •Result
- •Action
- •Result
- •Action
- •Result
- •Action
- •Result
- •Action
- •Result
- •Action
- •Result
- •Action
- •Result
- •Action
- •Result
- •Action
- •Result
- •Action
- •Result
- •Action
- •Result
- •Action
- •Result
- •Basic controls
- •Action
- •Result
- •Action
- •Result
- •Action
- •Result
- •9.1.2 Creating a derived form
- •Action
- •Result
- •9.2 Labels and text boxes
- •Action
- •Result
- •Action
- •Result
- •Action
- •Result
- •Action
- •Result
- •Action
- •Result
- •Action
- •Result
- •Action
- •Result
- •Action
- •Result
- •Action
- •Result
- •Action
- •Result
- •Action
- •Result
- •Action
- •Result
- •Action
- •Result
- •Action
- •Result
- •Action
- •Result
- •Action
- •Result
- •Action
- •Result
- •Action
- •Result
- •9.3.6 Adding AlbumEditDlg to our main form
- •Action
- •Result
- •Action
- •Result
- •9.4 Recap
- •List controls
- •10.1 List boxes
- •Action
- •Result
- •Action
- •Result
- •Action
- •Result
- •Action
- •Result
- •10.2 Multiselection list boxes
- •10.2.1 Enabling multiple selection
- •Action
- •Result
- •Action
- •Result
- •Action
- •Result
- •Action
- •Result
- •10.3 Combo boxes
- •Action
- •Result
- •Action
- •Result
- •10.4 Combo box edits
- •Action
- •Result
- •Action
- •Result
- •Action
- •Result
- •10.5 Owner-drawn lists
- •Action
- •Result
- •Action
- •Result
- •Action
- •Result
- •Action
- •Result
- •More controls
- •Action
- •Result
- •Action
- •Result
- •11.2 Tab pages
- •Action
- •Result
- •Action
- •Result
- •11.3.1 Dates and times
- •Action
- •Result
- •Action
- •Result
- •Action
- •Result
- •Action
- •Result
- •Action
- •Result
- •Action
- •Result
- •11.5 Recap
- •A .NET assortment
- •12.1 Keyboard events
- •Action
- •Result
- •Action
- •Result
- •12.2 Mouse events
- •Action
- •Result
- •Action
- •Result
- •Action
- •Result
- •12.3 Image buttons
- •Action
- •Result
- •Action
- •Result
- •Action
- •Result
- •Action
- •Result
- •Action
- •Result
- •Action
- •Result
- •Action
- •Result
- •Action
- •Result
- •Action
- •Result
- •12.4 Icons
- •Action
- •Result
- •Action
- •Result
- •Action
- •Result
- •12.5 Recap
- •Toolbars and tips
- •13.1 Toolbars
- •Action
- •Result
- •Action
- •Result
- •Action
- •Result
- •Action
- •Result
- •Action
- •Result
- •Action
- •Result
- •Action
- •Result
- •Action
- •Result
- •Action
- •Result
- •13.4.2 Creating tool tips
- •Action
- •Result
- •Action
- •Result
- •Advanced Windows Forms
- •List views
- •14.2 The ListView class
- •Action
- •Result
- •Action
- •Result
- •Action
- •Result
- •Action
- •Result
- •14.2.3 Populating a ListView
- •Action
- •Result
- •Action
- •14.3 ListView columns
- •Action
- •Result
- •Action
- •Result
- •Action
- •Result
- •Action
- •Result
- •Action
- •Result
- •Action
- •Result
- •Action
- •Result
- •Action
- •Result
- •Action
- •Result
- •Action
- •Result
- •Action
- •Result
- •Action
- •Result
- •Action
- •Result
- •Action
- •Result
- •Action
- •Result
- •Action
- •Result
- •Action
- •Result
- •Action
- •Result
- •Action
- •Result
- •14.6 Recap
- •Tree views
- •Action
- •Result
- •Action
- •Result
- •Action
- •Result
- •15.3 Dynamic tree nodes
- •Action
- •Result
- •Action
- •Result
- •Action
- •Result
- •Action
- •Result
- •Action
- •Result
- •15.4 Node selection
- •Action
- •Result
- •Action
- •Result
- •Action
- •Result
- •Action
- •Result
- •Action
- •Result
- •15.5 Fun with tree views
- •Action
- •Result
- •Action
- •Result
- •Action
- •Result
- •Multiple document interfaces
- •Action
- •Result
- •Action
- •Result
- •Action
- •Result
- •16.3 Merged menus
- •Action
- •Result
- •Action
- •Result
- •Action
- •Result
- •Action
- •Result
- •16.4 MDI children
- •Action
- •Result
- •Action
- •Result
- •Action
- •Result
- •Action
- •Result
- •Action
- •Result
- •Action
- •Result
- •Action
- •Result
- •Action
- •Result
- •Action
- •Result
- •Action
- •Result
- •16.5 MDI child window management
- •Action
- •Result
- •Action
- •Result
- •16.6 Recap
- •Data binding
- •17.1 Data grids
- •Action
- •Result
- •Action
- •Result
- •17.2 Data grid customization
- •Action
- •Result
- •Action
- •Result
- •Action
- •Result
- •Action
- •Result
- •Action
- •Result
- •Action
- •Result
- •Action
- •Result
- •Action
- •Result
- •Action
- •Result
- •Action
- •Result
- •Action
- •Result
- •Odds and ends .NET
- •Action
- •Result
- •Action
- •Result
- •Action
- •Result
- •Action
- •Result
- •18.2 Timers
- •Action
- •Result
- •Action
- •Result
- •18.3 Drag and drop
- •Action
- •Result
- •Action
- •Result
- •18.4 ActiveX controls
- •Action
- •Result
- •Action
- •Result
- •Action
- •Result
- •Action
- •Result
- •Action
- •Result
- •18.5 Recap
- •C# primer
- •A.1 C# programs
- •A.1.1 Assemblies
- •A.1.2 Namespaces
- •A.2 Types
- •A.2.1 Classes
- •A.2.2 Structures
- •A.2.3 Interfaces
- •A.2.4 Enumerations
- •A.2.5 Delegates
- •A.3 Language elements
- •A.3.1 Built-in types
- •A.3.2 Operators
- •A.3.3 Keywords
- •A.4 Special features
- •A.4.1 Exceptions
- •A.4.2 Arrays
- •A.4.3 Main
- •A.4.4 Boxing
- •A.4.5 Documentation
- •.NET namespaces
- •B.1 System.Collections
- •B.2 System.ComponentModel
- •B.3 System.Data
- •B.4 System.Drawing
- •B.5 System.Globalization
- •B.6 System.IO
- •B.7 System.Net
- •B.8 System.Reflection
- •B.9 System.Resources
- •B.10 System.Security
- •B.11 System.Threading
- •B.12 System.Web
- •B.13 System.Windows.Forms
- •B.14 System.XML
- •Visual index
- •C.1 Objects
- •C.2 Marshal by reference objects
- •C.3 Components
- •C.4 Common dialogs
- •C.7 Event data
- •C.8 Enumerations
- •For more information
- •bibliography
- •Symbols
- •Index
5.2CLASS LIBRARIES
Finally, we are ready to specify our album class. We have decided to base this on CollectionBase, and use our own Photograph object for the elements. As we discussed in the previous section, the CollectionBase class provides a limited set of methods, so it will be up to us to implement the appropriate class members to support the required interfaces.
As a result, our PhotoAlbum class will look something like the following. Since this is a photo album and we expect to display photos from it, we will also add some methods to manage the current position within the album.
public class PhotoAlbum : CollectionBase |
b Inherit from |
{ |
CollectionBase class |
//Default constructor
//The IEnumerable interface is provided by CollectionBase
//This allows the use of foreach with an album
//ICollection members
//IList members
//Position operations
//- Get/Set current position (as index).
//- Get photograph at current position.
//- Move to the next photograph.
//- Move to the previous photograph.
}c End of PhotoAlbum class
Some syntactic points here:
bAs already mentioned, classes in C# support inheritance from a single class only, in this case from the CollectionBase class, although multiple interfaces can be specified. This is the same as Java, and a break from C++. Also unlike the C++ language, C# classes do not support private or protected inheritance.
cIf you haven’t realized it by now, also note that there are no header files in C#. Like Java, the entire class is specified in a single file. For C++ programmers, also note that a semicolon (;) is not required after the class definition.
The Photograph class will hold the original file name for the image, and the Bitmap object when necessary. Its definition will look something like this:
public class Photograph |
d Inherit from System.Object |
{ |
|
//Create a new instance from a file name.
//Properties:
//- get the file name for the Photograph
//- get the Bitmap for the Photograph
//Methods:
//- see if two Photographs are equal
}
CLASS LIBRARIES |
133 |

One additional point here:
dIt is worth noting that all classes in C# implicitly inherit from the object class even when it is not specified. This ensures that all classes have a common ancestor. So even though it is not shown, our Photograph class inherits from the base System.Object class implicitly, which is equivalent to the C# object class.
Now that we understand the framework for our classes, let’s perform the actual implementation. This section will create the class library in Visual Studio, discuss creating such a library using the command line tools, and provide the initial implementation of our PhotoAlbum and Photograph classes.
5.2.1CREATING THE CLASS LIBRARY
Enough preparation: time to create our library. If you are not using Visual Studio
.NET here, create your library as a separate directory and place the files discussed here in it. We’ll give you some hints for building this from the command line later in the chapter.
In this section we will create a new project as part of our MyPhotos solution. This project will build the new MyPhotoAlbum library. We will create a top-level namespace called Manning for this project, and reference the new library from our MyPhotos project.
Set the version number of the application to 5.2.
CREATE A REUSABLE LIBRARY IN VISUAL STUDIO .NET
Action |
Result |
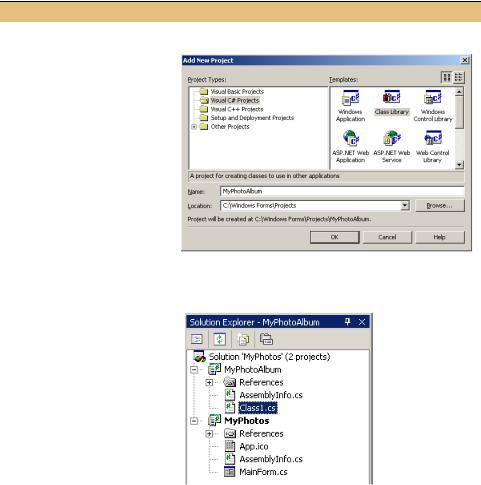
1Add a new project to the MyPhotos solution.
How-to
a.Click the File menu in Visual Studio .NET.
b.Click on the Add Project menu.
c.Select the New Project… item.
134 |
CHAPTER 5 REUSABLE LIBRARIES |

CREATE A REUSABLE LIBRARY IN VISUAL STUDIO .NET (continued)
|
Action |
Result |
|
|
|
2 |
Configure the new project |
|
|
as a class library named |
|
|
“MyPhotoAlbum.” |
|
|
How-to |
|
|
a. Select Visual C# Projects |
|
|
as the Project Type. |
|
|
b. Select Class Library as |
|
|
the Template. |
|
|
c. Enter “MyPhotoAlbum” |
|
|
for the name of the |
|
|
project. |
|
|
|
|
3 |
Click the OK button to |
In the Solution Explorer window, the new project appears with |
|
create the new project. |
a default initial class named Class1. The main window displays |
|
|
the Class1.cs source file. |
|
|
Note: The MyPhotos project is in bold to indicate that it |
|
|
is the default project, or the startup project in Visual Stu- |
|
|
dio .NET terms. |
|
|
|
That’s all it takes. The solution MyPhotos now contains two projects: a MyPhotoAlbum project to create a DLL library, and a MyPhotos project to create a Windows Forms application. You will note that the new project has its own AssemblyInfo.cs file to support an independent version number for the library.
CLASS LIBRARIES |
135 |
We do not want a class called Class1, so let’s rename it to PhotoAlbum. We will also adjust the version number of our new project to reflect the current section number.
|
RENAME THE CLASS1.CS CLASS FILE |
|
|
|
|
|
Action |
Result |
|
|
|
4 |
Set the MyPhotoAlbum |
When you compile the MyPhotoAlbum library, the new version |
|
version number to 5.2. |
number is included, and will be visible when displaying the |
|
How-to |
properties for the generated library assembly. |
|
|
|
|
a. Double-click the Assem- |
Note: Your main window now displays two Assembly- |
|
blyVersion.cs file. |
Info.cs tabs for the corresponding files in each project. |
|
b. Modify the Assembly- |
Make sure you keep track of which is which. The dis- |
|
Version line to contain |
played file is always selected in the Solution Explorer win- |
|
the desired version |
dow, which identifies the project that contains the file. To |
|
number. |
display the Solution Explorer window while editing a file, |
|
|
use the keyboard shortcut Ctrl+Alt+L. |
|
|
|
5 |
Rename the Class1.cs file |
The Class1.cs tab in the main window is renamed as well. |
|
name to PhotoAlbum.cs. |
|
|
How-to |
|
|
a. Right-click on the |
|
|
Class1.cs file. |
|
|
b. Select Rename. |
|
|
c. Enter “PhotoAlbum.cs” |
|
|
for the file name. |
|
|
|
|
6 |
Rename the Class1 class |
The PhotoAlbum.cs file should look like this: |
|
name to PhotoAlbum. |
using System; |
|
|
|
|
How-to |
namespace MyPhotoAlbum |
|
a. Double-click the PhotoAl- |
|
|
{ |
|
|
bum.cs file. |
/// <summary> |
|
b. Change the three |
/// Summary description for PhotoAlbum. |
|
/// </summary> |
|
|
instances of “Class1” to |
|
|
public class PhotoAlbum |
|
|
“PhotoAlbum” in the |
{ |
|
code. |
public PhotoAlbum() |
|
|
{ |
|
|
// |
|
|
// TODO: Add Constructor Logic here |
|
|
// |
|
|
} |
|
|
} |
|
|
} |
|
|
|
Visual Studio automatically uses the project name as the namespace for all files in the project. Here, the PhotoAlbum class is in the MyPhotoAlbum namespace, so that our class called PhotoAlbum will not interfere with anyone else who may have a class called PhotoAlbum. By convention, namespaces should specify the company name, followed by the project name. Since our library might be used outside of this book (hey, you never know!), we should follow this convention as well. We will use the publisher’s name Manning as our top-level namespace.
136 |
CHAPTER 5 REUSABLE LIBRARIES |