

- •brief contents
- •about this book
- •The Windows Forms namespace
- •Part 1: Hello Windows Forms
- •Part 2: Basic Windows Forms
- •Part 3: Advanced Windows Forms
- •Who should read this book?
- •Conventions
- •Action
- •Result
- •Source code downloads
- •Author online
- •acknowledgments
- •about .NET
- •Casting the .NET
- •Windows Forms overview
- •about the cover illustration
- •Hello Windows Forms
- •1.1 Programming in C#
- •1.1.1 Namespaces and classes
- •1.1.2 Constructors and methods
- •1.1.3 C# types
- •1.1.4 The entry point
- •1.1.5 The Application class
- •1.1.6 Program execution
- •1.2 Adding controls
- •1.2.1 Shortcuts and fully qualified names
- •1.2.2 Fields and properties
- •1.2.3 The Controls property
- •1.3 Loading files
- •1.3.1 Events
- •1.3.2 The OpenFileDialog class
- •1.3.3 Bitmap images
- •1.4 Resizing forms
- •1.4.1 Desktop layout properties
- •1.4.2 The Anchor property
- •1.4.3 The Dock property
- •1.5 Recap
- •2.1 Programming with Visual Studio .NET
- •2.1.1 Creating a project
- •Action
- •Result
- •2.1.2 Executing a program
- •Action
- •Result
- •2.1.3 Viewing the source code
- •View the code generated by Visual Studio .NET
- •Action
- •Result
- •2.2 Adding controls
- •2.2.1 The AssemblyInfo file
- •Action
- •Results
- •2.2.2 Renaming a form
- •Action
- •Result
- •2.2.3 The Toolbox window
- •Action
- •Result
- •2.3 Loading files
- •2.3.1 Event handlers in Visual Studio .NET
- •Action
- •Result
- •2.3.2 Exception handling
- •Action
- •Result
- •Action
- •Results and Comments
- •2.4 Resizing forms
- •2.4.1 Assign the Anchor property
- •Action
- •Result
- •2.4.2 Assign the MinimumSize property
- •Action
- •Result
- •2.5 Recap
- •Basic Windows Forms
- •Menus
- •Action
- •Result
- •Action
- •Result
- •Action
- •Result
- •Action
- •Result
- •3.3 Click events
- •Action
- •Result
- •Action
- •Result
- •Action
- •Result
- •Action
- •Result
- •Action
- •Result
- •Action
- •Result
- •3.5 Context menus
- •Action
- •Result
- •Action
- •Result
- •3.6 Recap
- •Status bars
- •4.1 The Control class
- •4.2 The StatusBar class
- •Action
- •Result
- •Action
- •Result
- •4.3.1 Adding panels to a status bar
- •Action
- •Result
- •Action
- •Result
- •Action
- •Result
- •Action
- •Result
- •4.5 Recap
- •Reusable libraries
- •5.1 C# classes and interfaces
- •5.2 Class libraries
- •Action
- •Result
- •Action
- •Result
- •Action
- •Result
- •Action
- •Result
- •Action
- •Result
- •Action
- •Result
- •Action
- •Result
- •Action
- •Result
- •Action
- •Result
- •5.3 Interfaces revisited
- •Action
- •Result
- •Action
- •Result
- •Action
- •Result
- •5.4 Robustness issues
- •Action
- •Result
- •Action
- •Result
- •Action
- •Result
- •Action
- •Result
- •Action
- •Result
- •Action
- •Result
- •Common file dialogs
- •Action
- •Results
- •Action
- •Result
- •Action
- •Result
- •Action
- •Result
- •Action
- •Result
- •6.3 Paint events
- •Action
- •Result
- •Action
- •Result
- •6.4 Context menus revisited
- •Action
- •Result
- •Action
- •Result
- •6.5 Files and paths
- •Action
- •Result
- •Action
- •Result
- •Action
- •Result
- •6.6 Save file dialogs
- •Action
- •Result
- •Action
- •Result
- •Action
- •Result
- •Action
- •Result
- •Action
- •Result
- •6.7 Open file dialogs
- •Action
- •Result
- •Action
- •Result
- •6.8 Recap
- •Drawing and scrolling
- •7.1 Form class hierarchy
- •Action
- •Result
- •Action
- •Result
- •Action
- •Result
- •Action
- •Result
- •Action
- •Result
- •Action
- •Result
- •Action
- •Result
- •Action
- •Result
- •Action
- •Result
- •Action
- •Result
- •Action
- •Result
- •Action
- •Result
- •7.4 Panels
- •Action
- •Result
- •Action
- •Result
- •Action
- •Result
- •Action
- •Result
- •Action
- •Result
- •Dialog boxes
- •8.1 Message boxes
- •Action
- •Result
- •Action
- •Result
- •8.1.4 Creating A YesNoCancel dialog
- •Action
- •Result
- •Action
- •Result
- •8.2 The Form.Close method
- •8.2.1 The relationship between Close and Dispose
- •Action
- •Result
- •8.3 Modal dialog boxes
- •Action
- •Result
- •Action
- •Result
- •8.3.2 Preserving caption values
- •Action
- •Result
- •Action
- •Result
- •Action
- •Result
- •Action
- •Result
- •Action
- •Result
- •Action
- •Result
- •Action
- •Result
- •Action
- •Result
- •Action
- •Result
- •Action
- •Result
- •Action
- •Result
- •Action
- •Result
- •Action
- •Result
- •Action
- •Result
- •Action
- •Result
- •Action
- •Result
- •Action
- •Result
- •Basic controls
- •Action
- •Result
- •Action
- •Result
- •Action
- •Result
- •9.1.2 Creating a derived form
- •Action
- •Result
- •9.2 Labels and text boxes
- •Action
- •Result
- •Action
- •Result
- •Action
- •Result
- •Action
- •Result
- •Action
- •Result
- •Action
- •Result
- •Action
- •Result
- •Action
- •Result
- •Action
- •Result
- •Action
- •Result
- •Action
- •Result
- •Action
- •Result
- •Action
- •Result
- •Action
- •Result
- •Action
- •Result
- •Action
- •Result
- •Action
- •Result
- •Action
- •Result
- •9.3.6 Adding AlbumEditDlg to our main form
- •Action
- •Result
- •Action
- •Result
- •9.4 Recap
- •List controls
- •10.1 List boxes
- •Action
- •Result
- •Action
- •Result
- •Action
- •Result
- •Action
- •Result
- •10.2 Multiselection list boxes
- •10.2.1 Enabling multiple selection
- •Action
- •Result
- •Action
- •Result
- •Action
- •Result
- •Action
- •Result
- •10.3 Combo boxes
- •Action
- •Result
- •Action
- •Result
- •10.4 Combo box edits
- •Action
- •Result
- •Action
- •Result
- •Action
- •Result
- •10.5 Owner-drawn lists
- •Action
- •Result
- •Action
- •Result
- •Action
- •Result
- •Action
- •Result
- •More controls
- •Action
- •Result
- •Action
- •Result
- •11.2 Tab pages
- •Action
- •Result
- •Action
- •Result
- •11.3.1 Dates and times
- •Action
- •Result
- •Action
- •Result
- •Action
- •Result
- •Action
- •Result
- •Action
- •Result
- •Action
- •Result
- •11.5 Recap
- •A .NET assortment
- •12.1 Keyboard events
- •Action
- •Result
- •Action
- •Result
- •12.2 Mouse events
- •Action
- •Result
- •Action
- •Result
- •Action
- •Result
- •12.3 Image buttons
- •Action
- •Result
- •Action
- •Result
- •Action
- •Result
- •Action
- •Result
- •Action
- •Result
- •Action
- •Result
- •Action
- •Result
- •Action
- •Result
- •Action
- •Result
- •12.4 Icons
- •Action
- •Result
- •Action
- •Result
- •Action
- •Result
- •12.5 Recap
- •Toolbars and tips
- •13.1 Toolbars
- •Action
- •Result
- •Action
- •Result
- •Action
- •Result
- •Action
- •Result
- •Action
- •Result
- •Action
- •Result
- •Action
- •Result
- •Action
- •Result
- •Action
- •Result
- •13.4.2 Creating tool tips
- •Action
- •Result
- •Action
- •Result
- •Advanced Windows Forms
- •List views
- •14.2 The ListView class
- •Action
- •Result
- •Action
- •Result
- •Action
- •Result
- •Action
- •Result
- •14.2.3 Populating a ListView
- •Action
- •Result
- •Action
- •14.3 ListView columns
- •Action
- •Result
- •Action
- •Result
- •Action
- •Result
- •Action
- •Result
- •Action
- •Result
- •Action
- •Result
- •Action
- •Result
- •Action
- •Result
- •Action
- •Result
- •Action
- •Result
- •Action
- •Result
- •Action
- •Result
- •Action
- •Result
- •Action
- •Result
- •Action
- •Result
- •Action
- •Result
- •Action
- •Result
- •Action
- •Result
- •Action
- •Result
- •14.6 Recap
- •Tree views
- •Action
- •Result
- •Action
- •Result
- •Action
- •Result
- •15.3 Dynamic tree nodes
- •Action
- •Result
- •Action
- •Result
- •Action
- •Result
- •Action
- •Result
- •Action
- •Result
- •15.4 Node selection
- •Action
- •Result
- •Action
- •Result
- •Action
- •Result
- •Action
- •Result
- •Action
- •Result
- •15.5 Fun with tree views
- •Action
- •Result
- •Action
- •Result
- •Action
- •Result
- •Multiple document interfaces
- •Action
- •Result
- •Action
- •Result
- •Action
- •Result
- •16.3 Merged menus
- •Action
- •Result
- •Action
- •Result
- •Action
- •Result
- •Action
- •Result
- •16.4 MDI children
- •Action
- •Result
- •Action
- •Result
- •Action
- •Result
- •Action
- •Result
- •Action
- •Result
- •Action
- •Result
- •Action
- •Result
- •Action
- •Result
- •Action
- •Result
- •Action
- •Result
- •16.5 MDI child window management
- •Action
- •Result
- •Action
- •Result
- •16.6 Recap
- •Data binding
- •17.1 Data grids
- •Action
- •Result
- •Action
- •Result
- •17.2 Data grid customization
- •Action
- •Result
- •Action
- •Result
- •Action
- •Result
- •Action
- •Result
- •Action
- •Result
- •Action
- •Result
- •Action
- •Result
- •Action
- •Result
- •Action
- •Result
- •Action
- •Result
- •Action
- •Result
- •Odds and ends .NET
- •Action
- •Result
- •Action
- •Result
- •Action
- •Result
- •Action
- •Result
- •18.2 Timers
- •Action
- •Result
- •Action
- •Result
- •18.3 Drag and drop
- •Action
- •Result
- •Action
- •Result
- •18.4 ActiveX controls
- •Action
- •Result
- •Action
- •Result
- •Action
- •Result
- •Action
- •Result
- •Action
- •Result
- •18.5 Recap
- •C# primer
- •A.1 C# programs
- •A.1.1 Assemblies
- •A.1.2 Namespaces
- •A.2 Types
- •A.2.1 Classes
- •A.2.2 Structures
- •A.2.3 Interfaces
- •A.2.4 Enumerations
- •A.2.5 Delegates
- •A.3 Language elements
- •A.3.1 Built-in types
- •A.3.2 Operators
- •A.3.3 Keywords
- •A.4 Special features
- •A.4.1 Exceptions
- •A.4.2 Arrays
- •A.4.3 Main
- •A.4.4 Boxing
- •A.4.5 Documentation
- •.NET namespaces
- •B.1 System.Collections
- •B.2 System.ComponentModel
- •B.3 System.Data
- •B.4 System.Drawing
- •B.5 System.Globalization
- •B.6 System.IO
- •B.7 System.Net
- •B.8 System.Reflection
- •B.9 System.Resources
- •B.10 System.Security
- •B.11 System.Threading
- •B.12 System.Web
- •B.13 System.Windows.Forms
- •B.14 System.XML
- •Visual index
- •C.1 Objects
- •C.2 Marshal by reference objects
- •C.3 Components
- •C.4 Common dialogs
- •C.7 Event data
- •C.8 Enumerations
- •For more information
- •bibliography
- •Symbols
- •Index
The slide show form is now fully integrated into our main application. Compile and run to see this window. Load an album and select the Slide Show menu to display the new dialog.
TRY IT! Throughout the book we have used the photo album and photograph abstractions we constructed in chapter 5 to represent and display images. In the MyPhotos application we display photographs in a Panel control, while in our other applications we use a PictureBox control. In both cases we were forced to override the Paint event in order to draw a photograph with the proper aspect ratio. It would be nice to have a control that provided this functionality directly.
Try creating a new PhotoBox class based on the Windows Forms PictureBox control that adds a new SizeMode setting called ScaleImage to the control. When set to this value, this new control should display the entire image with the proper aspect ratio within the control, just as we have done throughout the book. You can replace the existing Box.SizeMode property using a new set of enumeration values by defining the property in the following manner. You will also need to override the OnPaint and OnResize methods to properly draw an image within the new control.
private PhotoBoxSizeMode _sizeMode; public new PhotoBoxSizeMode SizeMode
{
get { return _sizeMode; } set { _sizeMode = value; }
}
Use your new control in place of the PictureBox control in the SlideShowForm window. My implementation of this control is available on the book’s web site. Also included on the site are the instructions for making this new control, referred to as a custom control, available in the Toolbox window of Visual Studio .NET.
18.3DRAG AND DROP
Continuing with our whirlwind tour of topics, let’s take a quick look at drag and drop. This refers to dragging an object from one location to another, and can occur within an application or between applications. Typically, a drag and drop operation is begun by clicking an object with the mouse pointer, holding down the mouse button while moving, or dragging, the object to a new location; and dropping the object at the new location by releasing the mouse button.
This topic can get fairly complicated, so we will show a rather basic example supporting the following types of drag and drop operations.
•Dragging a file from the Windows file system into a PhotoAlbum in a MainForm window.
618 |
CHAPTER 18 ODDS AND ENDS .NET |
•Dragging a photograph file from the MainForm window to an external Windows location.
•Dragging the photograph caption from the MainForm window to a text editor.
•Dragging a photograph file from one PhotoAlbum to another within the MyPhotos MDI application.
The Windows Forms Control class provides direct support for drag and drop operations. The following table summarizes these members.
Members of the Control class related to drag and drop
Public Properties |
AllowDrop |
Gets or sets whether the control will permit drag and drop |
|
|
operations within its boundaries. The default is false. |
||
|
|
||
|
|
|
|
Public Methods |
DoDragDrop |
Initiates a drag and drop operation from within this control. |
|
|
Typically, this is called from a MouseDown event handler. |
||
|
|
||
|
|
|
|
|
DragDrop |
Occurs when the user completes a drag and drop operation |
|
|
|
within this control. |
|
|
DragEnter |
Occurs when an object is dragged into the control’s |
|
Public Events |
|
boundaries. |
|
DragLeave |
Occurs when an object formerly dragged into the control is |
||
|
|||
|
|
dragged out of the control’s boundaries. |
|
|
DragOver |
Occurs when an object within the control is moved within |
|
|
|
the control’s boundaries. |
|
|
|
|
At a high level, a drag and drop operation performs the following steps. These steps are illustrated by the code in the subsequent sections. Note that the source and target of the operation may be within the same application or in separate applications.
1A source control initiates drag and drop, typically within a MouseDown event handler, using the DoDragDrop method. One or more data objects and associated formats are provided as part of invoking this method.
2The user drags the object to a target control that has its AllowDrop property set to true.
3As the mouse enters the target control, the DragEnter event occurs to permit the target to identify whether the data can be recognized by this control. This permits the operating system to display an appropriate mouse cursor for the user.
4If so, then the DragOver event occurs as the user moves the drag and drop object within the control.
5If the object is dragged out of the control, the DragLeave event occurs.
6If the user releases the object within the target control, then the DragDrop event occurs to permit the control to receive the data.
7The result of the operation is returned by the DoDragDrop method in the original source control.
DRAG AND DROP |
619 |

We will divide our example into two sections. First, we will begin a drag and drop operation from within the PictureBox control of our MainForm class. Next, we will receive external drag and drop operations within this same control.
18.3.1INITIATING DRAG AND DROP
The key to beginning a drag and drop operation is the DoDragDrop method. This method defines the data for the operation and the kind of operation permitted.
public DragDropEffects DoDragDrop(object data,
DragDropEffects allowedEffects);
While the data parameter can be any data, the DataObject class provides a standard mechanism for safely transferring data between applications. The
Effects enumeration permits different types of drag and drop operations to be supported. For example, the Move, Copy, and Link values permit an object to be moved, copied, or linked from the original data source to the drop target.
The DoDragDrop method does not return until the drag and drop operation is completed. The return value indicates what effect was performed by the operation. The QueryContinueDrag event in the Control class can be used to keep tabs on the operation. This event occurs periodically during drag and drop and can be used to cancel the operation or to modify the application window as required.
In our application, we will simply begin the operation and let the .NET Framework take care of the rest. We will provide two types of data formats using the DataObject class. The first will be the FileDrop format recognized by the Windows file system and applications such as Microsoft Paint. The second will be the Text format recognized by most word processors.
The following table details the changes required.
Set the version number of the MyPhotos application to 18.3.
BEGIN A DRAG AND DROP OPERATION
|
Action |
Result |
|
|
|
1 |
Locate the MouseDown event |
private void pnlPhoto_MouseDown |
|
handler for the Panel control in |
(object sender, |
|
the MainForm.cs code window. |
System.Windows.Forms.MouseEventArgs e) |
|
{ |
|
|
|
|
|
|
|
2 |
If the Ctrl key is not held down, |
if (ctrlKeyHeld) |
|
then retrieve the current |
{ |
|
photograph for the album. |
. . . |
|
} |
|
|
|
|
|
|
else |
|
|
{ |
|
|
// Initiate drag and drop for this image |
|
|
Photograph photo = _album.CurrentPhoto; |
|
|
|
620 |
CHAPTER 18 ODDS AND ENDS .NET |

BEGIN A DRAG AND DROP OPERATION (continued)
|
Action |
Result |
|
|
|
3 |
If this Photograph is found, |
if (photo != null) |
|
create a FileDrop data format for |
{ |
|
dragging the photograph to a new |
// Create object for encapsulating data |
|
DataObject data = new DataObject(); |
|
|
location. |
|
|
|
|
|
How-to |
// Construct string array for FileDrop |
|
string[] fileArray = new string[1]; |
|
|
a. Construct a DataObject |
|
|
fileArray[0] = photo.FileName; |
|
|
instance to hold the data for- |
data.SetData(DataFormats.FileDrop, |
|
mats. |
fileArray); |
|
b. Construct a string array to |
Note: The DataFormats class encapsulates vari- |
|
hold the associated file. |
ous data formats that can be used by drag and |
|
c. Associate the string array with |
drop operations. The FileDrop format used here |
|
requires a string array as the data type. This per- |
|
|
the FileDrop format for the |
|
|
mits multiple files to be provided at once. |
|
|
data. |
|
|
|
|
|
|
|
4 |
Also assign a Text format using |
// Use the caption for the text format |
|
the Caption property of the |
data.SetData(DataFormats.Text, |
|
photograph as the associated |
photo.Caption); |
|
|
|
|
data. |
|
|
|
|
5 |
Call the DoDragDrop method with |
// Initiate drag and drop |
|
the constructed data object to |
pnlPhoto.DoDragDrop(data, |
|
initiate a drag and drop Copy |
DragDropEffects.Copy); |
|
} |
|
|
operation. |
|
|
} |
|
|
|
} |
|
|
|
This code begins a drag and drop operation that can be received by any other application running on the computer. Other applications look at the provided data formats to identify whether they can accept the dragged data. We will look at how to do this in Windows Forms in a moment.
Of course, for applications that can receive multiple formats, the result they receive depends on which format they prefer. Most word processing applications look for the Text format first, and will therefore receive the Caption property of our photo, rather than the associated file object.
Compile and run the application. Display an album and click on the image. Hold the mouse and drag it to a new location to perform a drag and drop operation. Figure 18.3 shows the result of dragging one of our favorite images from the MyPhotos application into a Microsoft Paint application. The Paint application opens the given file and displays a copy of the image in its main window. Also try dragging an image into WordPad or some other word processor to see how the caption string appears.
DRAG AND DROP |
621 |
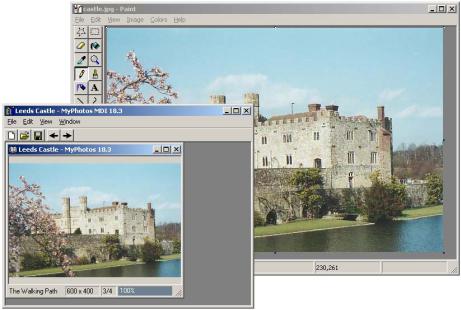
Figure 18.3 The FileDrop format used here to drag an image into Microsoft Paint is a common method for transferring files between applications.
This completes our example for initiating a drag and drop operation. The next topic is to handle drag and drop operations within the MainForm window.
18.3.2RECEIVING DRAG AND DROP
Regardless of where a drag and drop operation originates, an application can elect to handle the incoming data. The DragEnter and DragDrop events are used to receive such operations. Event handlers for both of these events receive a DragEventArgs object as their event parameter. A summary of this object appears in .NET Table 18.4.
622 |
CHAPTER 18 ODDS AND ENDS .NET |