

HTML 4_01 Weekend Crash Course - G. Perry
.pdf112 |
Saturday Morning |
areas — the two text areas and the image area — comprise three distinct bands on the Web page?
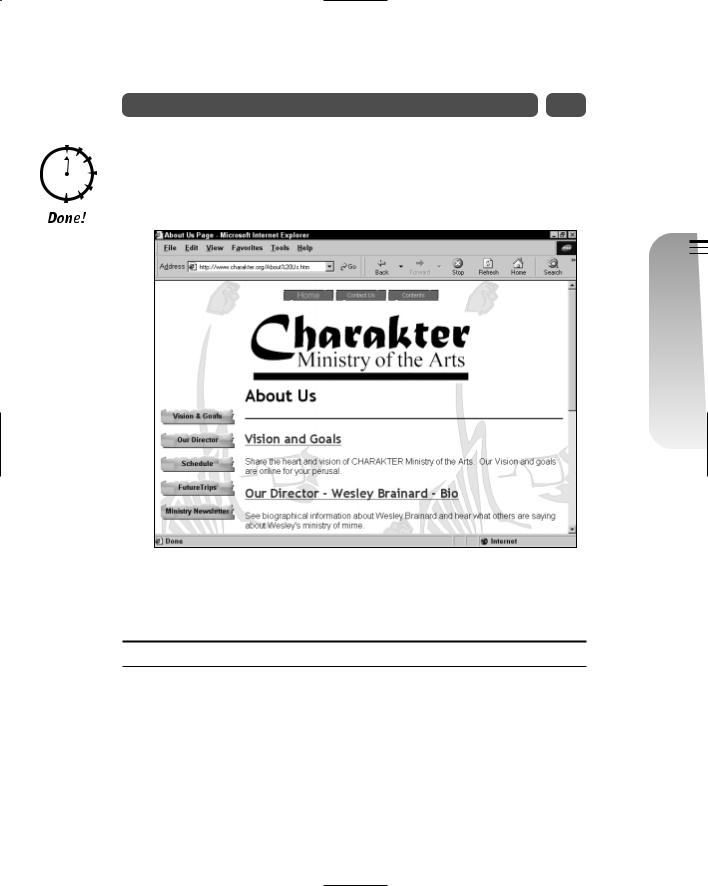
<p><font size=6>When a Web page combines text and graphics, the placement and alignment of the image determines where the image falls in relation to the surrounding text.</p>
<p><img border=0 src=”images/man.gif” width=190 height=176>
The image can fall any number of places in relation to the text. You have full control, through HTML, on the alignment of the image and text.</font></p>
Figure 9-1 shows the Web page that results from this HTML code. As you can see, by default, the page contains three distinct bands: the first text, the image, and the final text. Only a small portion of the text resides on the same line as the figure.
Figure 9-1
By default, your images and text consume different areas of the Web page.

Session 9—Text and Graphics Organization |
113 |
The three separate areas appear because of the paragraph tags. If you remove the paragraph tags, things can get messy depending on the browser. Without the paragraph tags separating the figure from the surrounding text, the figure goes inline with the text and falls in the middle of the text without any proper line breaks.
Horizontal image alignment
The <img> tag supports the align= attribute that you learned about in Session 7. The align=left and align=right attributes align the graphic image on the page. In addition, align=left and align=right affect how the image adjusts to surrounding text. That is, if you use the align=left or align=right attribute in the <img> tag, subsequent text appears to the left or right of the image.
|
Remember that the align=left and align=right attributes |
|
determine how subsequent text appears, not text already |
Note |
displayed. Therefore, all previous text that appears in your |
HTML code displays on the page in its normal fashion. When |
|
|
the <img> tag appears with an align=left or align=right |
|
attribute, any remaining text on that page begins next to |
|
the image. |
The following code is identical to what you have seen in the previous example except that the <img> tag includes the align=right attribute. This means that the image, not the text, aligns horizontally to the right side of the window and the text appears to the left of that image, as Figure 9-2 shows. The text that follows the <img> tag appears to the left of the image; this text is not extremely lengthy, but as you can see from the figure, it appears on the same horizontal area as the image and does not wait to appear after the image downloads. If you include the align=left attribute, the image will appear on the window’s left side.
<p><font size=6>When a Web page combines text and graphics, the placement and alignment of the image determine where the image falls in relation to the surrounding text.</p>
<p><img border=0 src=”images/man.gif” width=190 height=176 align=right>
The image can fall any number of places in relation to the text. You have full control, through HTML, on the alignment of the image and text.</font></p>
Morning Saturday—II Part
9 Session

114 |
Saturday Morning |
Figure 9-2
The align= attribute can determine on which side of the image the text appears.
Vertical image alignment
The text that appears to the left and right of the image in Figure 9-2 looks somewhat strange because of a few reasons: The text is not long enough to fill the area next to the image, and the text aligns at the top of the image and does not rest on the image’s baseline, nor is it centered to the image’s vertical area.
The <img> tag supports three vertical alignment attributes with which you can better align the image to the text. You can specify align=top (the default), align=middle, or align=bottom to determine how the image aligns with the base of the text.
Figure 9-3 shows the result of all three vertical alignment attributes by showing an image aligned to the top of the text’s baseline, the middle, and the bottom of the text’s baseline, according to the following HTML code:
<p><font size=6>Aligns with the align=top attribute.
<img border=”0” src=”images/girl.gif” width=190 height=157 align=top></p>

Session 9—Text and Graphics Organization |
115 |
<p>Aligns with the align=middle attribute.
<img border=”0” src=”images/girl.gif” width=190 height=157 align=middle></p>
<p>Aligns with the align=bottom attribute.</font>
<img border=0 src=”images/girl.gif” width=190 height=157 align=bottom></p>
Morning Saturday—II Part
9 Session
Figure 9-3
The image is aligned with the text’s vertical baseline in three different ways.
Never mix an align=left or align=right attribute with one of the vertical alignment attributes. HTML goes by only the final align= attribute that you specify in an <img> tag list. If you
Never want the image to align on the left or right side of the text when you use one of the vertical alignment attributes, enter the text before the <img> tag. Enter the text after the <img> tag if you want the image to appear to the left of the text. The text precedes the image placement, hence the text appears to
the right of the image.

116 |
Saturday Morning |
|
The <br> tag supports clear=left, clear=right, and clear=all |
|
attributes that enable you to stop or change the alignment of an |
Tip |
image from that point forward in the text. In other words, if you |
left-align an image so that the subsequent text appears to the |
|
|
right of the image, place the <br clear=left> at the point |
|
where you want the text to stop appearing next to the image. |
|
The text will stop appearing until the entire left margin is clear |
|
of the image. If you specify <br clear=right>, the subsequent |
|
text in the HTML page stops appearing until the right margin is |
|
free of the image. The <br clear=all> tag resumes the display |
|
of text once both margins are clear of any images. |
A special vertical alignment attribute, align=absmiddle, aligns an image in the very center of a horizontal line of other graphics and text. If you want an image to appear in the center of its surrounding images and text, instead of aligning the image only to text alone, use align=absmiddle.
Spacing Images and Creating Horizontal Rules
Several methods enable you to control exact spacing between images, and the next section explains one of the easiest ways. In addition, you can create your own images that become horizontal rules to eliminate the boring gray horizontal rule that appears as a result of the <hr> tag that you learned about in Session 6.
Increasing image space
The <img> tag supports the hspace= attribute that determines how much blank space, in pixels, an image contains on its left and right sides. The vspace= attribute controls blank space at the top and bottom of an image.
The best way to learn these spacing attributes is to see them in action. Figure 9-4 shows the same image displayed three times with text appearing to the right of the image in each case.
Listing 9-1 contains the code necessary to produce Figure 9-4. The first image shows the text as it appears with no added spacing specified around the image. The second image appears with horizontal space added to the image. The final image appears with vertical space at the top and bottom of the image.

Session 9—Text and Graphics Organization |
117 |
Morning Saturday—II Part
9 Session
Figure 9-4
The effect of adding extra horizontal and vertical space around an image
Listing 9-1
Increasing the blank pixel area on an image’s sides
<img border=”0” src=”images/italy.gif” width=105 height=85 align=left>
<font size=5>The image aligns with no extra space around the image. Notice the image appears to the left of the text due to the image’s align= attribute and no extra space appears on the side of the image. The image contains micro-spacing on its sides automatically.
<p>
<img border=”0” src=”images/italy.gif” width=105 height=85 align=left hspace=35>
Continued

118 |
Saturday Morning |
Listing 9-1 |
Continued |
The image aligns with extra space around the image. Notice the image appears to the left of the text due to the image’s align= attribute and extra space appears on the sides of the image.
The image contains micro-spacing on its sides automatically. </p>
<p>
<img border=0 src=”images/italy.gif” width=105 height=85 align=left vspace=35>
The image aligns with no extra space around the image. Notice the image appears to the left of the text due to the image’s align= attribute and extra space appears on the top and bottom sides of the image. The image contains micro-spacing on its sides automatically and vspace= adds additional space on the top and bottom of the image.</font>
</p>
Creating your own horizontal rules
If you want to spruce up the gray horizontal rules that appear as a result of the <hr> tag, you can create your own. Feel free to create all the horizontal rules you want. The horizontal rule files should be GIF images.
The only thing you need to remember when using GIF files as horizontal rules is that you should perform an align=center command before using your own rule images so that text does not flow oddly around a graphic horizontal rule that’s supposed to be separating text sections.
Use graphic horizontal rules that repeat a simple pattern to create separating rules that do not distract from the text and,
more importantly, the images on your Web page.
Tip
Just about any graphics program will create fancy horizontal rules with little effort on your part. Sometimes, a simple colored line, three or four pixels wide, makes the perfect horizontal rule for a page. Although the standard horizontal rule that appears because of the <hr> tag works well for just about any page
of any design, unique rules can help distinguish your Web page.

Session 9—Text and Graphics Organization |
119 |
Using Headline and Background Images
Two additional uses of graphics are their placement in headlines (which are covered in Session 5), such as banner ads, and as background images produced from an enlarged version of a graphic image. The next two sections discuss these two additional uses.
Headline graphics
When you use an image in a headline, as you might do when placing a banner advertisement at the top of your Web page, be sure to enclose the image inside the page’s <hn> tag.
Consider the following code:
<h1 align=center>
<img src=”images\myad.gif” border=4 alt=”Site’s Income”> </h1>
A headline image can appear between any of the headline tags, <h1> through <h6>. The headline tags are explained in Session 5.
Note
Figure 9-5 shows the result of placing an image inside headline tags. Although the headline tags are not required for the image to appear before the text, since you can easily use an <img> tag inside the Web page body to display an image before text begins, the headlines enable you to easily maintain the headline placement later. You can add additional headline levels or change the headline level of the image without having to restructure the body of your page.
Background images
As you learned in Session 5, the bgcolor= attribute of the <body> tag colorizes your Web page background. You are not limited to single colors that the tag provides. You can place your own image on the background of your Web pages. Use the background= attribute inside the <body> tag using this format:
<body background=”image.jpg”>
Morning Saturday—II Part
9 Session

120 |
Saturday Morning |
Figure 9-5
Images work well inside headlines.
Not every image works well as a background for your Web page. Keep the following in mind:
Do not make your background image stronger than your Web page. If the background includes rich colors and crisp lines, the text and graphics that you intend to place over the image will be less noticeable. The background is exactly that: a background.
A light background is almost always preferable to a dark background. Several exceptions to this exist, however. Black actually makes a good background for some text. You will have to experiment.
You can create your own background images. All you need to do, if you create a background that continually repeats a pattern, is create only the small, single instance of the pattern, and the browser will repeat that image until the Web page background is full.
Even though the image repeats, the browser only has to load the image one time. Therefore, a background takes only as long to load as the single pattern image takes to load.
When you create your background’s pattern, make sure that the pattern has no border.
Your background image patterns can be large, but make sure the pattern fits well within a small browser. Then, when the image repeats, even inside the small browser, at least two full images will appear in the browser background.
Session 9—Text and Graphics Organization |
121 |
Figure 9-6 shows an effective background image that is rather different from the typical repeated pattern image. The image repeats only once, but the double image encloses the rest of the page fairly effectively. (On large monitors powered by high-resolution graphic adapters, the image repeats three or more times.)
Figure 9-6
When a background image repeats, the load time takes only as long as the single image takes to load.
REVIEW
You can align your images properly with text and with other images on your Web page.
Extra space around some graphics often set apart the image from other elements on your Web page.
You can create your own horizontal rule images with just about any graphics program when the normal gray horizontal rules are not enough.
Morning Saturday—II Part
9 Session