

Ministry of Health Protection of Ukraine
Kharkov National Medical University Orthopedic Dentistry Department
|
“APPROVED” The Head of Orthopedic Dentistry Department Kharkov National Medical University Professor MD, DDS, PhD ___________Victor P.Golik " 30 " August 2012.
|
Methodological instruction
to the practical class №2
(for teacher)
Module 3
«COMPLETE removable dentURES»
MAKE ON THE BASE OF CREDIT-MODULE SYSTEM ACADEMIC PROCESS ORGANIZATION FOR DENTAL FACULTY STUDENTS OF ΙΙΙ-IV LEVELS ACCREDITATION HIGHER EDUCATIONAL
Contents module 1
Examination oral cavity of the patients with edentulous jaws. Taking functional impressions. Biomechanical movements of the lower jaw.
Methodological instruction is composed
by assistant NATALIYA N. BreSLAVETS
Kharkov 2012
VII term, lesson 6
Methodological instruction to practical class for teacher
Topic № 88: |
ANATOMICAL SETTING TEETH ON GLASS, AND SPHEROID SURFACE |
Duration 3 hours
Time tabulate of practical class
1. Organization of laboratory class and preparation of working places - 5 minutes.
2. Analysis of home assignment - 20 minutes.
3. Demonstration of practical skills for independent students’ work - 15 minutes.
4. Independent students’ work under teacher’s supervision - 45 minutes.
5. Summing up of laboratory class and formulation of home task - 5 minutes.
Total time - 90 minutes.
Theme urgency
Information of the anatomical setting teeth on glass, and spheroid surface. Techniques.
The General purpose
Taking anatomical setting teeth on glass, and spheroid surface.
Specific purposes
Techniques of anatomical setting teeth on glass, and spheroid surface.
Theoretical questions ON WHICH BASIS PERFORMANCE OF TARGET KINDS OF ACTIVITY IS POSSIBLE
1. Setting teeth on glass by Vasiliev.
2. Setting teeth spherical surface
3. Setting individual teeth in occlusion curves.
4. Phenomenon of Katz - Efron - Gelfand
5. Phenomenon of Christiansen.
6. Anatomic staging teeth in progenic and prognatic jaws value.
Literature recommended
Main Sources:
Prosthetic treatment of the edentulous patient. Fourth edition. R.Basker, J.Davenport. Blackwell. 2002 – 316 p.
Complete Denture. Manual. Robert W. Loney, DMD, MS. 2009.- 99 p.
Duncan, J. P., Taylor, T. D.: Simplified complete dentures. Dent Clin North. 2004;48:625.
Felton, D. A., Cooper, L. F., Scurria, M. S.: Predictable impression procedures for complete dentures, In Engelmeier, R.L., ed. Complete Dentures. Dent Clin North Am. Philadelphia: W.B. Saunders, 1996;40:39-51.
Petropoulo.s, V. C., Rashedi, B.: Compute denture education in U.S. dental schools. J Prosthodont. 2005:14:191-7.
ORGANIZATIONAL STRUCTURE OF THE practical CLASSES
(Implementation of practical class plan):
At the beginning of the class a teacher calls the register and designates a student on duty, names the topic and purpose of the class, finds out unclear questions, which appeared during independent work of students.
Then the teacher analyzes subject questions, tasks of students’ research work and methods of practicing skills in accordance with the methodologic instruction, by means of actively questioning all students of the group.
The teacher is guided by the extent of knowledge obtained by the students during their independently studying the material in the textbooks, lecture notes and methodologic instructions, as well as preparing students’ research work in the albums for independent work.
Besides, the teacher can choose to check the hometask in oral or written form, as well as in mixed and oral-and-written form. The teacher can use situational tasks and test questions in addition to routine subject questions.
Having controlled the students’ knowledge for the class, the teacher demonstrates to the students methods of preparation and obtaining of a print thermoplastic impression material.
After the demonstration the students start to independently train practical skills on each other under supervision of a senior laboratory assistant or the teacher.
At the end of the class the teacher gives marks for oral answer or written work, for independent students’ work, signs the protocol of the laboratory work, as well as names the next topic and questions for study.
Summary
Selecting and Setting Denture Teeth
Reference Marks on the Occlusion Rims, Record Bases and Master Casts
W hen
a dental laboratory technician will be setting the denture teeth, it
is critical that the occlusal vertical dimension, the lip support,
the angulation and overjet of the wax occlusion rims be determined
correctly, for the technician will not have the benefit of patient
contact to help them set the teeth in proper position. After
accurately adjusting these aspects of the occlusal rims, the dentist
should place some additional reference marks on the occlusion rims to
aid in tooth selection and placement.
hen
a dental laboratory technician will be setting the denture teeth, it
is critical that the occlusal vertical dimension, the lip support,
the angulation and overjet of the wax occlusion rims be determined
correctly, for the technician will not have the benefit of patient
contact to help them set the teeth in proper position. After
accurately adjusting these aspects of the occlusal rims, the dentist
should place some additional reference marks on the occlusion rims to
aid in tooth selection and placement.
The selection of shade is very difficult for some patients because it is not a scientific procedure. The following aids are helpful:
1. The shade of teeth on any previous dentures is often the shade of choice for patients.
2. Although teeth tend to darken over time, there is no specific shade of artificial teeth that can be used for a given age group.
3. The selection of tooth shade may be based upon die facial complexion. The least conspicuous shade is often the best choice.
4. Make use of any pre-extraction shade determination.
5. Recently extracted teeth may be useful, but caution is advised. Extracted teeth tend to lighten in shade with during or storage in disinfectant solutions.
6. Listen to the patient's desires.
Rules for Setting Denture Teeth
1. The labial surface of the maxillary centrals should be 8-10mm in front of the center of the incisive papilla. (See the "reference" section in the "addendum" at the end of web site.) The incisal edge should be on the occlusal plane.
2. The midline should be taken from a line drawn down the middle of the face. The maxillary centrals should be on that (vertical) line.
So after we set the midline on the wax rim, the student noticed that the centrals were not exactly in the middle of the arch. He/she therefore moved the midline so it would coincide with the median raphe of the palate (or the middle of the incisive papilla). Naturally when we tried in the teeth the midline was off and all the teeth had to be reset.
You should try to get the lower midline to coincide with the upper. However this is not critical. Sometimes it is impossible to line up the midlines because your lower appliance is a partial and the teeth have drifted.
3. No anterior contact.
4. Buccal overjet all the way around the arch. (No overbite.)
5. Set central fossa of mandibular posterior teeth over the crest of the mandibular ridge.
6. Set teeth flat bilaterally, and half way, to two thirds up the pad.
(Check from the lingual to see if the lingual cusps are on the same level as the buccal cusps.)
7. Simultaneous bilateral posterior contact.
8. Contacts of equal intensity around the arch.
9. Group function. (No canine guidance.)
10. With flat teeth there are no cusps or fossa. There can't be an exact cusp to fossa relationship. Some instructors still prefer a very good approximation of cusp to fossa. (I don't.)
11. The occlusal plane should be at about the commissure of the lips. It should also be just below the dorsum of the tongue. (Just follow your occlusion rims is the easiest rule.)
12. When the set-up is complete check the lingual contacts of the maxillary teeth while viewing from the back of the articulator. Frequently they are out of contact. Open the articulator and dig into the lingual wax to pull down the maxillary linguals. Close the articulator so the maxillary teeth will return to proper contact. Fill the holes in the wax to secure the position of the maxillary teeth.
Method of execution: the once widely used in our production methods became artificial teeth on glass by M.Ye.Vasylyevym. It allows setting artificial teeth not only in the articulator, but in simple hinged occludators as artificial teeth are placed in a certain order with respect to the prosthetic plane.
Setting artificial teeth in the glass if different types of malocclusion always start from the upper jaw. This glass fix to the upper occlusal ridges, then make cutting parts of bite roller mandible thick in 2-3 mm, stick thin columns softened wax and closes occludator to block occlusal height. Plates fix by molten wax to bite ridge of the mandible, separated from the upper roller and start setting artificial teeth of the upper jaw.
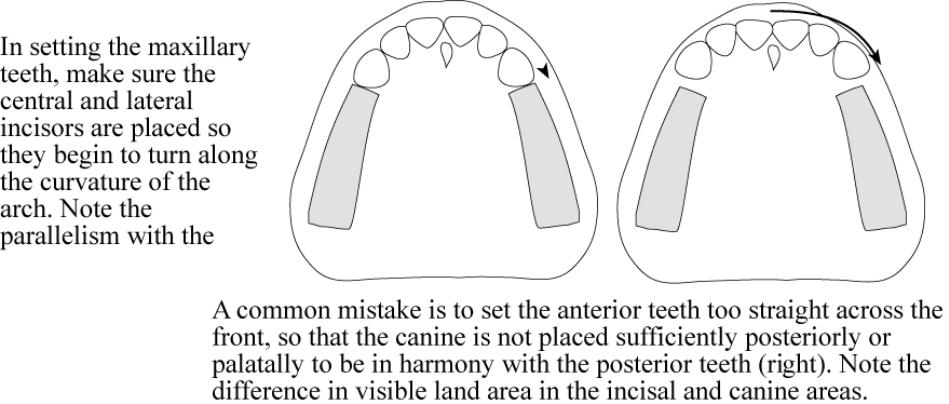
The upper incisors are placed on both sides of the medial line so that the cutting edges are touching to glass surface. In relation to the collar bone incisors and canines are placed so that 2/3 of their thickness located external from its middle. Lateral incisors are placed with medial tilt the cutting edge of the central incisor and with small medial rotation angle to anterior. The cutting edge of not reaching the glass surface by 0.5 mm.
Fang should touch the surface of the glass, put it on a slight slope cutting edge to the midline. Group frontal incisors and canines have form of semicircle.
The first premolars placed so that it touched the glass surface only buccal tubercle, palate behind the glass of 1 mm. Second premolars touches the surface of the glass both hills, the first molar - only medial-palatal tubercle. Medially-Jaw mound behind the glass at 0.5 mm distal-palatal - 1 mm, and distal-buccal - 1.5 mm. The second molar is placed in such a way that all its bumps do not touch the glass surface, a medial-Jaw mound located at the distal buccal protuberance first molar. The remaining teeth placed so that they do not reach the glass at 2-2.5 mm. To ensure fixation of prostheses during operation is mandatory production of chewing teeth strictly middle ridge collar bone. This rule neobhidnodo infrastructure capacity for meeting and event productions lower front incisors and posterior teeth. After the construction of artificial denture maxilla him spend setting artificial teeth of the mandible. First we are setting second premolars, then - chewing teeth and first premolars, guided by a Pound triangle, last of all conduct posing front of the teeth. Using the setting artificial teeth by the method M.Ye.Vasylyeva receive the artificial tooth rows sagittal and transversal occlusal curves that provide effective functioning complete dentures in the mouth.
A. Maxilla
In the maxilla, reference marks should include:
M idline
of the maxillary rim - Use a wax
spatula to score a line demarcating the position of the midline of
philtrum of the lip. This is one of the most critical references to
record. Ensure the mark is a line, not just a dot, which parallels
the patients overall facial midline. Otherwise the incisors can be
set at an angle, making the set up look off center. The mandibular
midline can be marked at the same time.
idline
of the maxillary rim - Use a wax
spatula to score a line demarcating the position of the midline of
philtrum of the lip. This is one of the most critical references to
record. Ensure the mark is a line, not just a dot, which parallels
the patients overall facial midline. Otherwise the incisors can be
set at an angle, making the set up look off center. The mandibular
midline can be marked at the same time.
Corners of the mouth - Use a wax spatula to mark the corners of the patient’s mouth, when closed, at rest. This approximates where the distal of the canine teeth should terminate. Use the flexible Trubyte Auto-Rule to measure around the circumference of the rim between contralateral marks - tooth size of the six anterior teeth
High Lip line -Use a wax spatula to mark the highest point the upper lip reaches when the patient smiles. The maxillary anterior teeth should be selected so the cervical necks lie at or above this line. If shorter teeth are selected, the esthetic result will be compromised.
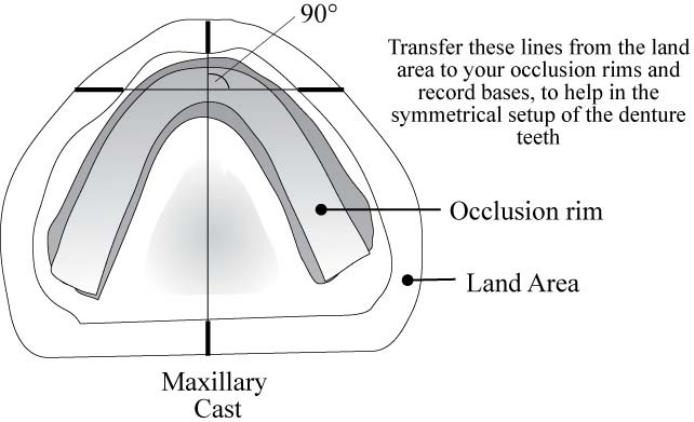
Palatal Midline - With a pencil (NOT an indelible stick) and a straight edge, draw a line through the middle of the incisive papilla and the mid-palatal raphe, extending it onto the land area of the cast. Check your occlusal rim for symmetry about this important midline. If it is not symmetrical, adjust the rim prior to sending it to the lab for placement of teeth.
Distal aspect of the incisive papilla - In the edentulous maxilla, a line drawn perpendicular to the palatal midline, passing trough the distal aspect of the incisive papilla should normally intersect with the cusp tips of the canines. Draw this line with pencil and a straight edge, on the cast, extending out to the land area. It will provide verification that your tooth size selection was correct. Additionally, it will provide another line to verify the symmetry of the wax rim and denture tooth setup.
On average, the facial surface of the central incisors should be approximately 8-10mm anterior to this line.

B. Mandible
In the mandible, reference marks should include:
Half way up the retromolar pad - the posterior aspect of the occlusal plane should intersect the midpoint of the pear shaped pad, to ensure the occlusal plane is not set too low (can cause tongue biting) or too high (can cause strain as tongue struggles to place the food bolus back on occlusal table)
Center of the posterior mandibular ridge - Draw this line with a pencil and a straight edge, on the cast, extending out to the land area. The lingual cusp of the maxillary posterior teeth should be centered over this line to ensure denture stability, by reducing fulcruming forces during function
Center of the anterior mandibular ridge - Draw this line with a pencil and a straight edge, on the cast, extending out to the land area. If the anterior teeth are set too far anterior to this line, heavy fulcruming forces can cause tilting and dislodging of the mandibular denture, particularly when the mandibular ridge is severely resorbed.

Selecting Anterior Teeth
Selection of anterior teeth requires a combination of science and artistic ability based on observation. Measurement, formulas etc. are only a starting point – use your eyes and common sense.
Size
- Use existing teeth as a guide:
- High Lip Line gives indication of inciso-gingival length (minimal gingival display)
- Mark the position of the commisures of mouth with patient relaxed, mouth closed
- Pre-extraction casts or photographs can be useful, if available
Shape
- Tooth shape does not correspond to facial shape, but the Trubyte system can be a good starting point for experimenting; there are proven no male/female characteristics
Shade
- Tooth shade darkens with age, but the suggestion that there is any correlation with skin and hair colour is suspect
- Don’t show a patient all shades in the shade guide outside of the mouth – patients will
almost always pick the whitest shade
- Instead show patient 2 or 3 shades under lip and ask their opinion (colour perception is affected by background) – disinfect the tabs afterward
- Use the Portrait Shade number and not the Vita shade code when prescribing denture teeth from the Portrait shade guide. (Portrait numbers begin with a "P" and are listed as the bottom-most shade code on the shade tabs)
- Anterior and posterior tooth shades are the same
- Shade selection for porcelain restorations should be made with the Vita shade guides
- If you need to match a porcelain restoration to denture teeth, select the Vita shade for porcelain and pick the corresponding Portrait shade for theVita shade (the Vita shades are listed on the top of the Portrait shade tabs )
- The patient should choose the shade guided by the dentist – if they want the whitest teeth possible, offer your opinion, don't persuade
- Use the squint test for value (brightness) - squinting reduces the influence of hue - if the teeth look too bright while squinting, suggest something less bright
Material
- Porcelain teeth are becoming less prevalent
- Acrylic much easier to set and adjust;

M andibular
anterior teeth incline similar to the maxillary teeth, but the
incisal edges are placed at a similar level to each other.
andibular
anterior teeth incline similar to the maxillary teeth, but the
incisal edges are placed at a similar level to each other.
The mandibular anterior teeth are set even with the occlusal plane (no overbite) for monoplane and lingualized occlusal schemes.
Canines should be tilted more posteriorly than other anterior teeth, and should have a more prominent cervical neck


Selecting Posterior Teeth Form
Anatomic (40 °, 30°, 20°(semi-anatomic), 10°)
- More esthetically pleasing (especially in the premolar region) – use for patients with esthetic concerns, if there are no contraindications (severe ridge resorption, uncoordinated jaw movement)
- Use when a balanced occlusion is desired – they are easier to balance. Select a tooth cusp angle similar to the condylar inclination
- Use when coordinated jaw movements are present
- Use when setting teeth for a single denture opposing a natural dentition (easier to interdigitate)
Non-anatomic (0°)
- Use when there are jaw size discrepancies (use in cross-bite situations, Angles Class III)
- Use when a reduction in horizontal forces is desired (severe ridge resorption)
- Use when a patient has uncoordinated jaw movements are present
- Poorer esthetics, due to lack of cuspal inclines
- Set with no incisal guidance (no overbite) when used in a monoplane occlusal scheme
- Selection of tooth form also depends on:
- Condylar and incisal guidance inclinations - easier to balance using a cusp angle similar to the condylar inclination
- Curve of Spee - determined by the dentist
- Angulation of occlusal plane - determined by the dentist
No tooth form has been proven most efficient – most patients can't discern a difference.
Posterior Tooth
Size :
- The Trubyte mould chart has of list of corresponding size to match the anterior teeth already selected
- Select by determining distance of distal of canine to position of beginning of ascending ramus (29, 30 mm. etc), also look at mould guide chart
- The posterior teeth should at least approximately match the cervico-incisal height of anteriors (no large discrepancies)
- Selection may be affected by the interocclusal distance available for setting teeth (amount of space for ‘S’, ‘M’, or ‘L’ teeth) - if limited space, choose a shorter mould
- buccolingual size of teeth can affect the tongue space – choose smaller teeth if tongue space is limited
Setting Posterior Teeth:
- Posterior teeth are set for function, while the anterior teeth are set mainly for esthetics and phonetics (although placement can affect incising ability and fulcruming potential of the denture)
- Stability is increased when centric contacts are on flat surfaces, rather than on inclines
- The most important cusp in the posterior setup is the maxillary lingual cusp which is set over the middle of the mandibular ridge (mandibular central fossae will be placed here)
- Ensure 1-2 mm of overjet in order to prevent cheek or lip biting
- Mandibular buccal cusps are lateral to the residual ridge and have more tipping potential for the lower denture
- For a lingualized setup, there should be 1mm separation of the maxillary and mandibular BUCCAL cusps
VII term, lesson 6
Methodological instruction to practical class for teacher
Topic № 88: |
CHECKING CONSTRUCTION COMPLETE DENTURES |
Duration 3 hours
Time tabulate of practical class
1. Organization of laboratory class and preparation of working places - 5 minutes.
2. Analysis of home assignment - 20 minutes.
3. Demonstration of practical skills for independent students’ work - 15 minutes.
4. Independent students’ work under teacher’s supervision - 45 minutes.
5. Summing up of laboratory class and formulation of home task - 5 minutes.
Total time - 90 minutes.
Theme urgency
Information of the checking construction complete dentures.
The General purpose
Taking checking construction complete dentures.
Specific purposes
Techniques of checking construction complete dentures.
Theoretical questions ON WHICH BASIS PERFORMANCE OF TARGET KINDS OF ACTIVITY IS POSSIBLE
Steps to check the design of complete dentures.
Requirements models toothless jaws.
Evaluation of wax patterns of artificial teeth.
Checking setting teeth.
Literature recommended
Main Sources:
Prosthetic treatment of the edentulous patient. Fourth edition. R.Basker, J.Davenport. Blackwell. 2002 – 316 p.
Complete Denture. Manual. Robert W. Loney, DMD, MS. 2009.- 99 p.
Duncan, J. P., Taylor, T. D.: Simplified complete dentures. Dent Clin North. 2004;48:625.
Felton, D. A., Cooper, L. F., Scurria, M. S.: Predictable impression procedures for complete dentures, In Engelmeier, R.L., ed. Complete Dentures. Dent Clin North Am. Philadelphia: W.B. Saunders, 1996;40:39-51.
Petropoulo.s, V. C., Rashedi, B.: Compute denture education in U.S. dental schools. J Prosthodont. 2005:14:191-7.
ORGANIZATIONAL STRUCTURE OF THE practical CLASSES
(Implementation of practical class plan):
At the beginning of the class a teacher calls the register and designates a student on duty, names the topic and purpose of the class, finds out unclear questions, which appeared during independent work of students.
Then the teacher analyzes subject questions, tasks of students’ research work and methods of practicing skills in accordance with the methodologic instruction, by means of actively questioning all students of the group.
The teacher is guided by the extent of knowledge obtained by the students during their independently studying the material in the textbooks, lecture notes and methodologic instructions, as well as preparing students’ research work in the albums for independent work.
Besides, the teacher can choose to check the hometask in oral or written form, as well as in mixed and oral-and-written form. The teacher can use situational tasks and test questions in addition to routine subject questions.
Having controlled the students’ knowledge for the class, the teacher demonstrates to the students methods of preparation and obtaining of a print thermoplastic impression material.
After the demonstration the students start to independently train practical skills on each other under supervision of a senior laboratory assistant or the teacher.
At the end of the class the teacher gives marks for oral answer or written work, for independent students’ work, signs the protocol of the laboratory work, as well as names the next topic and questions for study.
Summary
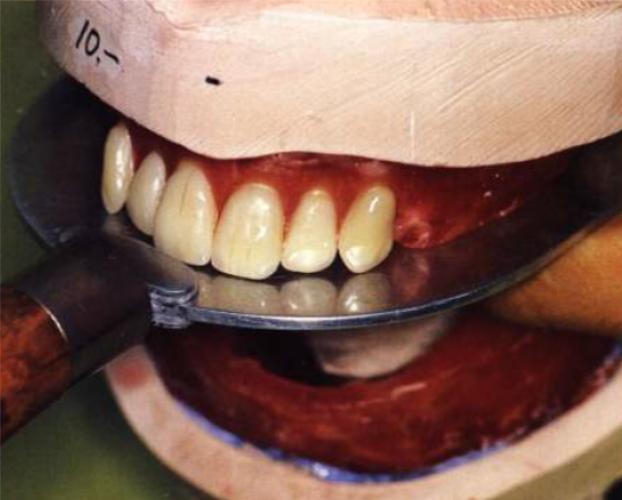
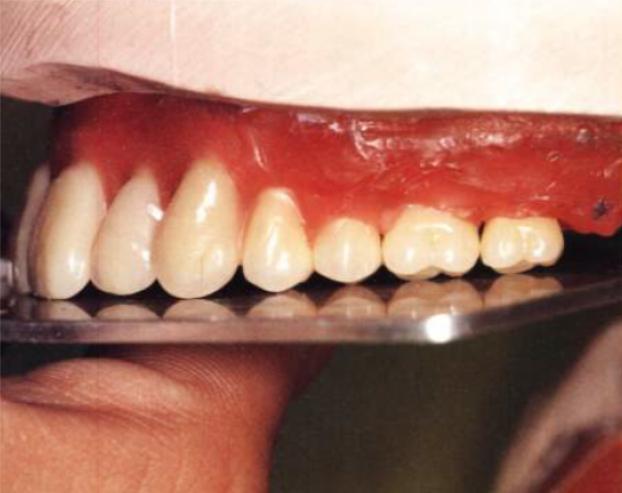
The Wax Try-in
The purpose of the wax try-in appointment is to verify all aspects of the denture tooth setup – the appearance, phonetics, occlusal relationships and patient comfort. Normally two try-in appointments are required, an initial wax try-in and a final wax tryin. Never overlook problems you find in the wax try-in stages. If you or the patient find problems, the problems may be more difficult or impossible to change after processing. Failure to make changes at this stage might require removal, resetting and reprocessing of the teeth on the finished denture – procedures that are more costly and time consuming.
Wax Try-in: Preliminary insertion of complete denture wax up (trial denture) to determine the fit, esthetics, maxillomandibular relations -----etc.