

Introduction to the ABAP Workbench
Icons in Body Text
The following icons are used in this handbook.
-
Icon
Meaning

For more information, tips, or background

Note or further explanation of previous point

Exception or caution
Procedures

Indicates that the item is displayed in the instructor’s presentation.
Course Overview .................. ....................... ................ vii
Course Goals ... ... .. ... ... ... .. ... ... .. ... ... ... .. ... ... ... .. ... ... .. ..vii
Course Objectives .. ... ... ... .. ... ... .. ... ... ... .. ... ... ... .. ... ... .. .. ix
Unit 1: Flow of an ABAP Program ...................... ............... 1
System Architecture and ABAP Program Using Example of
Selection Screen and List . ... ... .. ... ... ... .. ... ... ... .. ... ... .. ... 2
Unit 2: Introduction to the ABAP Workbench ............ ......... 17
Repository and Object Navigator . . . . . . . . . . . . . . . . . . . . . . . . . . . . . . . . . . . 18
Developing Programs and Organizing Developments . . . . . . . . . . . 29
Unit 3: Introduction to the ABAP Dictionary.............. ......... 61
Data Modeling and Descriptive Elements in the ABAP Dictionary
.. ... ... .. ... ... ... .. ... ... ... .. ... ... .. ... ... ... .. ... ... ... .. ... ... .. . 62
Unit 4: Basic ABAP Language Elements . . . ............... ......... 81
Working with Elementary Data Objects ... ... .. ... ... ... .. ... ... .. . 82
Working with Structures . . ... .. ... ... .. ... ... ... .. ... ... ... .. ... ... .. 107
Working with Internal Tables.. ... ... .. ... ... ... .. ... ... ... .. ... ... .. 120
Unit 5: Data Retrieval . ................... .................. ............ 145
Reading Database Tables . . . . . . . . . . . . . . . . . . . . . . . . . . . . . . . . . . . . . . . . . . 146
Authorization Check ... ... ... .. ... ... .. ... ... ... .. ... ... ... .. ... ... .. 174
Unit 6: Tools for Program Analysis .................. ............... 189
Runtime Analysis and Code Inspector ... ... .. ... ... ... .. ... ... .. 190
Unit 7: Subroutines in ABAP ... ....................... ............... 201
Subroutines .. ... ... .. ... ... ... .. ... ... .. ... ... ... .. ... ... ... .. ... ... .. 202
Unit 8: Introduction to ABAP Events ................ ............... 221
ABAP Events ... ... .. ... ... ... .. ... ... .. ... ... ... .. ... ... ... .. ... ... .. 222
Unit 9: User dialogs .............. ....................... ............... 233
List . ... ... .. ... ... ... .. ... ... ... .. ... ... .. ... ... ... .. ... ... ... .. ... ... .. 235
Selection Screen .. .. ... ... ... .. ... ... .. ... ... ... .. ... ... ... .. ... ... .. 255
Screen ... .. ... ... ... .. ... ... ... .. ... ... .. ... ... ... .. ... ... ... .. ... ... .. 273
User Interface . ... ... ... .. ... ... ... .. ... ... .. ... ... ... .. ... ... ... .. ... 320
Unit 10: Reuse Components .... ...................... ............... 341
Working with Function Modules . . . . . . . . . . . . . . . . . . . . . . . . . . . . . . . . . . . . 342
Working with Methods . . . . . . . . . . . . . . . . . . . . . . . . . . . . . . . . . . . . . . . . . . . . . . . 361
Working with BAPIs . . . . . . . . . . . . . . . . . . . . . . . . . . . . . . . . . . . . . . . . . . . . . . . . . . 380
Unit 11: Adjusting the SAP Standard Software (Overview) . . . 389
Adjusting the SAP Standard Software (Overview). . . . . . . . . . . . . . . 390
Index ................... ................... .................. ............... 403
This course introduces you to the ABAP programming language of SAP as well as its development environment, the ABAP Workbench. In both cases, we will be focusing on concepts and fundamental principles. We also introduce the appropriate terminology, so that you will find it easier to understand the in-depth documentation.
We always handle these topics using practical application examples, so that you can immediately implement what you have learned. Above all, it should be clear how little effort is required to rapidly create high-performance business applications in the ABAP Workbench.
We are convinced that this course will enable you to start developing immediately and provide you with the knowledge needed to focus on the essentials in subsequent courses.
That is why this course is a prerequisite for more in-depth ABAP Workbench
programming courses.
Target Audience
This course is intended for the following audiences:
• Project team members
• ABAP programmers
Course Prerequisites
Required Knowledge
• Programming knowledge
• SAPTEC (SAP NetWeaver - basics of the application platform)
Course Duration Details
Unit 1:
Flow of an ABAP Program
System Architecture and ABAP Program Using
Example of Selection Screen and List 20 Minutes
Unit 2: Introduction to the ABAP Workbench
Repository and Object Navigator 45 Minutes
Developing Programs and Organizing
Developments 95 Minutes Exercise 1: Organizing Developments 5 Minutes Exercise 2: Developing ABAP Programs 20 Minutes
Exercise 3: Creating Transactions 10 Minutes
Unit 3: Introduction to the ABAP Dictionary
Data Modeling and Descriptive Elements in the
ABAP Dictionary 75 Minutes
Exercise 4: Using Global Structures for Data
Objects and Dialogs 30 Minutes
Unit 4: Basic ABAP Language Elements
Working with Elementary Data Objects 75 Minutes Exercise 5: Basic ABAP Statements 30 Minutes Working with Structures 75 Minutes Exercise 6: Working with Structures 30 Minutes Working with Internal Tables 90 Minutes Exercise 7: Working with Internal Tables 30 Minutes
Unit 5: Data Retrieval
Reading Database Tables 110 Minutes Exercise 8: Data Retrieval Using a SELECT Loop 30 Minutes Exercise 9: Data Retrieval and Buffering in an
Internal Table 35 Minutes
Authorization Check 60 Minutes
Exercise 10: Authorization Check 20 Minutes
Unit 6: Tools for Program Analysis
Runtime Analysis and Code Inspector 30 Minutes
Unit 7: Subroutines in ABAP
Subroutines 70 Minutes
Exercise 11: Subroutines 30 Minutes
Unit 8: Introduction to ABAP Events
ABAP Events 20 Minutes
Unit 9: User dialogs
List 110 Minutes Exercise 12: List 50 Minutes Selection Screen 80 Minutes Exercise 13: Selection Screen 30 Minutes Screen 220 Minutes Exercise 14: Creating and Calling a Screen 40 Minutes Exercise 15: Screens: Data Transport 30 Minutes Exercise 16: Screens: Specifying the Next Screen
Dynamically 40 Minutes
User Interface 70 Minutes
Exercise 17: Creating an Interface 40 Minutes
Unit 10: Reuse Components
Working with Function Modules 80 Minutes
Exercise 18: Using Function Modules 40 Minutes
Working with Methods 80 Minutes Exercise 19: Using Methods 40 Minutes Working with BAPIs 30 Minutes
Unit 11: Adjusting the SAP Standard Software (Overview)
Adjusting the SAP Standard Software (Overview) 30 Minutes
Course Goals
This course will prepare you to:
• Understand and use basic ABAP syntax elements
• Implement different types of user dialog
• Program read accesses to the database
• Use the ABAP Workbench development tools
• Understand how developments are organized and transported
Course Objectives
After completing this course, you will be able to:
• Create an ABAP program containing user dialogs and database accesses
• Describe the different types of development objects and their typical intended purposes
• Use appropriate tools to create simple examples of the development objects presented
SAP Software Component Information
The information in this course pertains to the following SAP Software Components and releases:
• Overview of the course content (not until the end of unit 1)
Unit 1
![]() 1
Flow
of
an
ABAP
Program
1
Flow
of
an
ABAP
Program
Unit Overview
Refer to the individual lesson objectives for an overview of this unit.
Unit Objectives
After completing this unit, you will be able to:
• Describe the architecture of the SAP Web Application Server
• Describe how a simple dialog program is executed by the ABAP runtime system
Unit Contents
Lesson: System Architecture and ABAP Program Using Example of
Selection Screen and List... .. ... ... ... .. ... ... .. ... ... ... .. ... ... ... .. ... ... .. ...2
Lesson:
2
System Architecture and ABAP Program Using
Example of Selection Screen and List
Lesson Duration: 20 Minutes
Lesson Overview
In this lesson you will learn how a simple dialog program is executed by the
SAP Web Application Server.
After completing this lesson, you will be able to:
• Describe the architecture of the SAP Web Application Server
 •
Describe
how
a
simple
dialog
program
is
executed
by
the
ABAP
runtime
system
•
Describe
how
a
simple
dialog
program
is
executed
by
the
ABAP
runtime
system

Business Example
You are to explain the architecture of the SAP Web Application Servers as well as the execution of ABAP programs.
System Architecture and ABAP Program
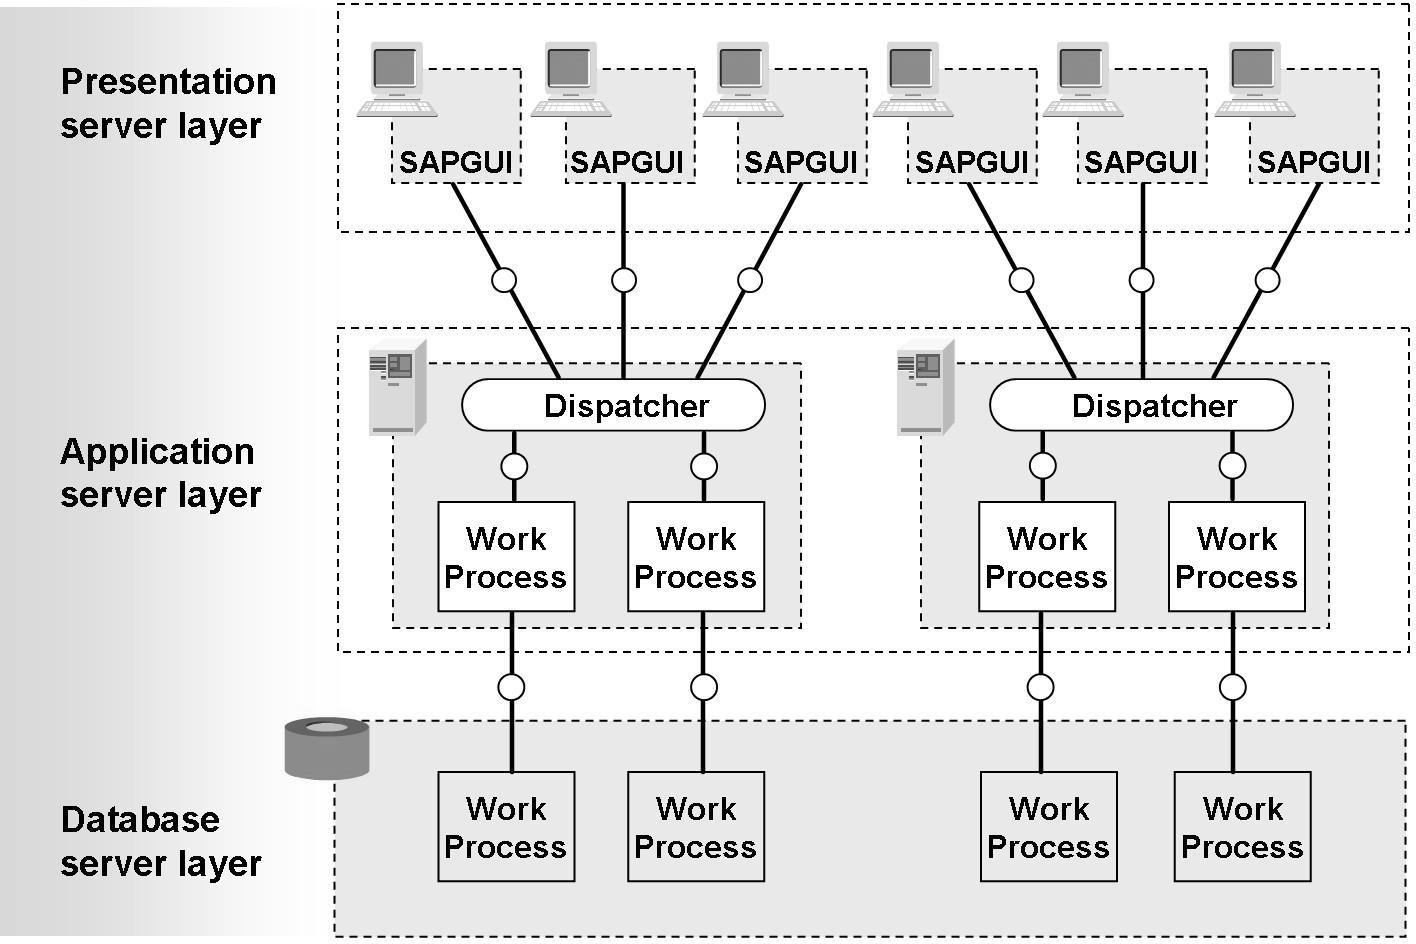
Figure 1: Client/Server Architecture of the SAP Web Application Server
The SAP Web Application Server has a modular architecture that follows the
software-oriented client/server principle.
In the SAP Web Application Server, presentations, application logic, and data storage can be assigned to different systems. This serves as the basis for the scalability of the system.
The lowest level is the database level. Here data is managed with the help of a relational database management system (RDBMS). This data includes, apart from application data, the programs and the metadata that the SAP System requires
for self-management.
The ABAP programs run at the application server level, that is, both the applications provided by SAP and the ones you develop yourself. The ABAP programs read data from the database, process the data, and possibly store data.
The third level is the presentation server level. This level contains the user interface where each user can access the program, enter new data, and receive the results of a work process.
The technical distribution of software is independent of its physical location on the hardware. Vertically, all levels can be installed on top of each other on one computer or each level on a separate computer. Horizontally, the presentation and application servers can be divided among any number of computers. The horizontal distribution of database components, however, depends on the type of database installed.
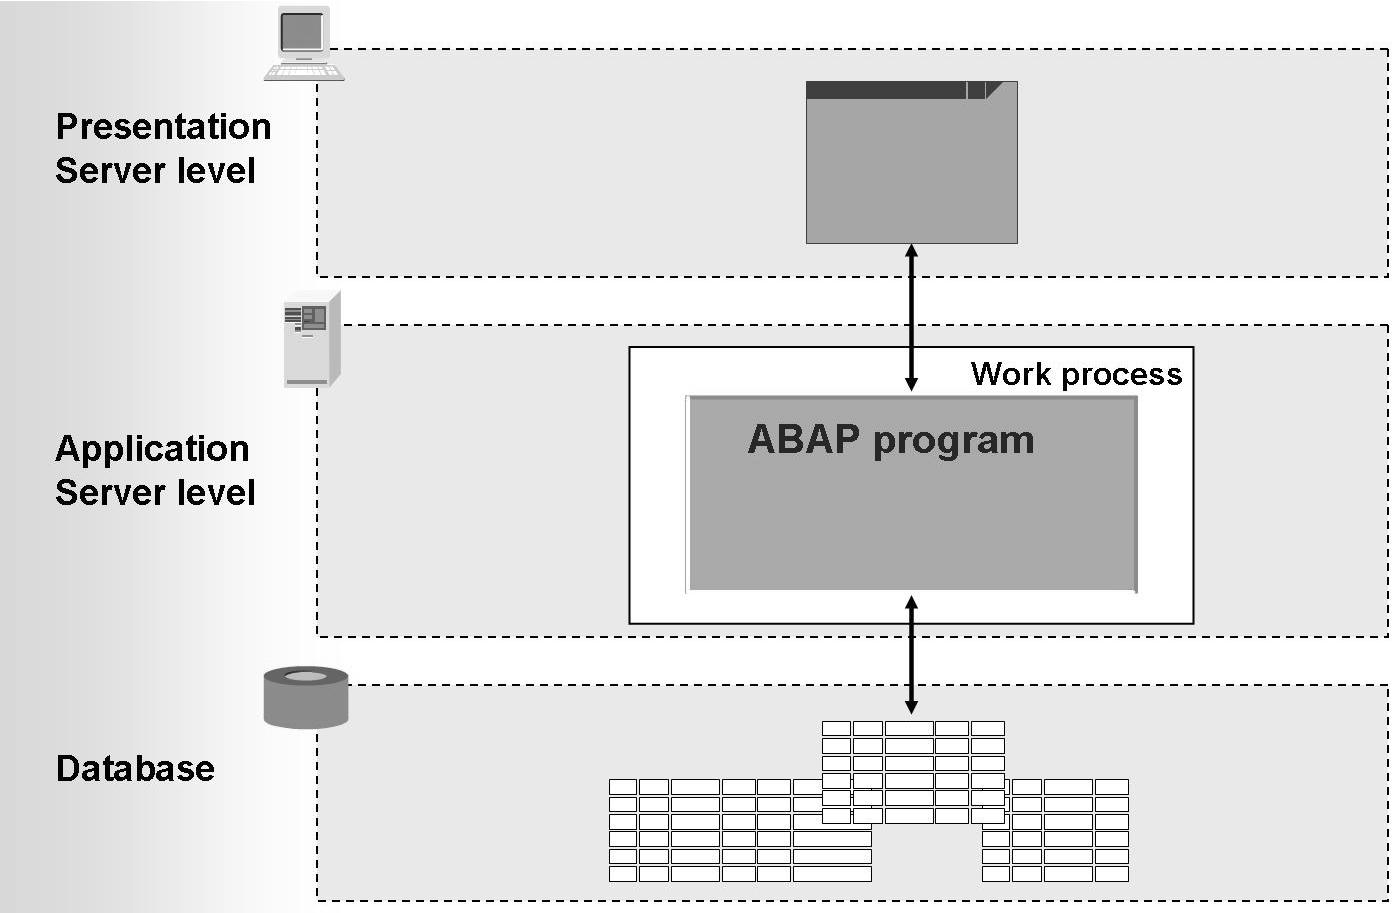
This graphic can be simplified for most topics discussed during this course. The interaction between one user and one ABAP program will be of primary interest to us during this course.
The exact processes involved in user dispatching on an application server are secondary to understanding how to write an ABAP program. Therefore, we will be working with a simplified graphic that does not explicitly show the dispatcher and the work process. Certain slides will, however, be enhanced to include these details whenever they are relevant to ABAP programming.
ABAP programs are processed on the application server. The design of user dialogs and database accesses is of particular importance when writing application programs.
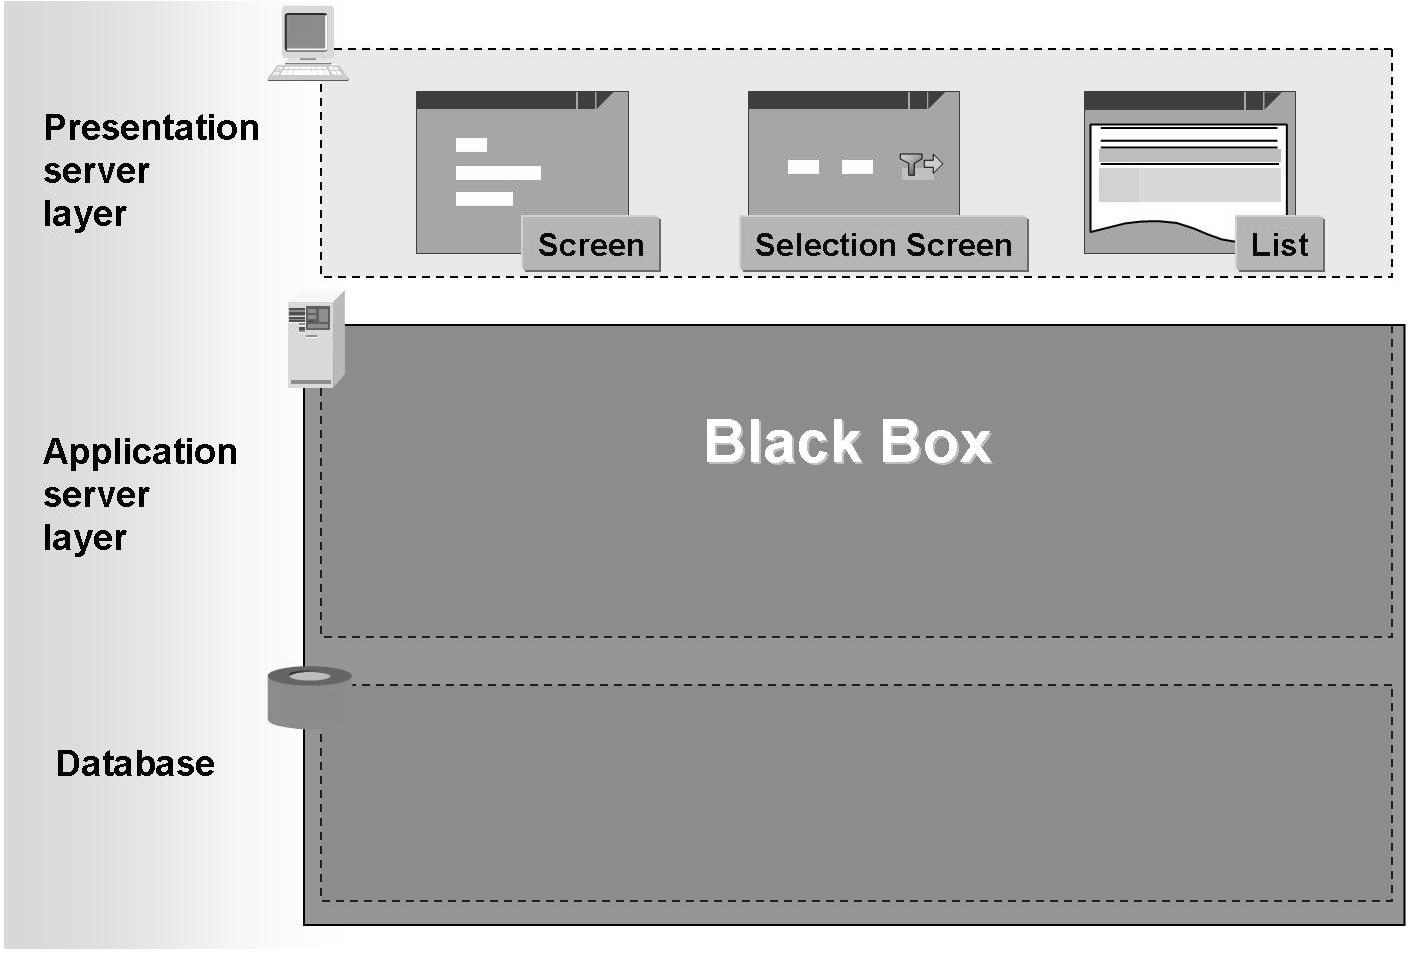
The user is only interested in how his or her business transaction flows and how data can be entered and output within the transaction. The technical aspects of programming are less interesting for the user. The user does not need to know the precise flow of the ABAP program on the application server. To the average user, the SAP System is like a "Black Box".
But from a technical point of view, there are, for example, three screen types: screens, selection screens and lists. Each type of screen provides different services to the user. Here the task of the developer is to select for each user dialog exactly those types that are most suitable for the accomplishment of the tasks concerned.
For this purpose, the exact knowledge of the technical aspects is very helpful.
Once the user performs a user action, for example by choosing Enter, a function key, a menu function, or a pushbutton, control is passed from the presentation server to the application server.
Only certain parts of the ABAP program will then be processed.
If a further user dialog is triggered from within the ABAP program, the system transmits the screen, and control is once again passed to the presentation server.
Runtime Architecture of a Program with Selection
Screen and List
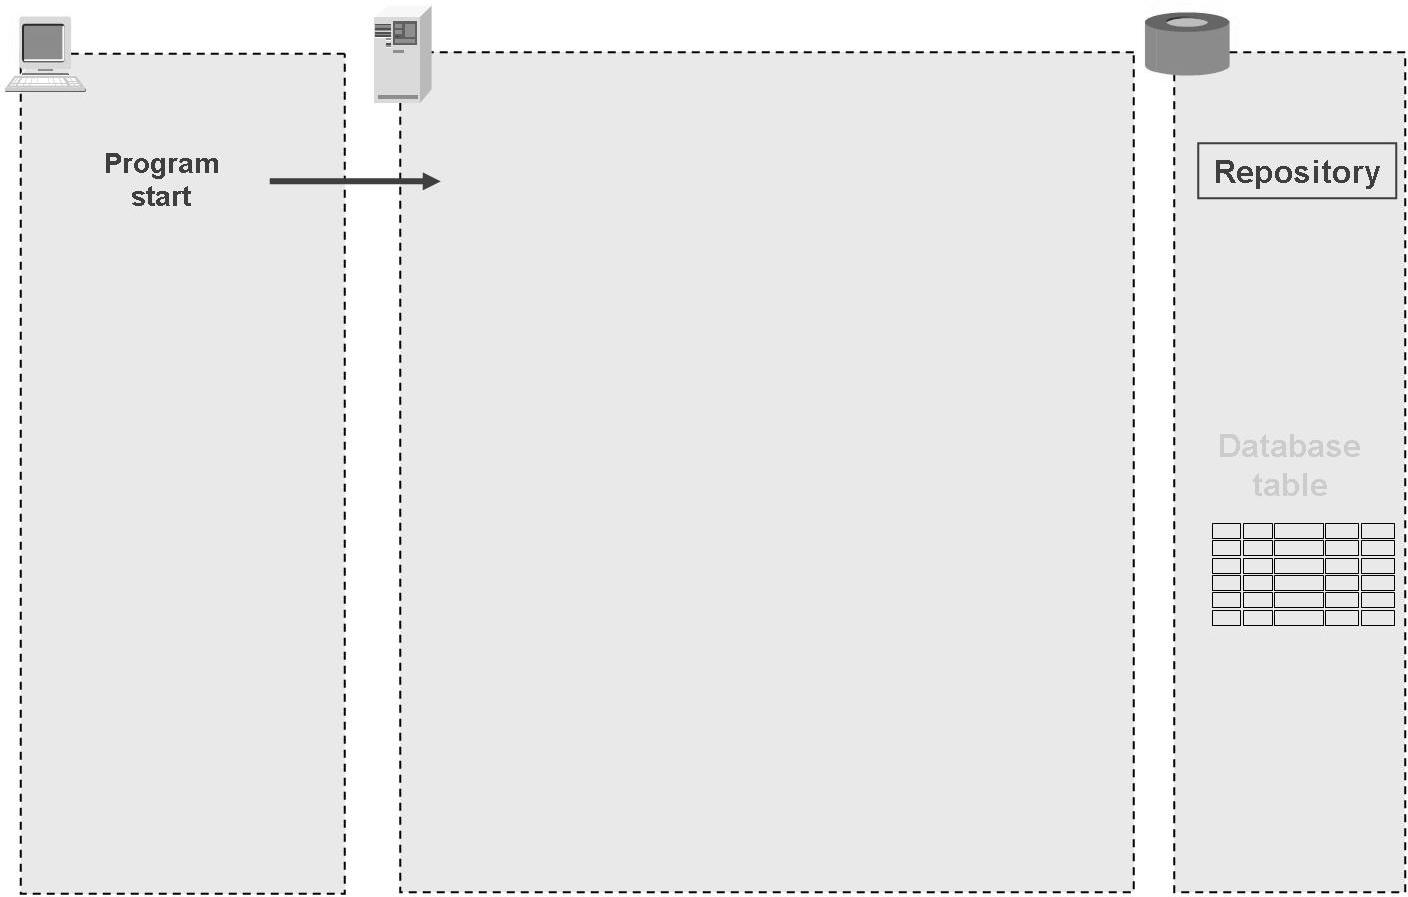
Figure 5: Program Start
Whenever a user logs on to the system, a screen is displayed. From this screen, the user can start an ABAP program through the menu path.
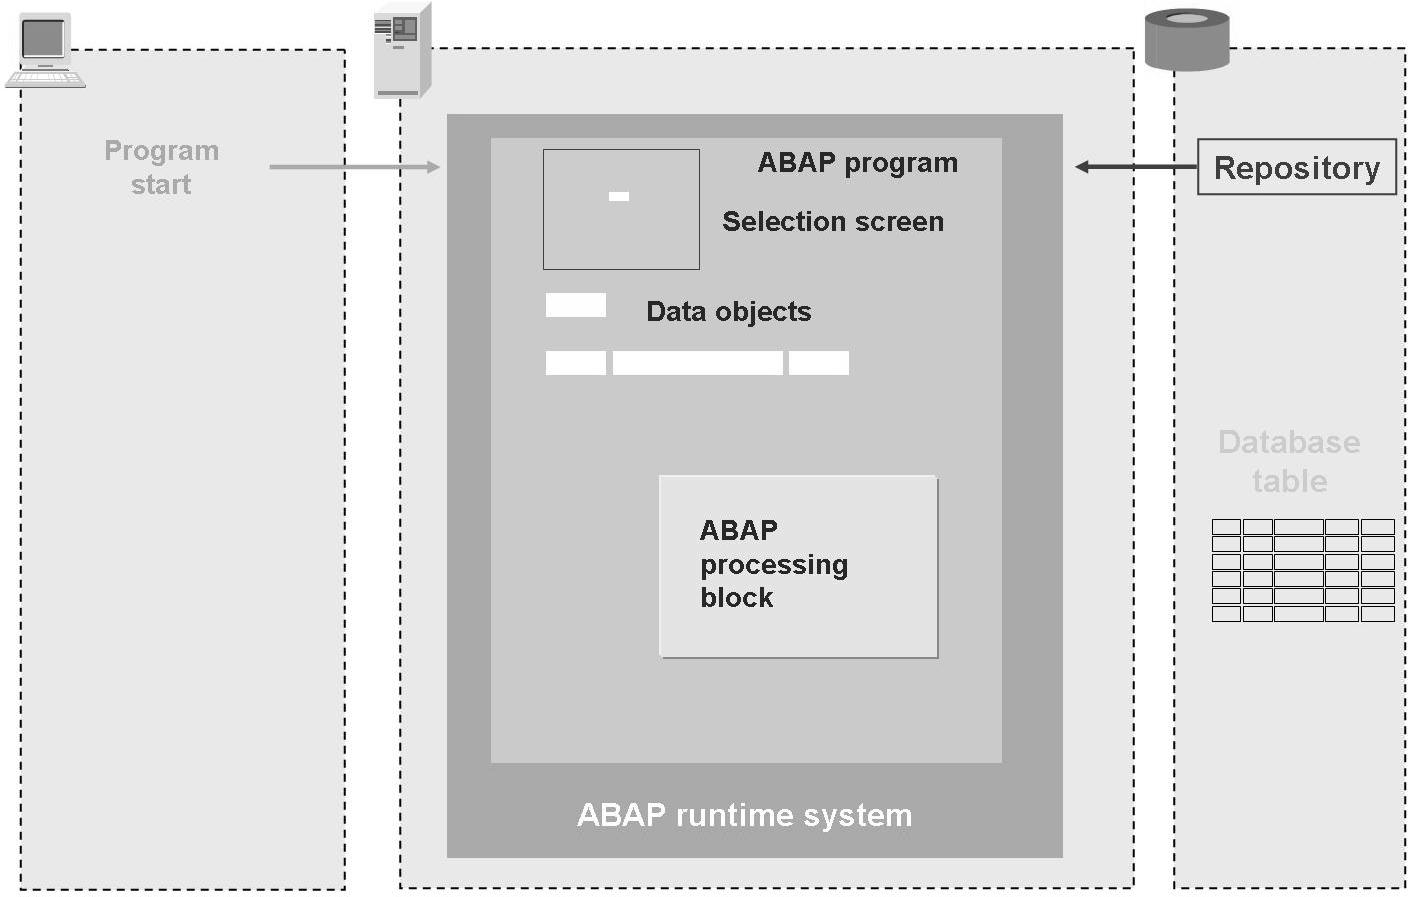
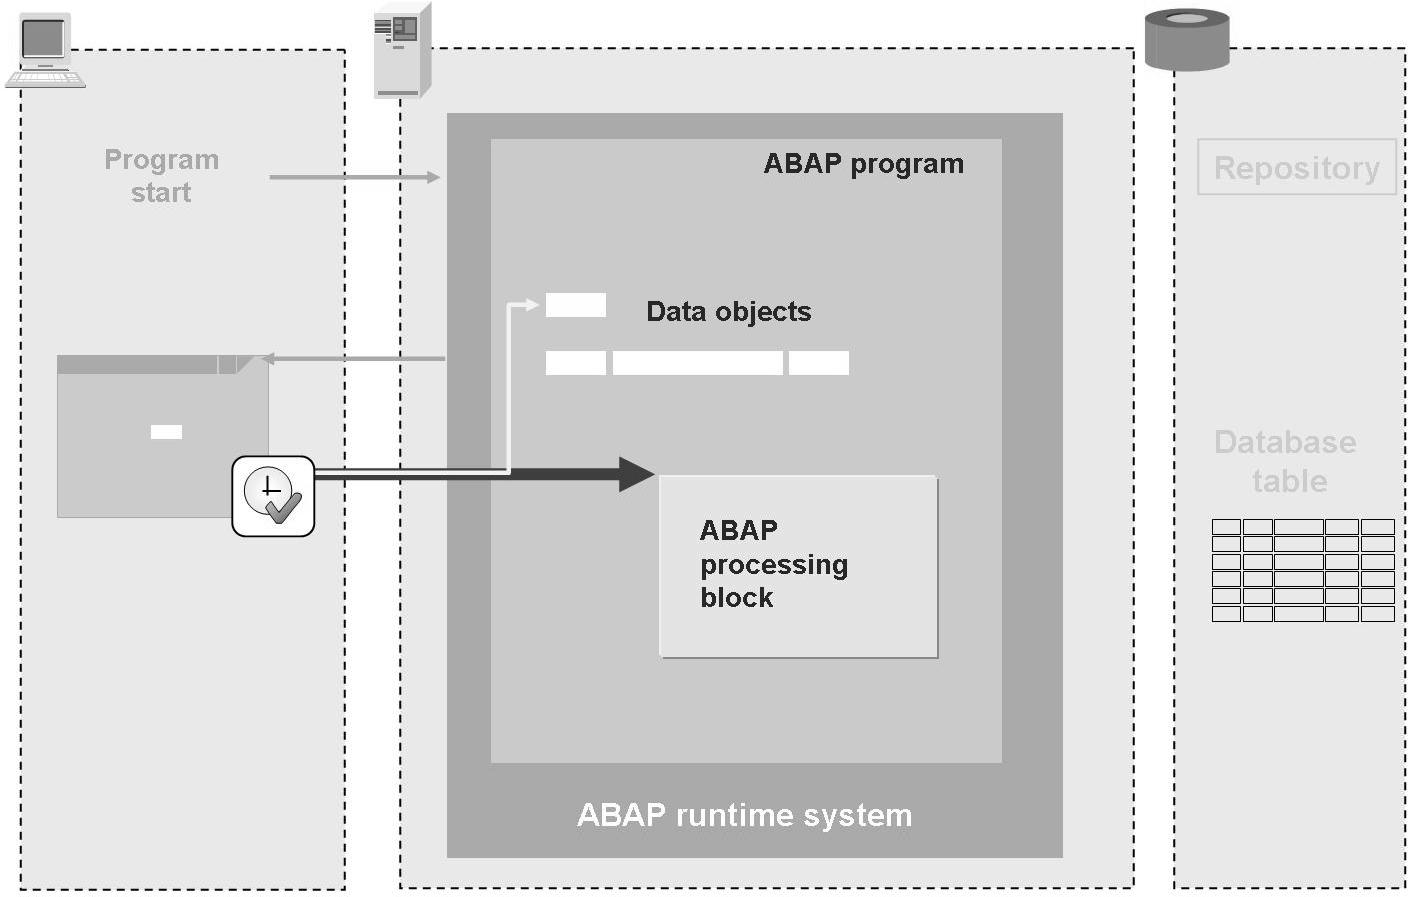
Figure 6: System Loads Program Context
In this case, the system first loads the program context onto the application server. The program context contains memory areas for variables and complex data objects, information on the screens for user dialogs, and ABAP processing blocks. The runtime system gets all this program information from the Repository, which is a special part of the database.
The sample program has a selection screen as the user dialog, a variable and a structure as data objects, and one ABAP processing block. The list used to display the data is created dynamically at runtime.
The ABAP runtime system controls the subsequent program flow.
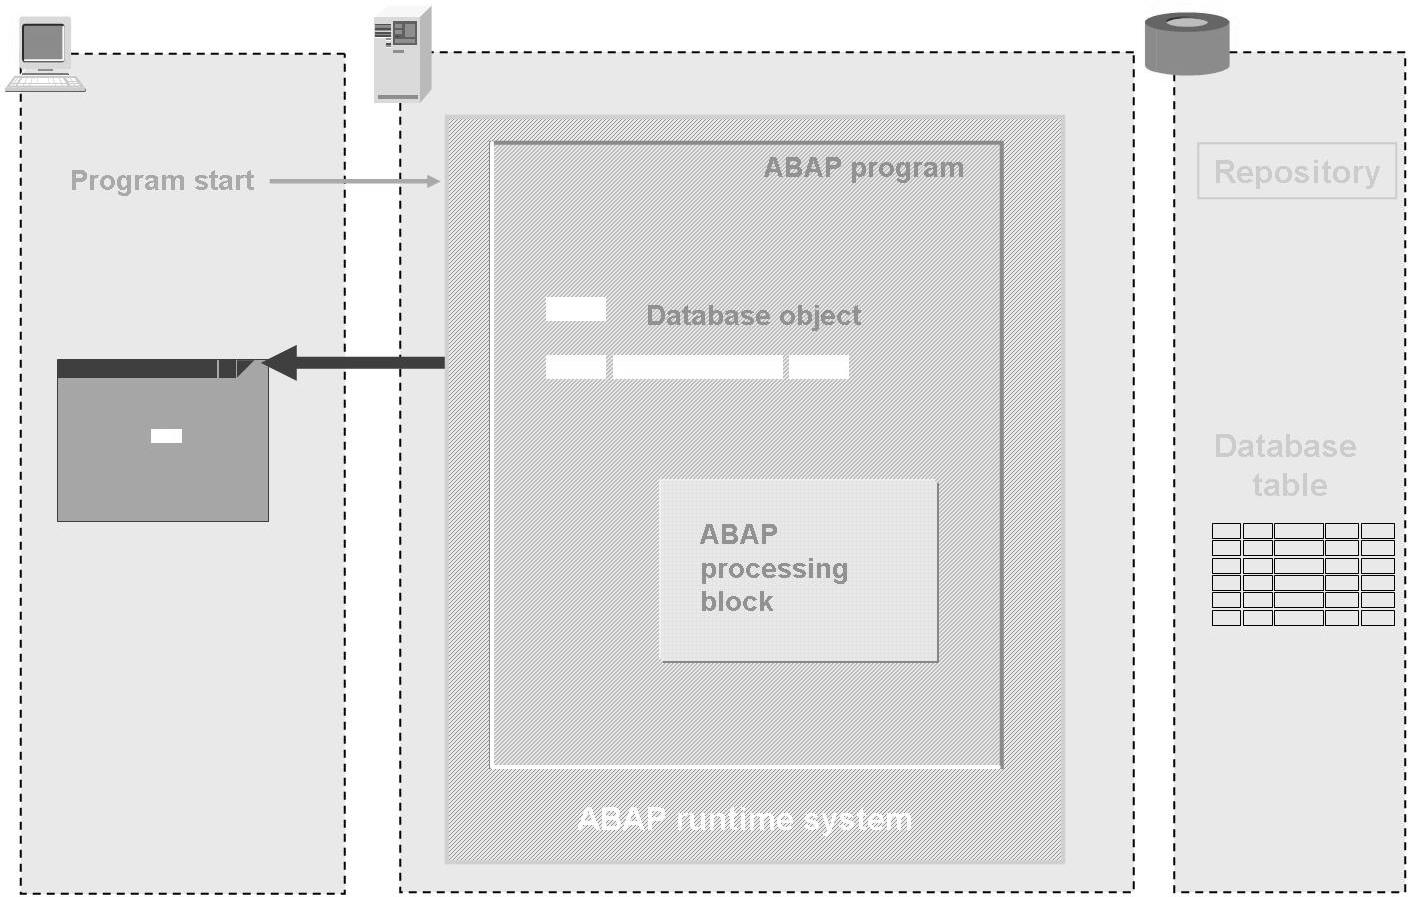
Figure 7: Runtime System Sends Selection Screen
Since the program contains a selection screen, the ABAP runtime system sends it to the presentation server. The presentation server controls the program flow for as long as the user has not finished entering data in the input fields.
Selection screens allow users to enter selection criteria required by the program for it to continue.
As soon as the user has finished entering data on the selection screen, he or she can trigger further processing of the program by choosing Execute.
The entered data is automatically placed in its corresponding data objects in the program and the ABAP runtime system resumes control of processing.
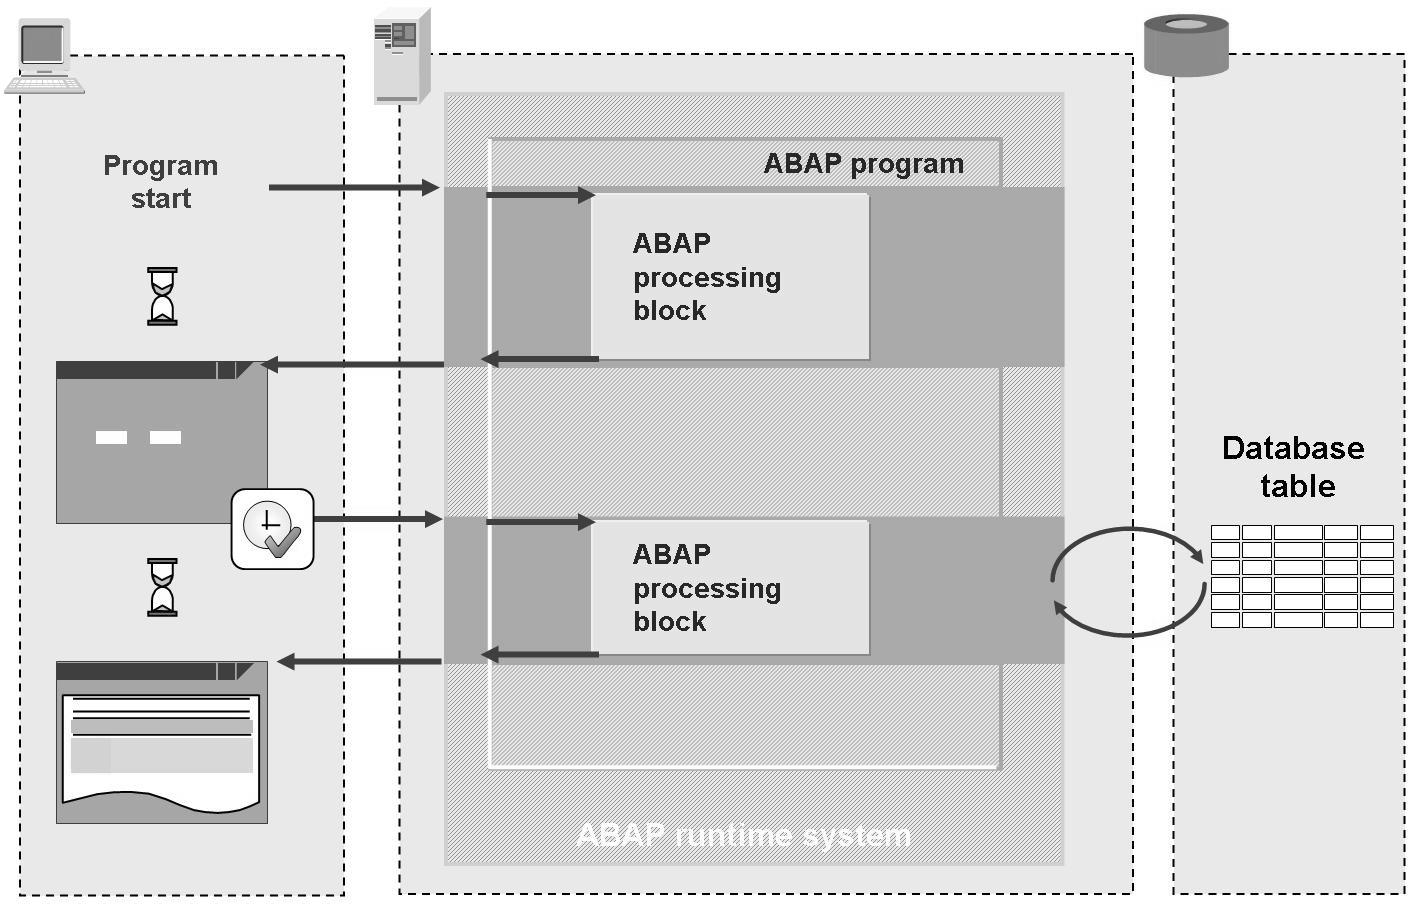
In our simple program example there is only one ABAP processing block. The ABAP runtime system triggers sequential processing of this ABAP processing block.
If the entries made by the user do not have the correct type, then an error message is automatically triggered. The user must correct his/her entries.

In the example program, read access to the database is programmed in the ABAP processing block. Therefore, information about which database table is accessed and which row in the table is read is passed to the database.
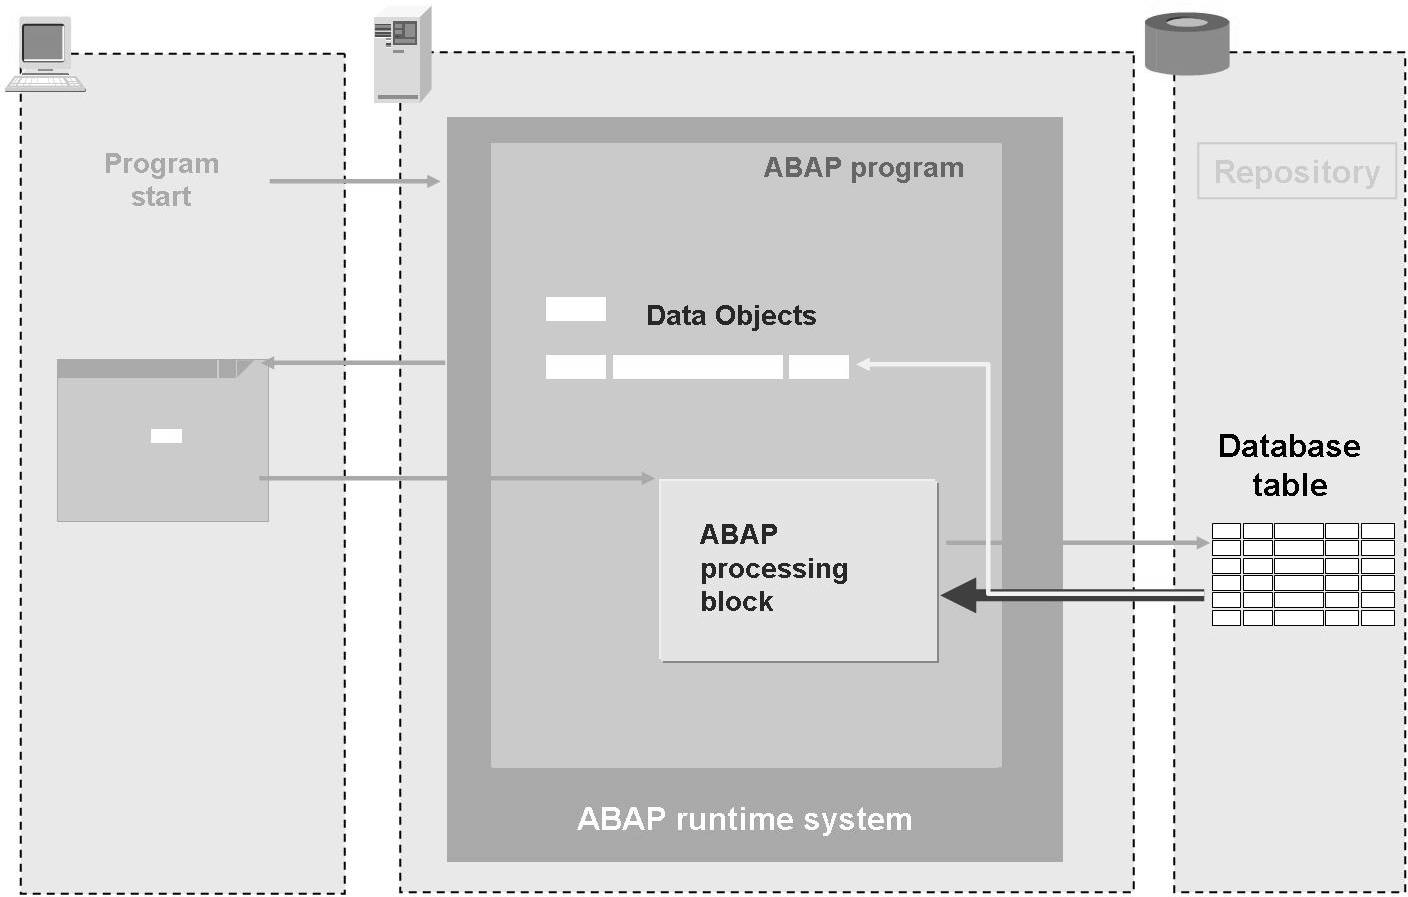
Figure 10: Database Returns Data Record to Program
The database returns the requested data record to the program and the runtime system ensures that this data is placed in the appropriate data objects.
If a single record is accessed, this data object is usually a structure that contains relevant components for all the required database fields.
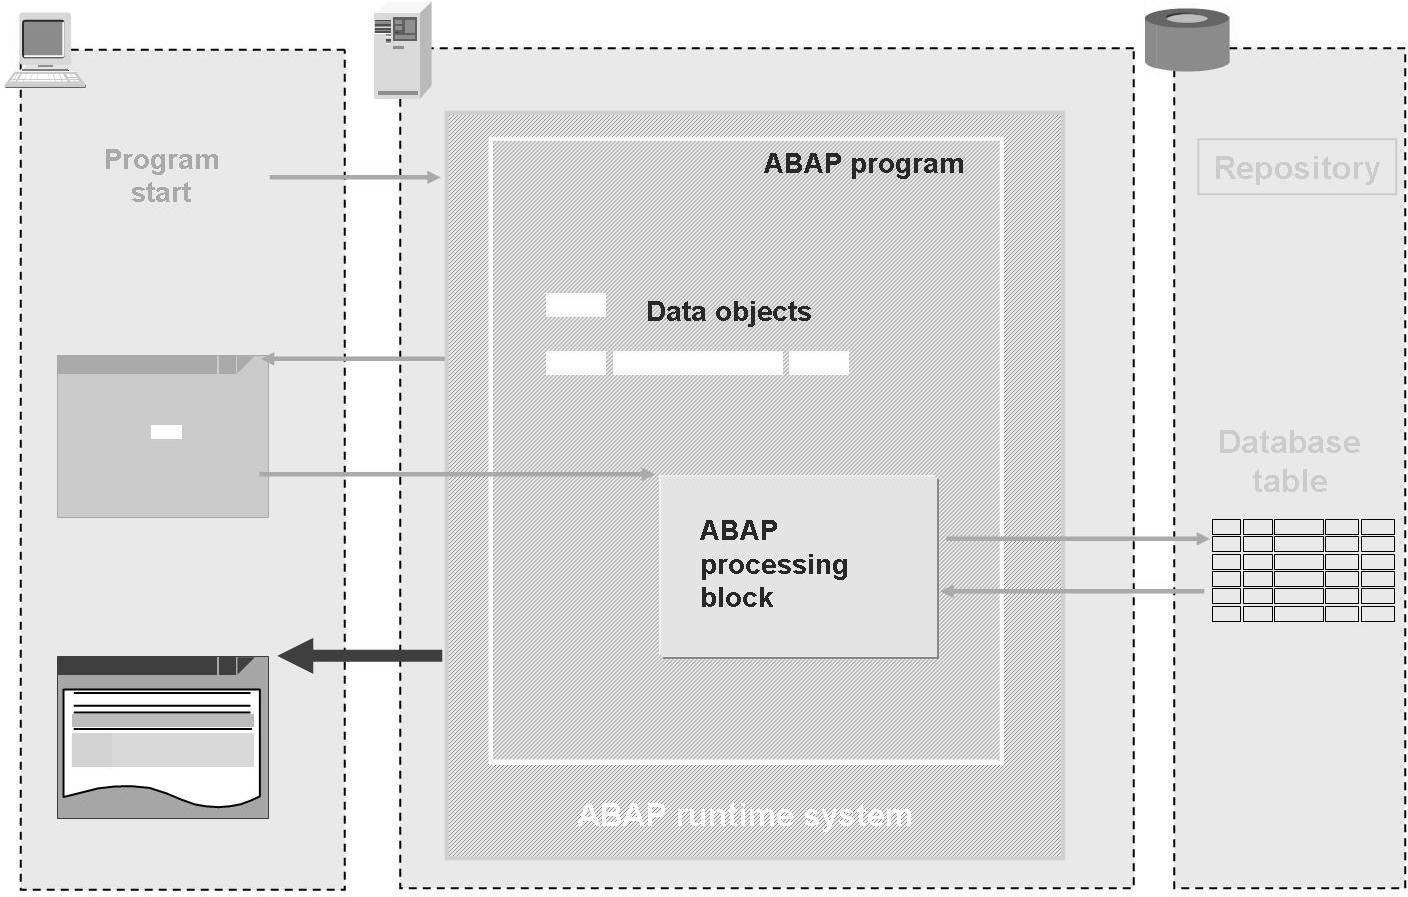
Figure 11: Runtime System Sends List
The layout of the subsequent list display is programmed into the processing block. After its completion, the runtime system sends this list to the presentation server as a screen.
Topic Overview
The above-described example program already demonstrates numerous concepts that make up the content of this course. The following table of contents, which shows which topics are dealt with in which units, serves as an aid to orientation for the further process of this course.
Flow of an ABAP Program
Unit 2
Introduction to the abap Workbench
Unit 3
Introduction to the ABAP Dictionary
Unit 4
Basic ABAP Language Elements
Unit 5
Data Retrieval
Unit 6
Tools for Program Analysis
Unit 7
Subroutines in ABAP
Unit 8
Introduction to ABAP Events
Unit 9
User Dialogs (Lists, Selection Screens, Screens, User Interface)
Unit 10
Reuse Components
Unit 11
Adjusting the SAP Standard Software (Overview)

You now have the opportunity to discuss any questions.
Discussion Questions
Use the following questions to engage the participants in the discussion. Feel free to use your own additional questions.
See list of course objectives.
Lesson Summary
You should now be able to:
• Describe the architecture of the SAP Web Application Server
• Describe how a simple dialog program is executed by the ABAP runtime system
 BC400
Unit
Summary
BC400
Unit
Summary
Unit Summary
You should now be able to:
• Describe the architecture of the SAP Web Application Server
• Describe how a simple dialog program is executed by the ABAP runtime system
Related Information
... Refer to the article “Overview of Application Program Components” in the online documentation.
Unit 2
15 Introduction to the abap Workbench
See the introductory instructors’ notes in the lessons
Unit Overview
Refer to the lesson summaries for an overview of this unit.
Unit Objectives
After completing this unit, you will be able to:
• Describe the structure of the Repository
• Name and use the search tools of the Repository
• Use the Object Navigator for displaying Repository objects
• Name and use the utilities for orderly software development
• Create packages
• Create programs
• Create transactions
Unit Contents
Lesson: Repository and Object Navigator . . . . . . . . . . . . . . . . . . . . . . . . . . . . . . . . . . . . 18
Lesson: Developing Programs and Organizing Developments . . . . . . . . . . . . 29
Procedure: Creating Packages ... .. ... ... .. ... ... ... .. ... ... ... .. ... ... .. . 32
Procedure: Creating an ABAP Program . . . ... ... ... .. ... ... ... .. ... ... .. . 40
Procedure: Creating Transactions . ... ... .. ... ... ... .. ... ... ... .. ... ... .. . 44
Procedure: Adding Transactions to your Personal Favorites . . . . . . . . . . 45
Exercise 1: Organizing Developments . . . . . . . . . . . . . . . . . . . . . . . . . . . . . . . . . . . 49
Exercise 2: Developing ABAP Programs. . ... ... ... .. ... ... ... .. ... ... .. . 53
Exercise 3: Creating Transactions . ... ... .. ... ... ... .. ... ... ... .. ... ... .. . 57
Lesson:
16
Repository and Object Navigator
Lesson Duration: 45 Minutes
Lesson Overview
This lesson gives a short description of the Repository and a brief overview of the most important components of the ABAP Workbench. It presents the Object Navigator as a central development tool.
After completing this lesson, you will be able to:
• Describe the structure of the Repository
• Name and use the search tools of the Repository
• Use the Object Navigator for displaying Repository objects
Business Example
You are to describe the structure of the Repository, use suitable tools to search for
Repository objects and analyze their structure.
Introduction to the Repository
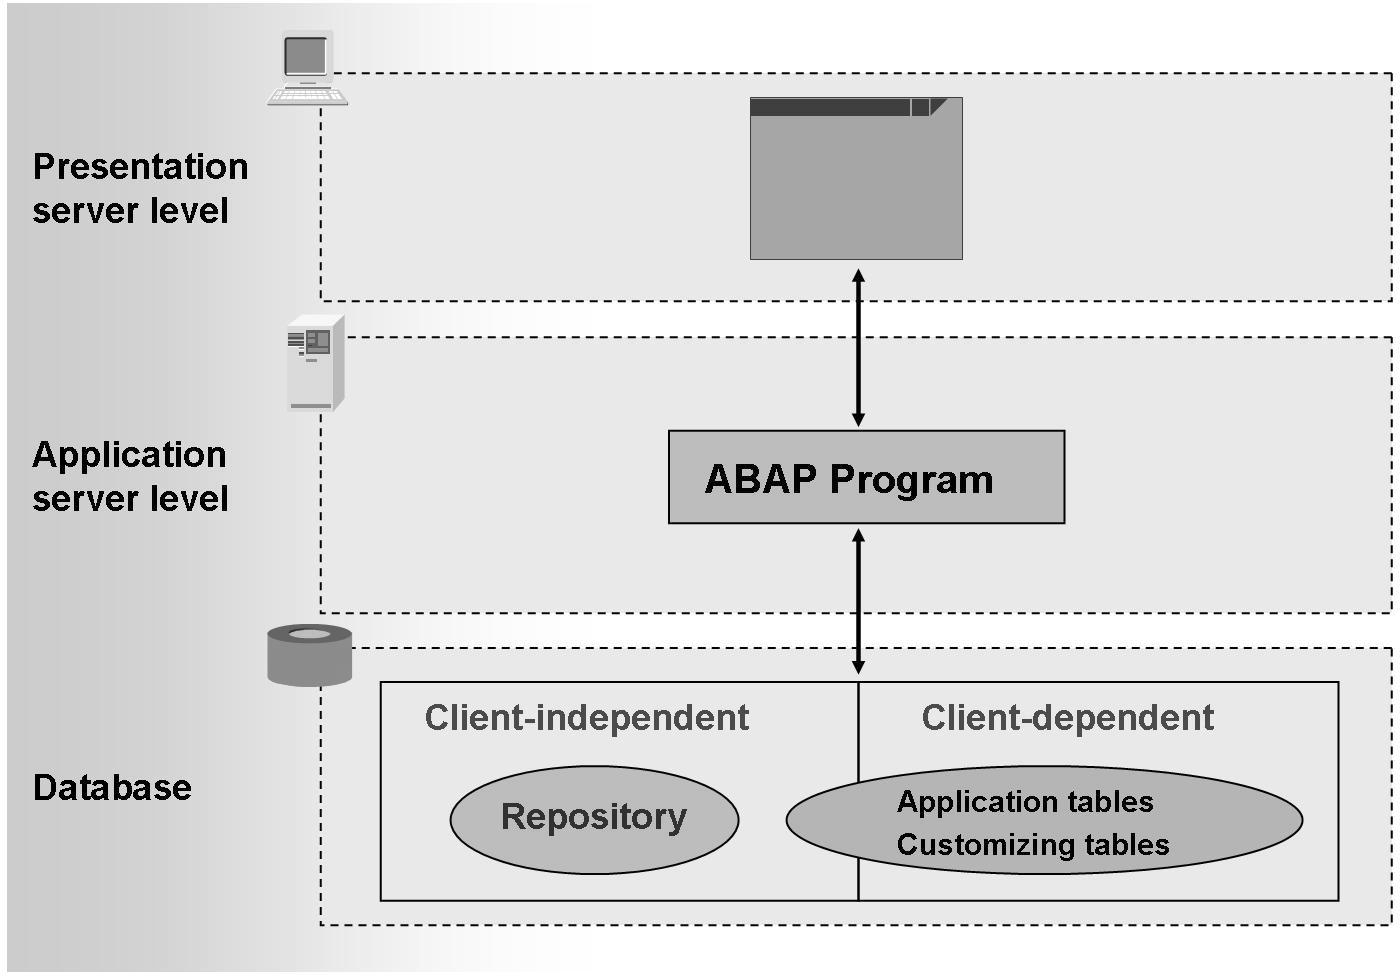
Figure 12: The Cross-Client Capability of the Repository
The Repository consists of all development objects of the system: the programs, function modules, definitions of database tables and other objects. The Repository is used to keep both objects defined by SAP as well as objects defined by customers. The Repository is in the database and is always independent of the client, meaning a Repository object can be accessed from any client.
Apart from the Repository, the database also contains application and Customizing tables, which are usually client-specific, that is, they have a client column.

The Repository is subdivided according to application components. Within an application component (e.g., MM) there are several packages
containing relevant objects for a more detailed logical subdivision. Whenever a Repository object is created, it must be assigned to a package.
Repository objects are often made up of sub-objects that are also referred to as
Repository objects.
Search Tools of the Repository
The Repository Information System is suitable for the random (i.e., not application-specific) search for Repository objects, such as all programs by a certain developer or all function modules that were changed after a certain date.
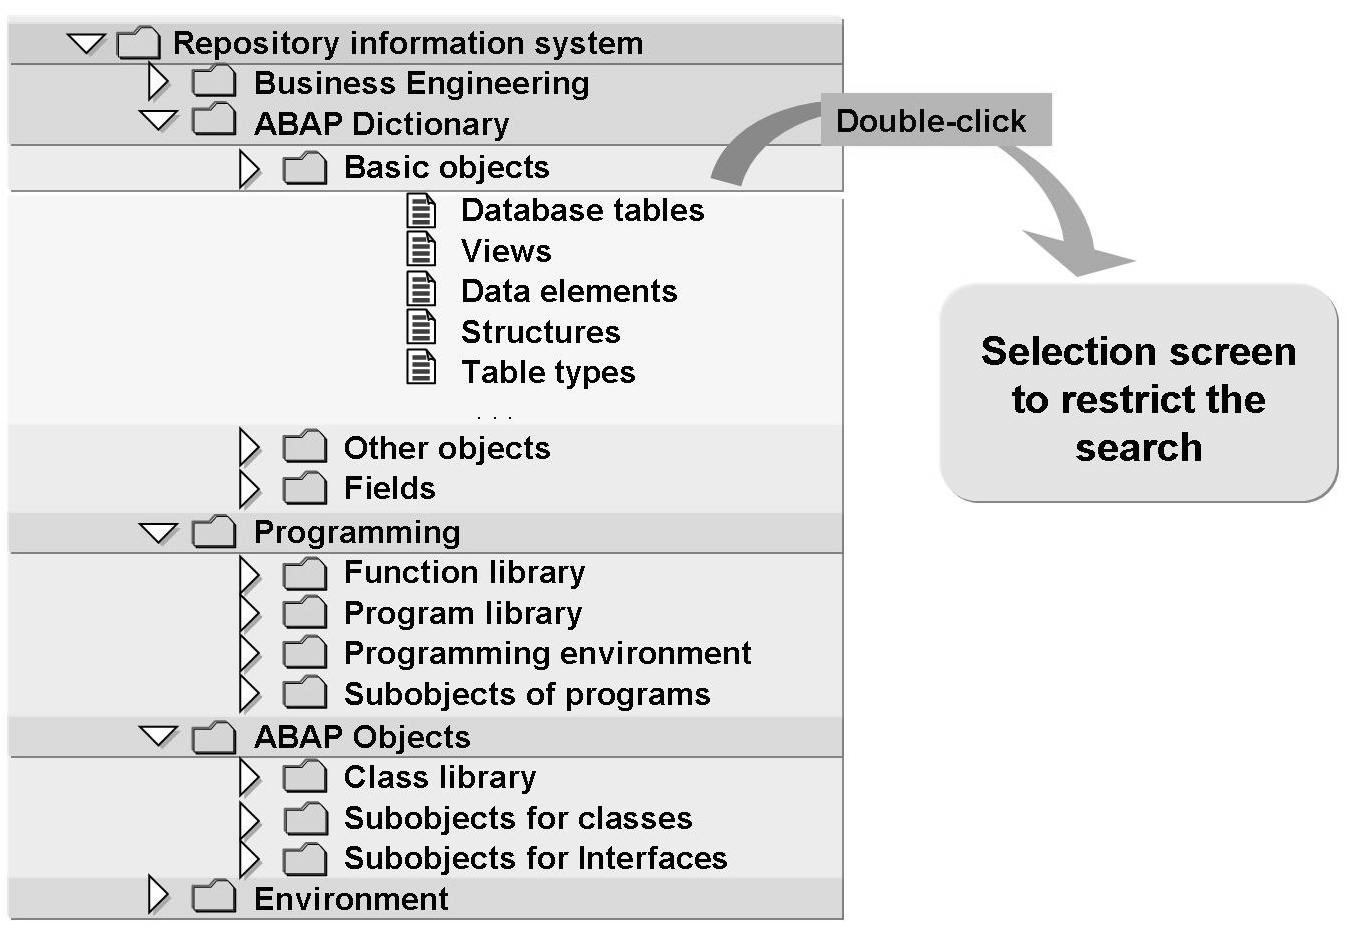
You get to the Repository Information System from the SAP Easy Access Menu by choosing Tools → ABAP Workbench → Overview → Information System. When you double-click a certain object type, a selection screen appears allowing you to limit your search.
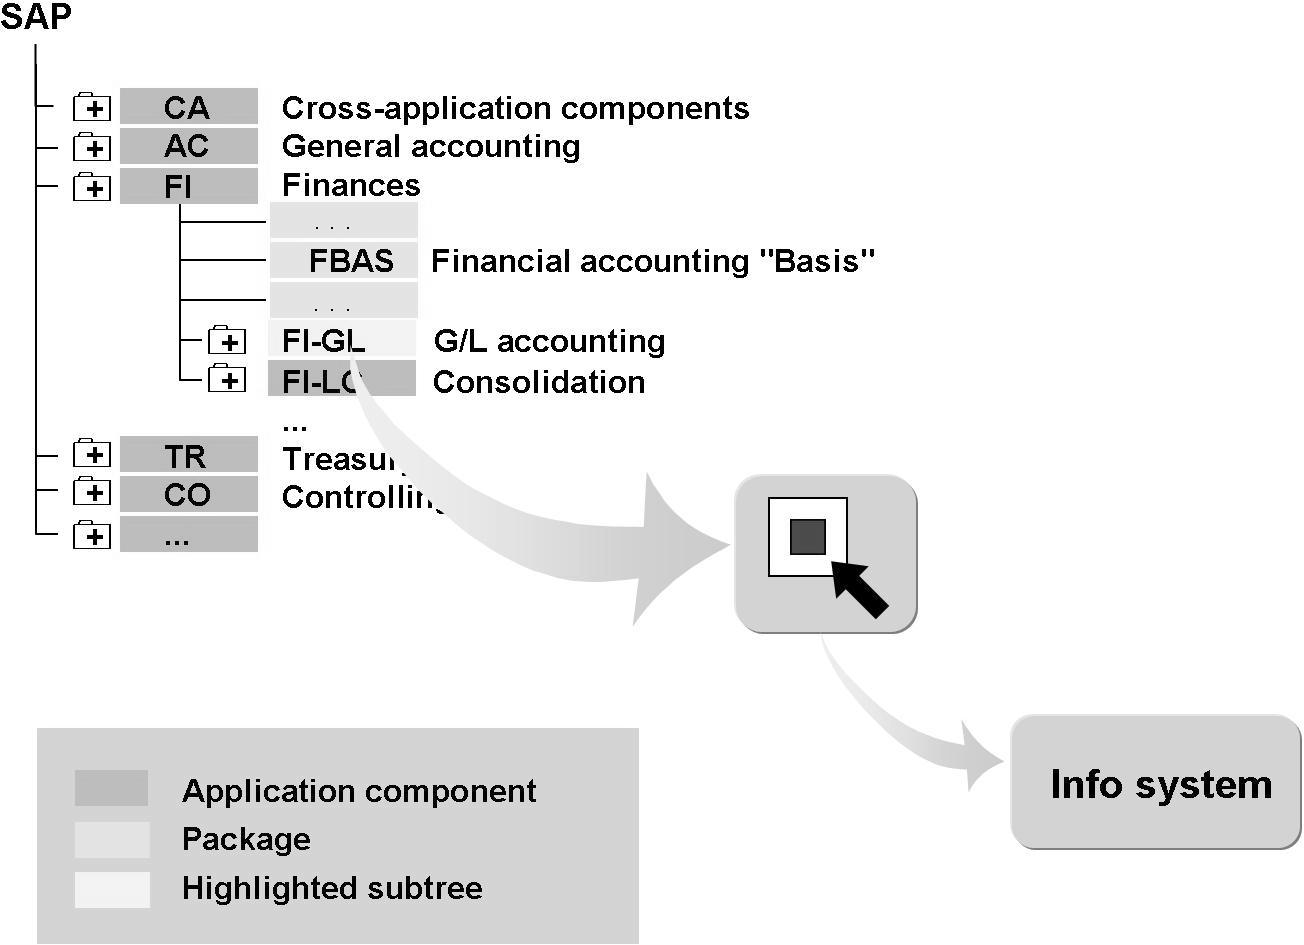
Figure 15: SAP Application Hierarchy
You use the application hierarchy for the application-specific search for Repository objects. There, the hierarchy of the application components is depicted in the form of a tree structure. From the SAP Easy Access Menu, you can easily branch to the SAP application hierarchy by choosing Tools→ ABAP Workbench
→ Overview → Application Hierarchy → SAP. Expanding a component node displays all the packages that are assigned to the corresponding component. You can now select any subtree using the Select button and then navigate directly to the Repository Information System using the Information System button. The system remembers all relevant packages of the selected subtrees and automatically enters them in the selection screen of the information system. This allows you to carry out a search in the previously selected applications.
Working with the Object Navigator
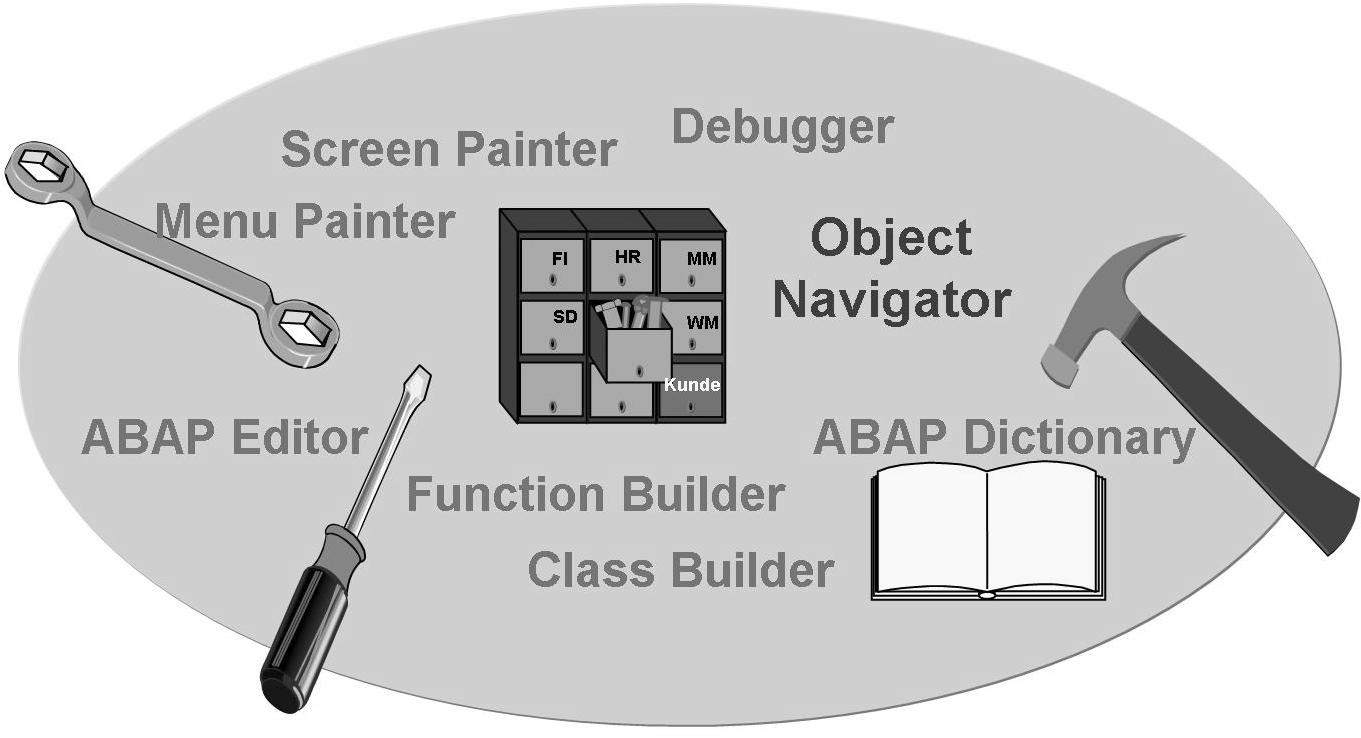
Figure 16: ABAP Workbench Tools
The ABAP Workbench includes all tools required for creating and editing Repository objects. These tools cover the entire software development cycle. The most important tools are:
• The ABAP Editor for editing source code
• The ABAP Dictionary for editing database table definitions, central data types, and so on
• The Screen Painter for configuring screens (screens together with functions for user dialogs)
• The Menu Painter for designing user interfaces (menu bar, standard toolbar, application toolbar, function key settings)
• The Function Builder for maintaining function modules
• The Class Builder for maintaining global classes and interfaces
You can call each of these tools explicitly and then load a Repository object for processing. But it is much more elegant and convenient to access them using the Object Navigator. You can have the requested Repository objects listed in this central development tool. All you have to do to edit one of them is to double-click to select it. The corresponding tool is called automatically and includes the selected Repository for displaying or editing.
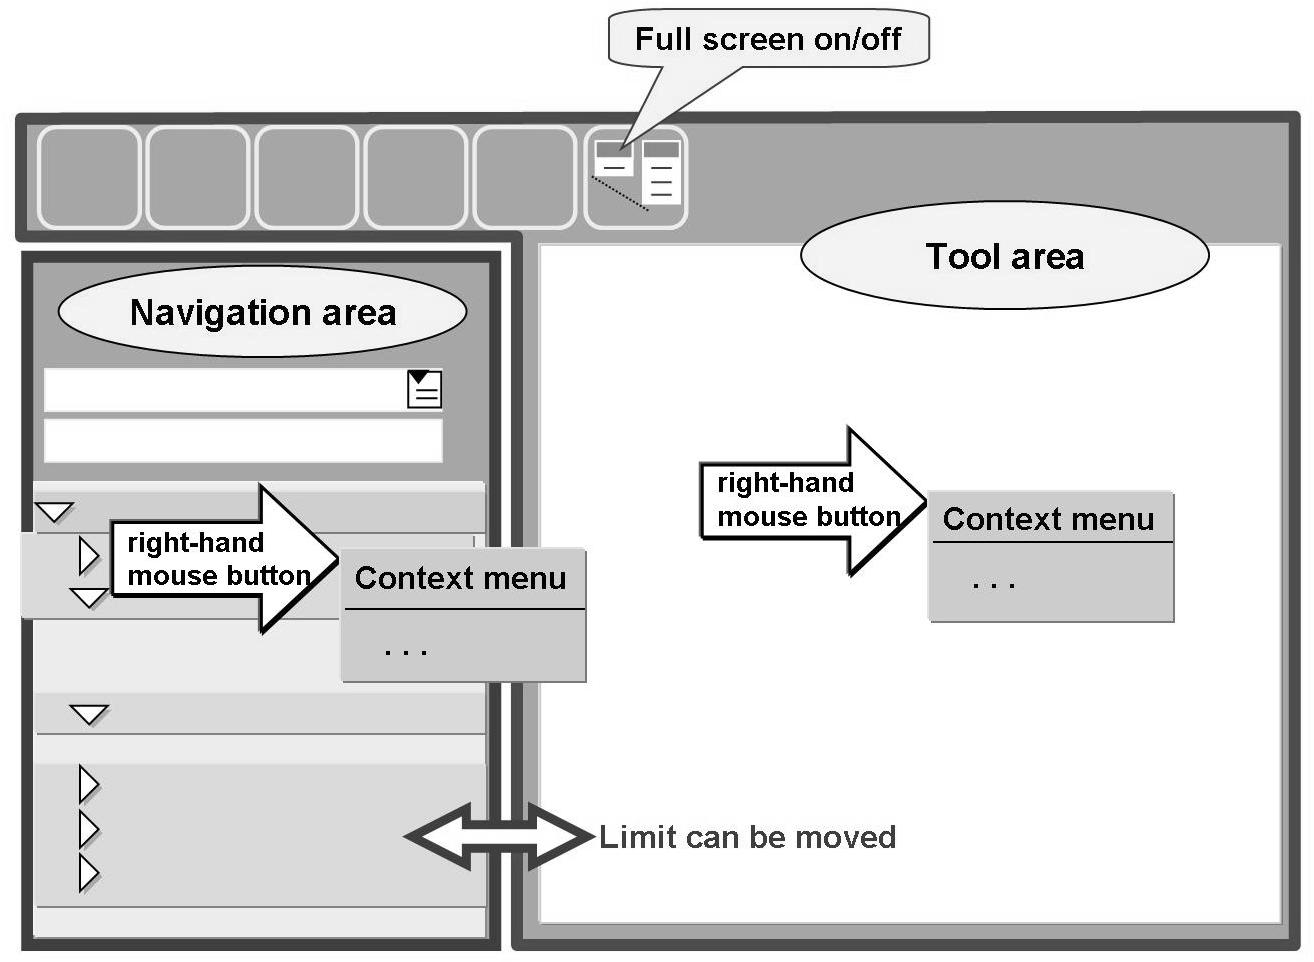
Figure 17: Screen Layout in the Object Navigator
The Object Navigator screen is split into two areas:
• The navigation area for displaying an hierarchical object list
• A tool area for displaying and editing a development object using the appropiate tool
You can display or hide the navigation area. (“Full screen on/off”)
In both areas, you can choose the functions using a context menu, which you access using the right mouse button (the left mouse button, if you have set your mouse up for left-handedness). The context menu offers only those functions which have been designed for the respective object.
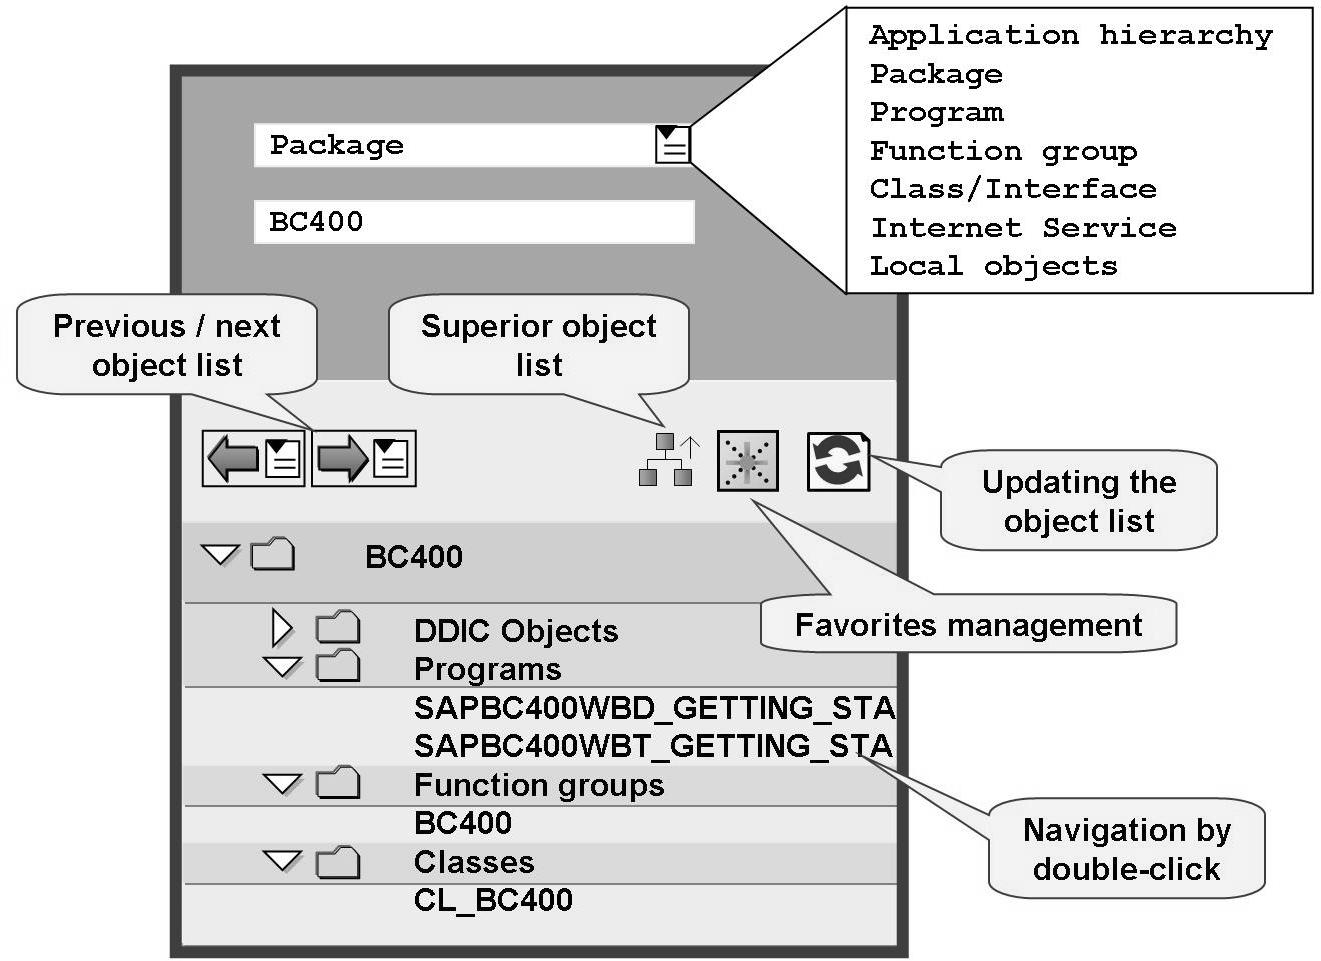
Object lists are displayed in the navigation area. For example, if you choose to display a package there, all of the Repository objects belonging to the specified package are listed.
Double-clicking a listed object lets you display or edit it.
You can navigate between the object lists that have been previously displayed in the current Object Navigator session (blue arrows).
You can add frequently used object lists to your favorites.

In the tool area, a Repository object is displayed in the corresponding tool.
You can navigate between the objects that have been previously displayed in the current Object Navigator session (blue arrows).
Furthermore, you can also display a subwindow with the previous navigation history. When you double-click an object in the navigation history, it is displayed in the tool area.
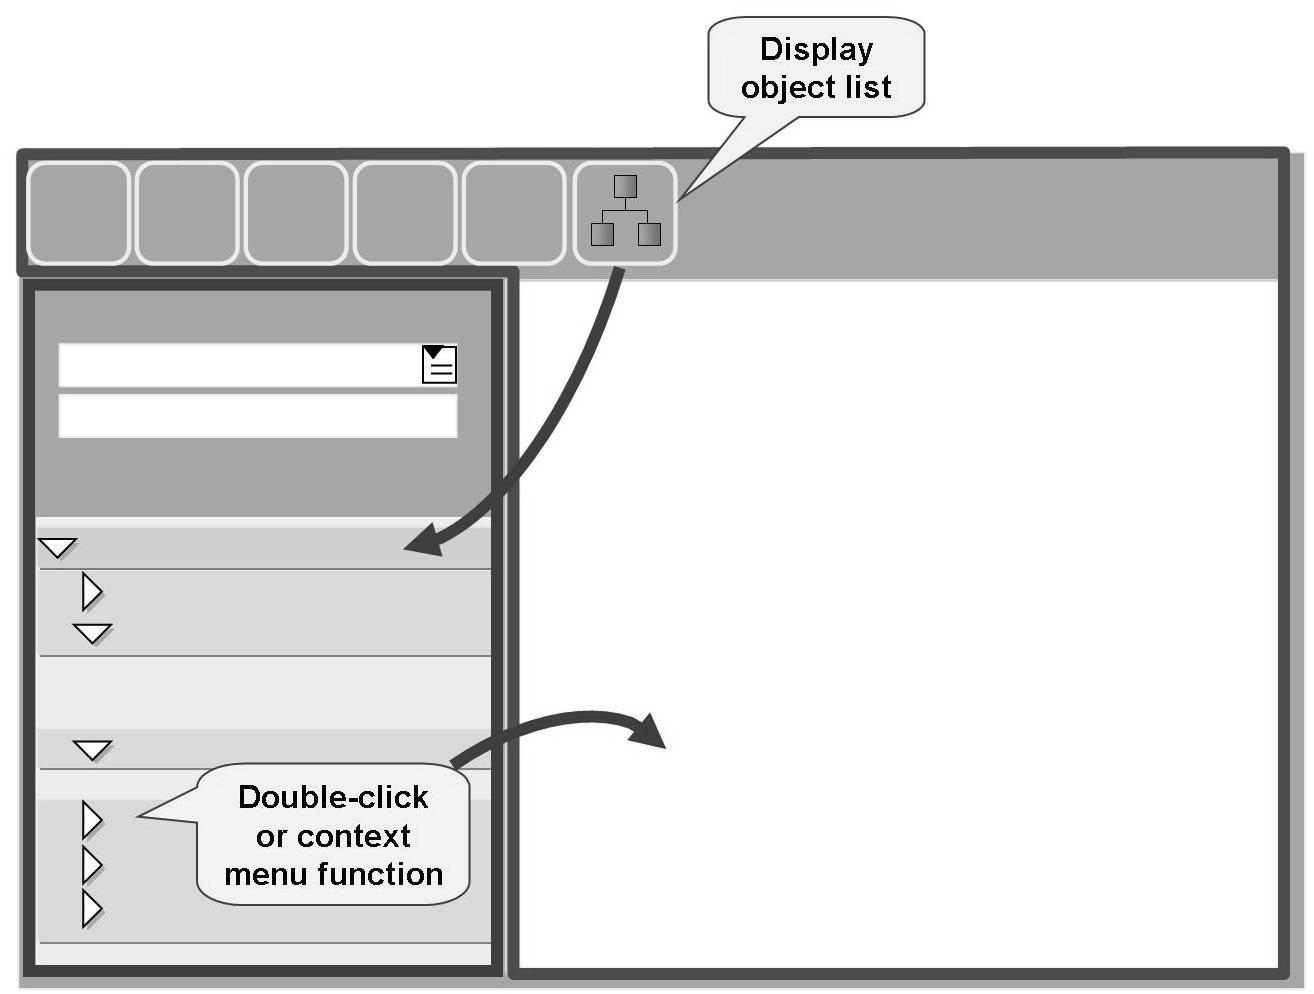
Navigation in the navigation area is independent of navigation in the tools area. This allows both areas to be used in a flexible manner.
If necessary, you can synchronize both areas as follows:
• You get to display an object in the tool area by double-cklicking in the navigation area or by using the corresponding context menu function of the object.
• You can display the object list of an object that you are currently editing in the tool area by choosing Display Object List in the navigation area.
To create a new object, you can use the context menu for an object type in the corresponding object list. Alternatively, you can use the Edit Object or Other Object ... buttons to create any objects you want.
You now have the opportunity to discuss any questions.
Discussion Questions
Use the following questions to engage the participants in the discussion. Feel free to use your own additional questions.
See list of course objectives.
Lesson Summary
You should now be able to:
• Describe the structure of the Repository
• Name and use the search tools of the Repository
• Use the Object Navigator for displaying Repository objects
Lesson:
25
Developing Programs and Organizing Developments
Lesson Duration: 95 Minutes
Lesson Overview
In this lesson you will learn how to create programs, transaction codes and packages and how to assign a Repository object to a package. You will also learn how development packages are implemented in the SAP environment using the ABAP Workbench.
After completing this lesson, you will be able to:
• Name and use the utilities for orderly software development
• Create packages
• Create programs
• Create transactions
Business Example
You are to create a new package and ABAP programs within the framework of a development project.
Organizing Developments
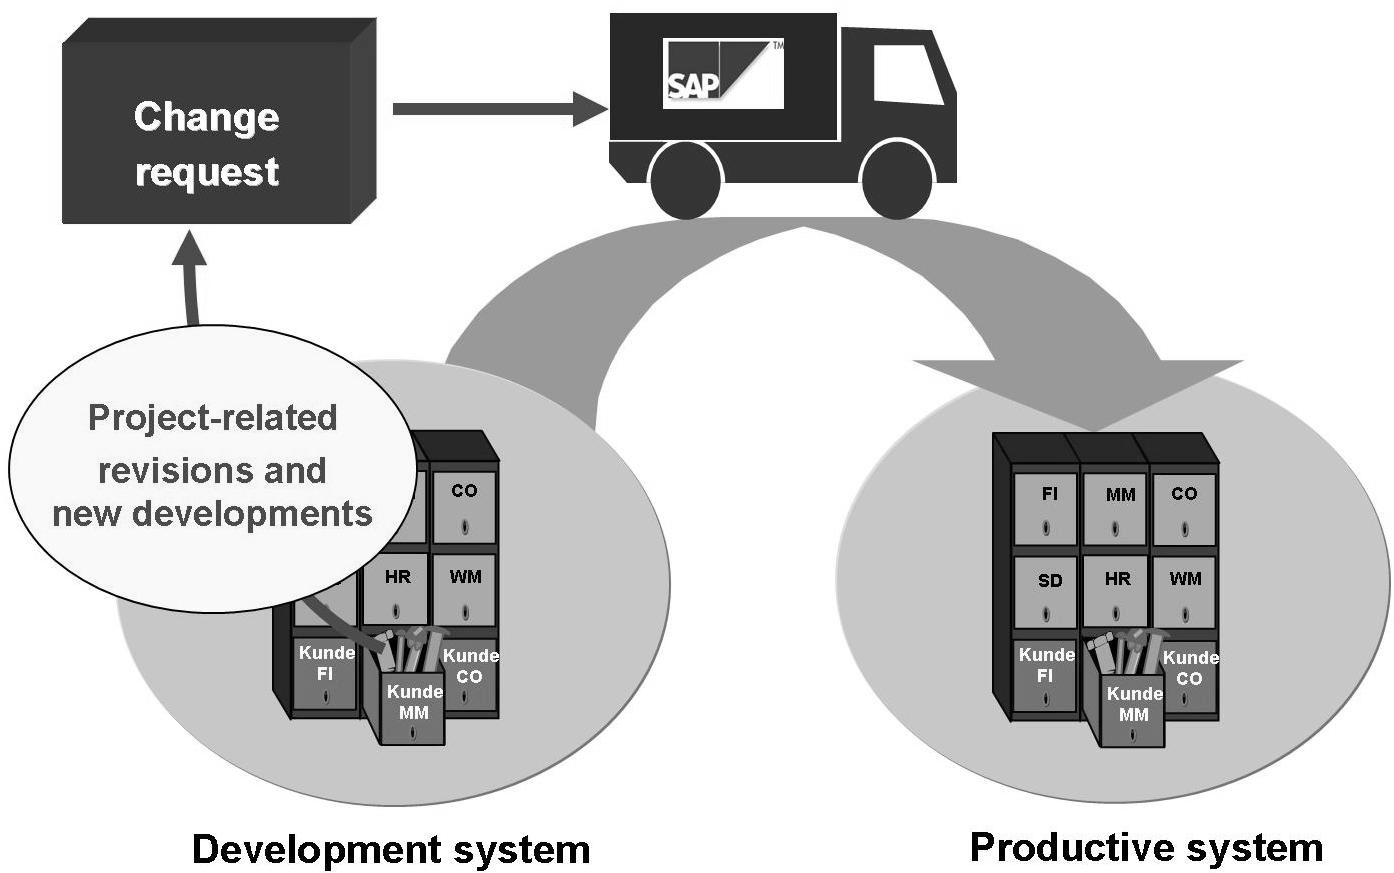
Figure 21: Transporting Development Objects
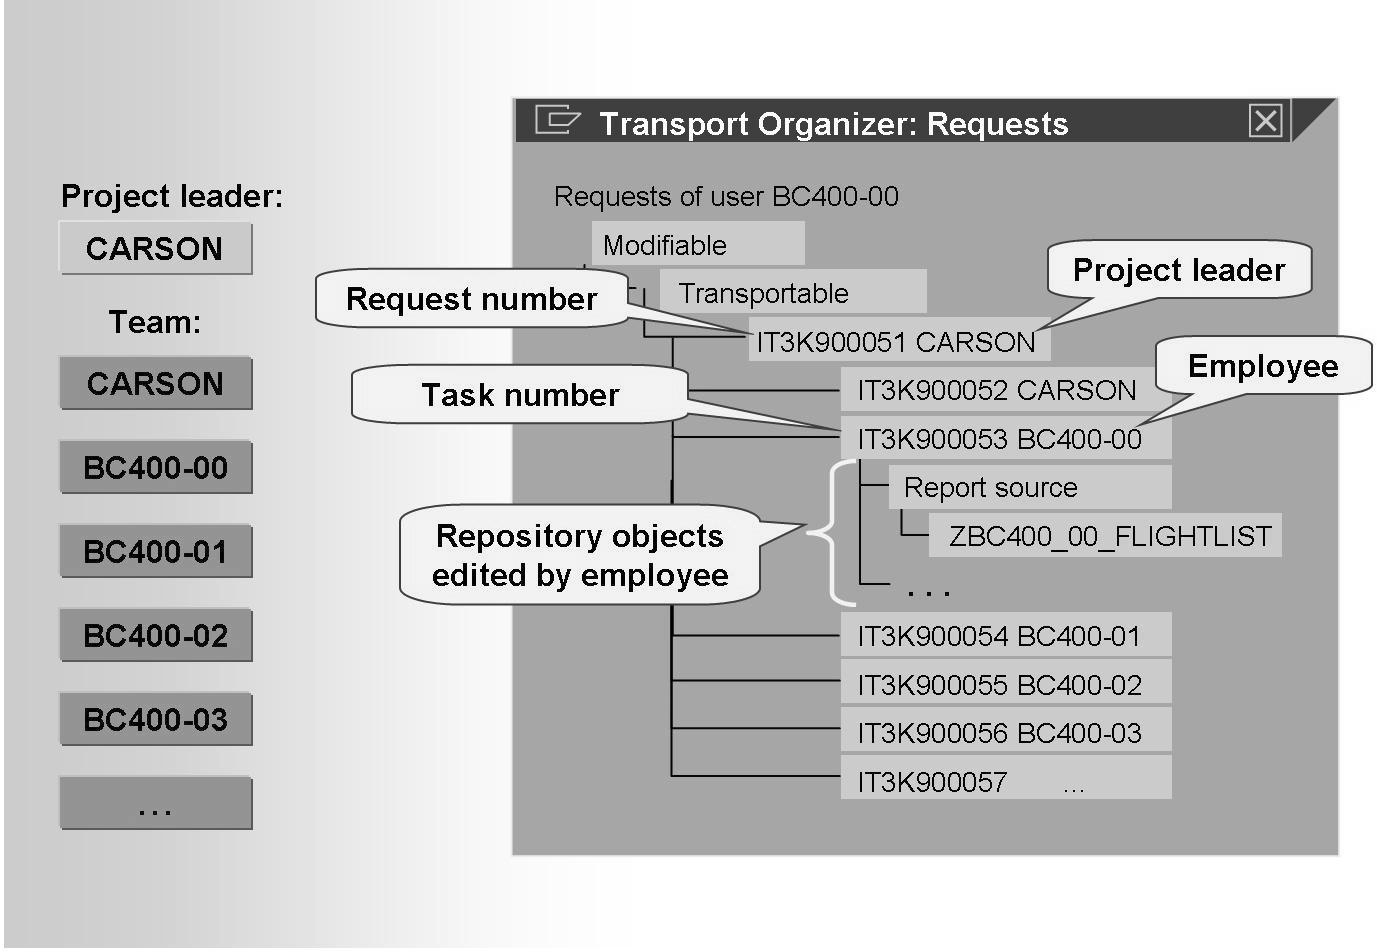
Development projects are carried out in a development system. The development objects edited or created in a project are transported to subsequent systems (test and/or production system) on project completion. At the start of a development project the project manager creates a change request, in which he or she names the employees of this project, in the Transport Organizer or directly in the
ABAP Workbench. The Transport Organizer then creates a task for each project
employee in the change request.
When a development object is edited or created, the relevant employee assigns this to the change request. The object is entered into the task of the employee. Thus, all repository objects that an employee works on during a development project are collected within his or her task.
Organizing a development project using a change request offers the following advantages:
• Each employee can track and check his or her project-specific activities.
• The respective development objects can be processed by all employees involved in the project. For those developers who do not belong to the project team, the repository objects remain locked until the project is completed (=change request is released).
• The joint transport of the development objects processed in the project at the time of project completion (= release of the change request) is automatically ensured by assigning the objects to the change request. The transport route of the involved packages (in which development took place) specifies to which subsequent system they are transported.
Unlike the functional divisions that separate Repository objects using packages, change requests are project-related and therefore have a limitation with regard to the time schedule of the objects involved. Thus, although a program always belongs to only one package, it can - at different times - belong to different projects.

Creating Packages
28
1. Navigate to the Object Navigator. You now have two options:
a) In the navigation area, choose the object type Package and enter the name of the package in the input field below. (Make sure you comply with the customer namespace conventions.) Choose Enter. If the specified package does not already exist, the system branches to a dialog for creating a package.
b) Choose Edit Object on the initial screen of the Object Navigator. In the dialog box, search for the option of specifying a package and enter the name of the package. Afterwards, click the button for creating the object (F5).
Hint: In SAP R/3 Release 4.6, packages are still called development classes. They are handled in the same way as described here. There is one minor limitation under Release 4.6a/b: The only option you have for creating a development class is that described in 1b).
2. Create the attributes of the package to be created.
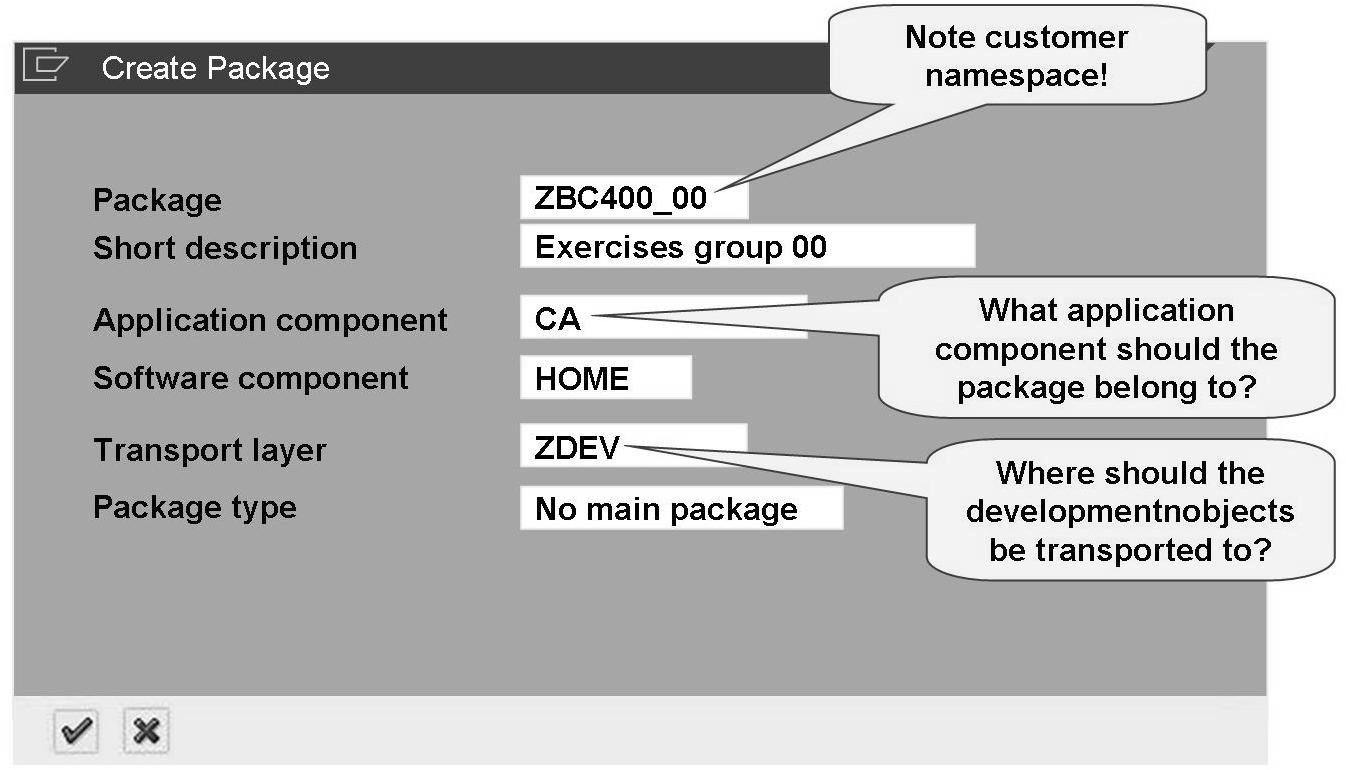
Figure 23: Setting Package Attributes (Example)
The attributes have the following meaning (detailed information can be obtained by using the field help (F1)):
Application Component
Determine the location of the package within the application hierarchy by specifying the corresponding application component.
Continued on next page
Software Component
For customer developments you should enter HOME as the software component.
Transport Layer
If you are executing your own developments, you must set up a transport layer for customer developments, which must be specified here. The transport layer determines if the objects of this package are to be transported to a subsequent system and, if so, to which system.
Package Type
You can choose between three package types:
• Standard package (Can contain Repository objects and other packages)
• Main package (Can only contain other packages)
• Structure package (Can only contain main packages)
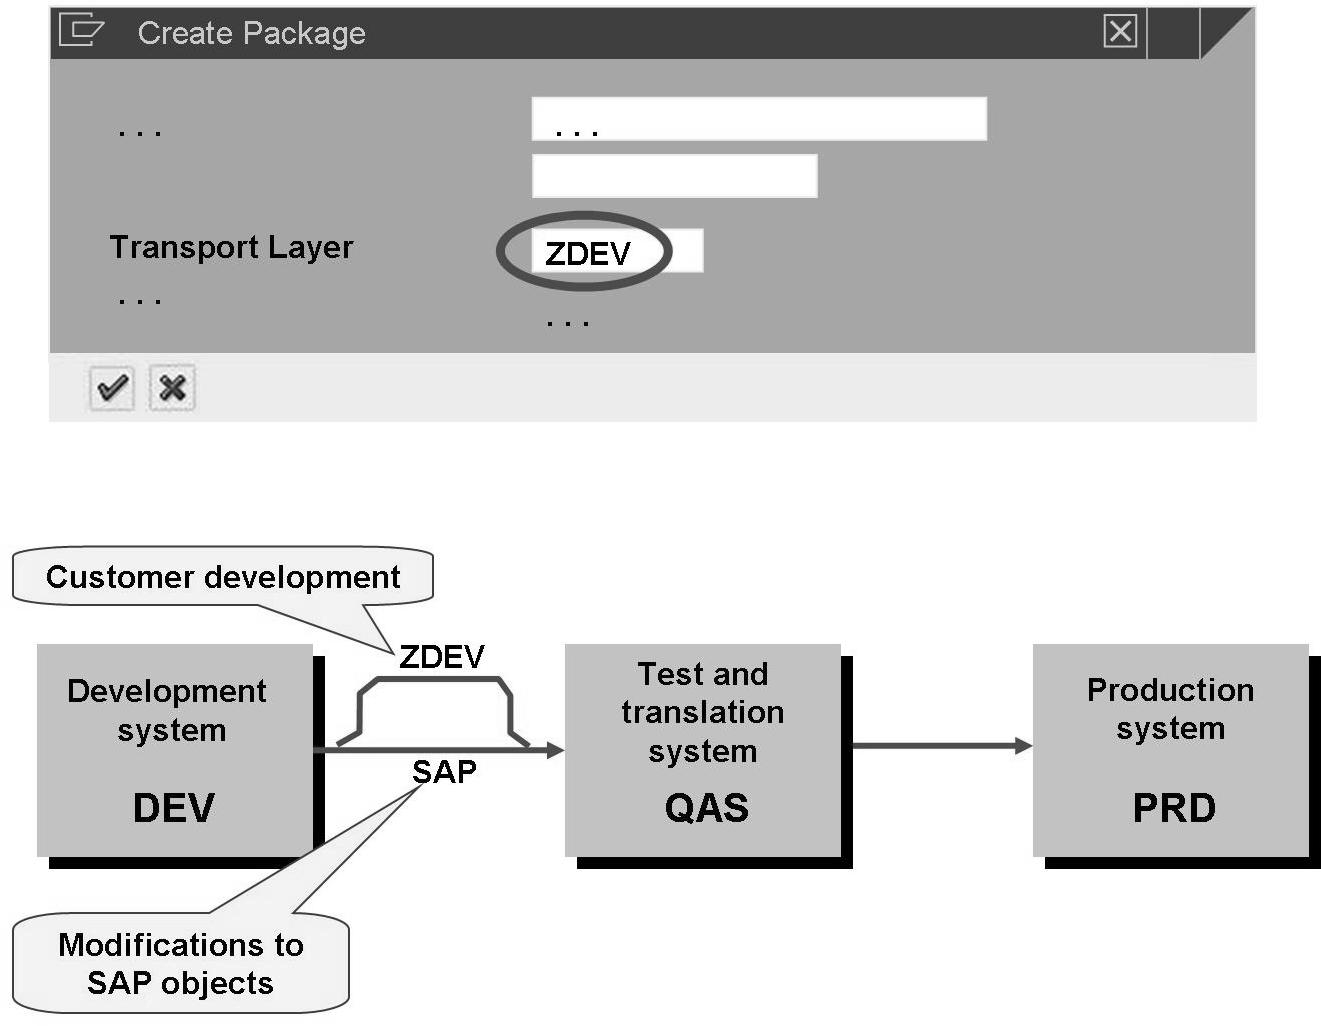
Figure 24: Specifying a Transport Route
3. Assign the package to a change request.
You can display all change requests in which you have a task using the My
Tasks pushbutton. Simply select the relevant request by double-clicking.
Continued on next page
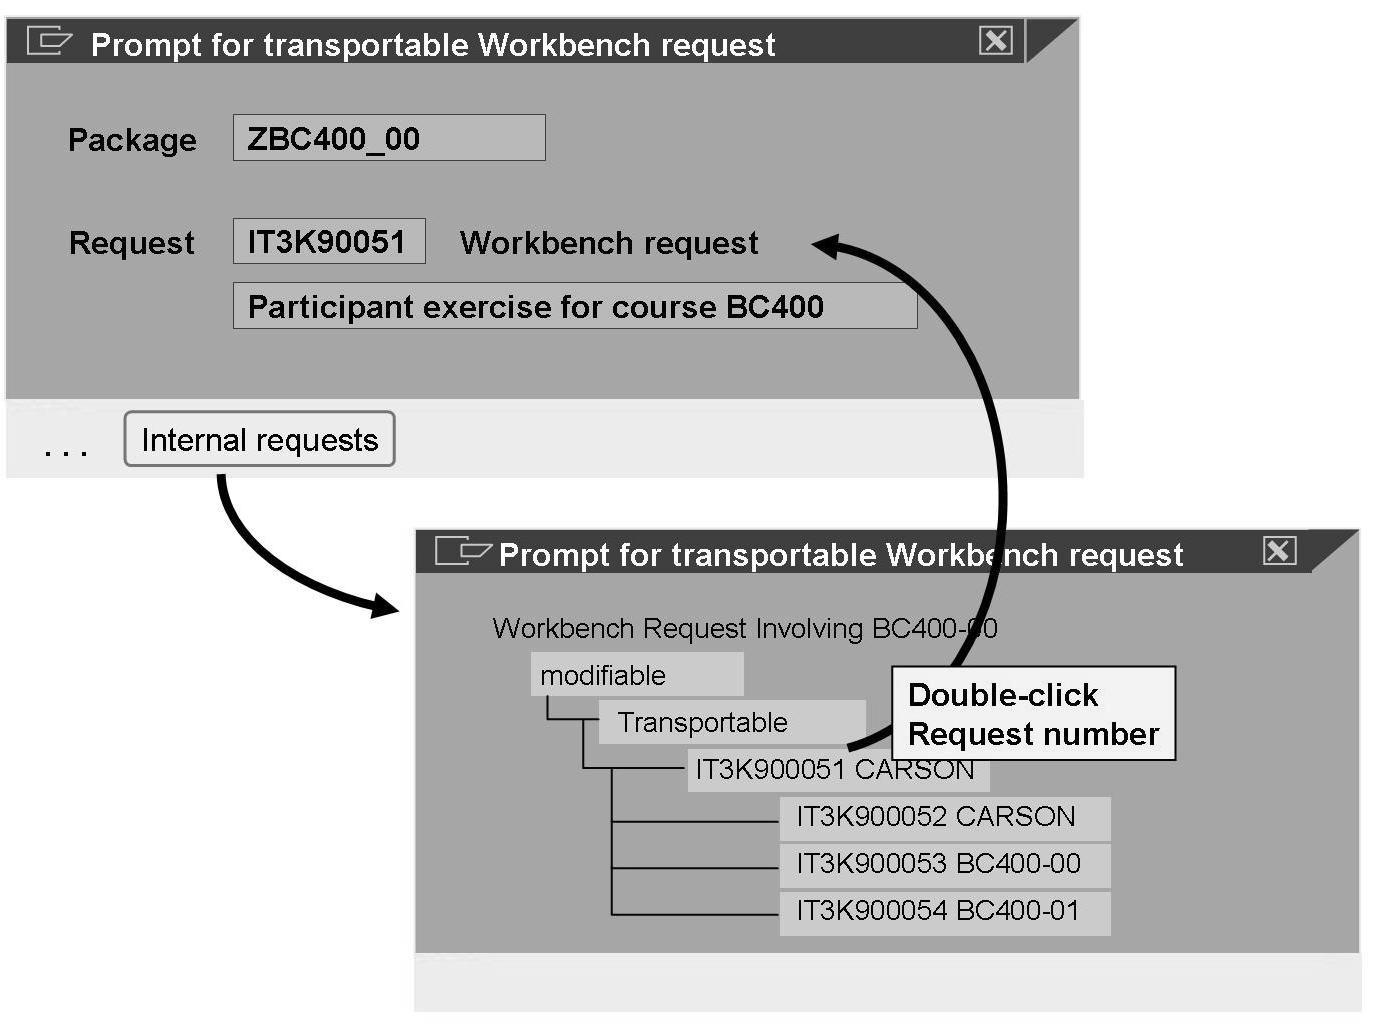
Note: The system takes care of the exact assignment for your task.
Hint: All repository objects that are created or changed must be assigned to the change request of the respective project. A change request has already been created for the project “Exercises for Training Participants BC400” in this training course. Each group of the course has a task within this change request.
Then you can do the corresponding exercise.
Introduction to the ABAP Programming Language
The ABAP programming language ...
• Enables multi-language applications
• Enables SQL access
• Has been enhanced as an object-oriented language
• Is platform-independent
• Is upward-compatible
It is especially designed for dialog-based business applications.
To support the type-specific processing of data, type conversions and type casting
are supported.
Using translatable text elements, you can develop multi-language applications. The Open SQL standard embedded in ABAP allows direct database accesses. ABAP Objects is the object-oriented enhancement of the ABAP programming
language.
The ABAP syntax is platform-independent. That means it always has the same meaning or function, irrespective of the relational database system and operating system of the application and presentation server.
Applications implemented in ABAP will also be able to run in future releases. (Upward compatibility of the language)
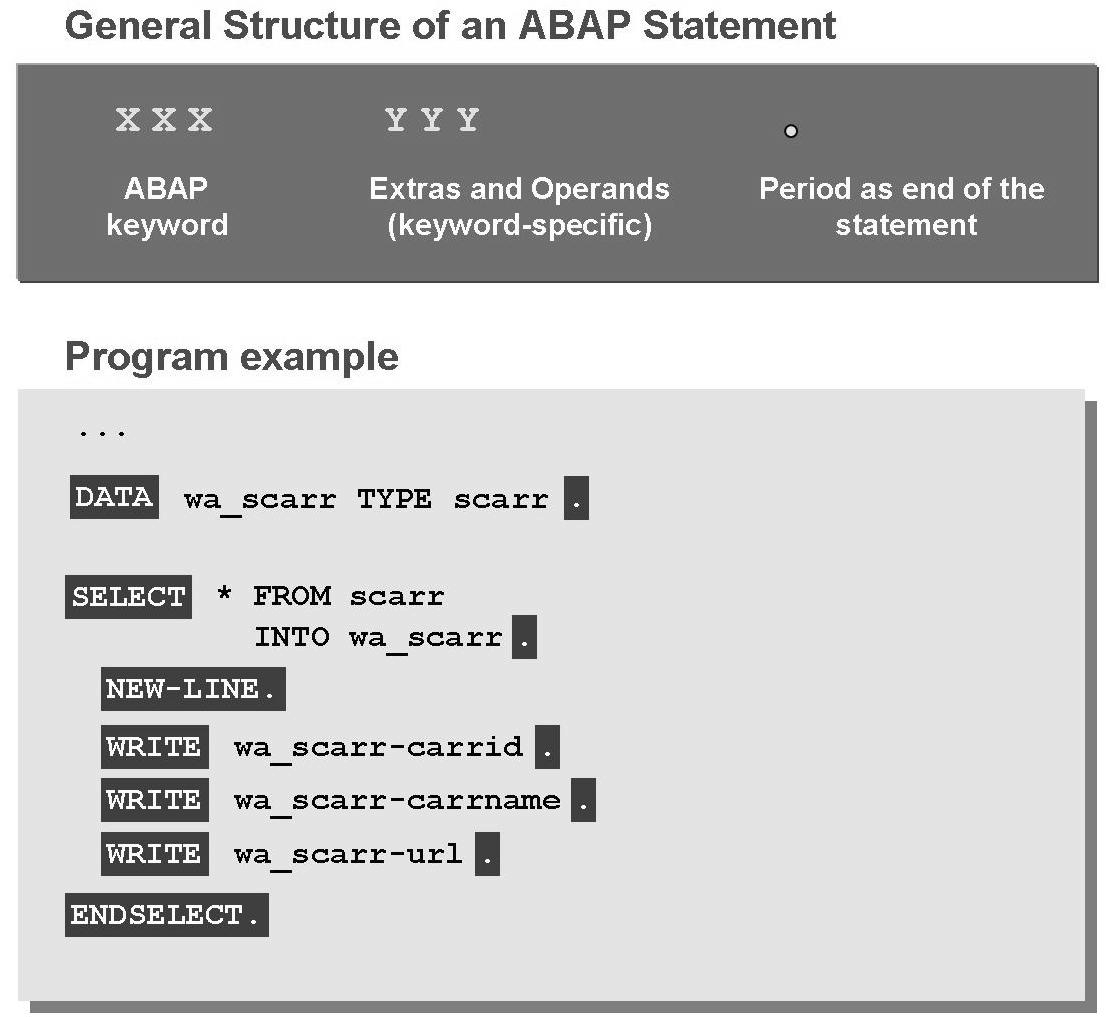
ABAP programs are made up of individual statements. The first word in a statement is called an ABAP keyword. Words must always be separated by at least one space. Each statement must end with a period.
Statements can be indented.
Statements can take up more than one line.
You can have multiple statements in a single line.
The ABAP runtime system does not distinguish between uppercase and lowercase letters for keywords, additions, and operands. In order to keep a better overview in this course, we will display all keywords and their additions in uppercase letters, and all operands in lowercase letters.
For indentations and for converting uppercase/lowercase letters, you can use the Pretty Printer (the correspondingly labeled button in the Editor). You can use the following menu path in the Object Navigator to make a user-specific setting to the Pretty Printer: Tools → Settings → ABAP Editor → Pretty Printer.
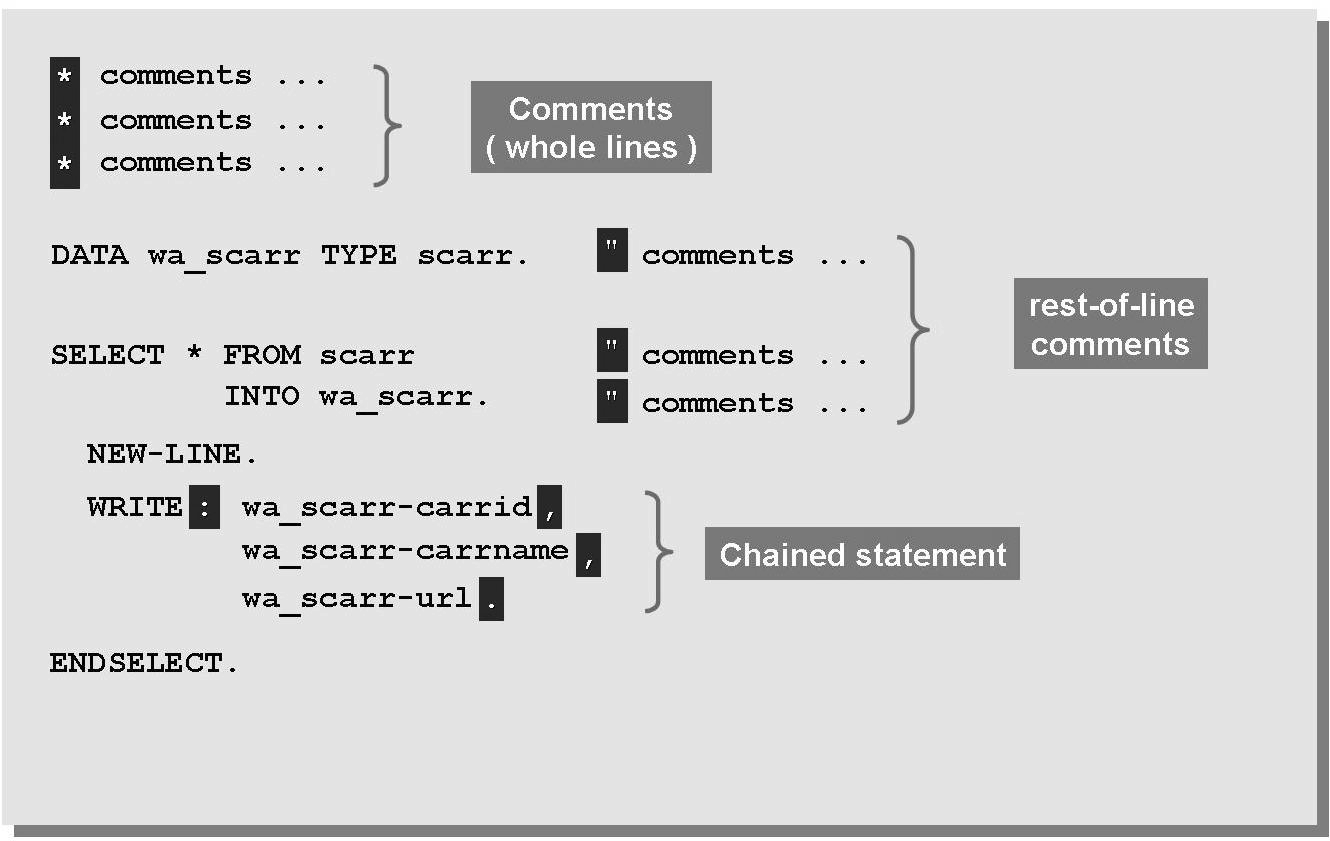
Comment lines are introduced with an asterisk *. The code generator recognizes the corresponding line as a comment so that it will be ignored by the runtime system.
If you wish to have the rest of a line set as a comment, you must use double quotation marks ".
You can combine consecutive statements with an identical beginning into a
chained statement:
• Write the identical beginning part of the records followed by a colon.
• After the colon, list the end parts of the statements (separated by commas).
• Blank spaces and line breaks are allowed before and after the separators
(colons, commas, periods).
• Note that this summarizing short hand is only a syntax help, it does not improve performance as the ABAP runtime system still processes the corresponding single statements.

If there are several ABAP statements, the ABAP runtime system writes the corresponding return code into the system field SY-SUBRC in order to provide information as to how successfully the particular statement was executed.
The value zero means that the statement was successful. Read the keyword documentation for the respective statements to find out if and how this return value is set in individual cases.
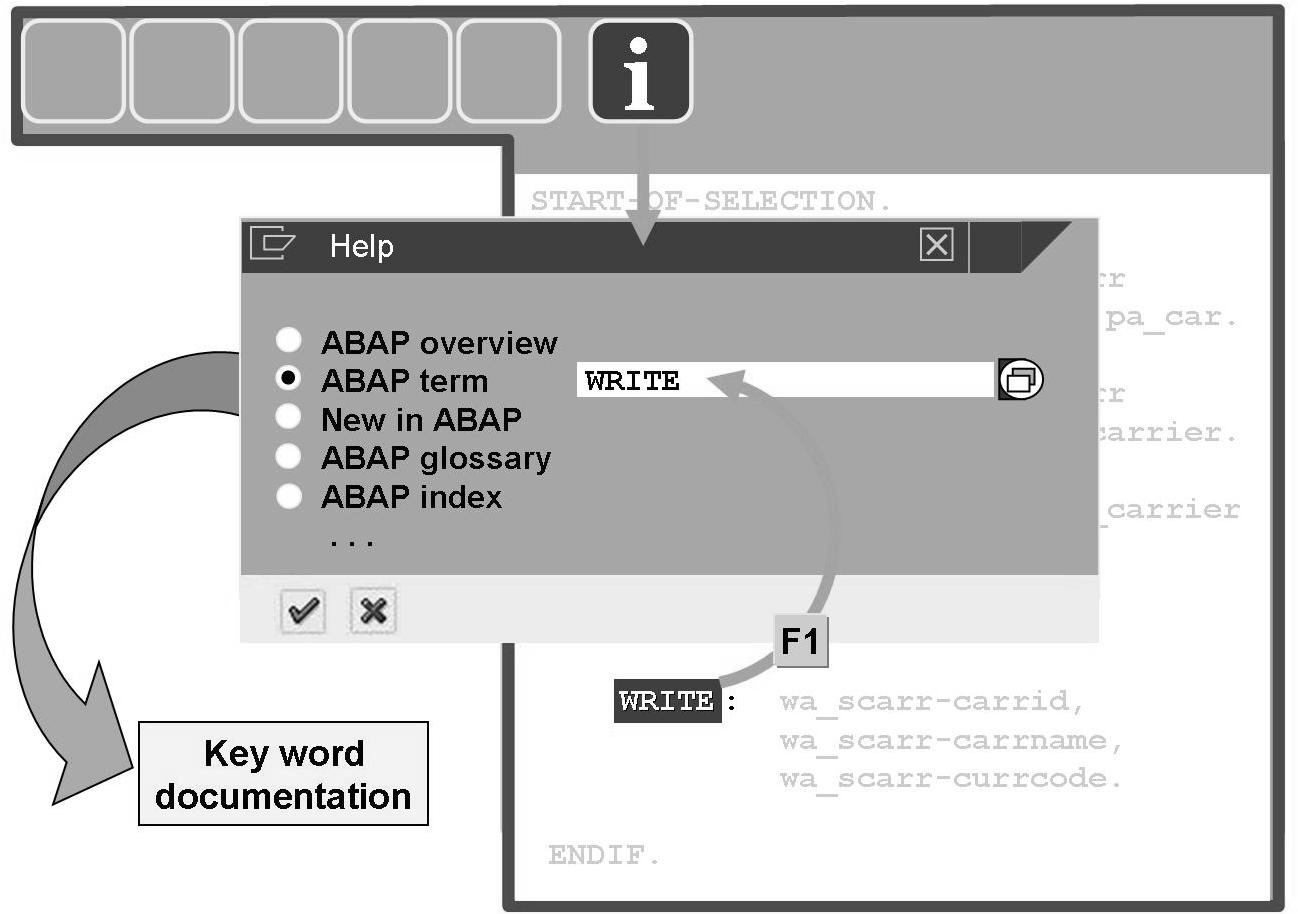
Figure 29: Keyword Documentation in the ABAP Editor
There are various ways of navigating to the documentation for an ABAP statement:
• The F1 key takes you directly to the documentation for the statement on which the cursor is positioned.
• The i button with the description Help on ... takes you to a dialog box where you can enter the required ABAP statement.
Developing an ABAP Program
In this section you will learn how to create programs and transactions in the ABAP Workbench. You will also learn about the purpose of program activation.
Creating an ABAP Program
36
1. Navigate to the Object Navigator. Three options are available:
a) In the navigation area, choose the object type Program and enter the name of the program in the input field below. (Comply with the customer namespace conventions.) Confirm with Enter. If the program does not exist, the system goes to the dialog that lets you create a program.
b) Display the package where you want to create the program. You can branch to the dialog for creating a program via the context menu for the package or the Programs node.
c) Choose Edit Object on the initial screen of the Object Navigator. In the dialog box, look for the option for specifying a program and enter the name of the program. Afterwards, click the button for creating the object (F5).
2. In this training course, remove the flag for With TOP Include. (Otherwise, your source code would be distributed to several programs.)
3. Change the title to a self-explanatory short text and, within this course, always choose Executable Program as the program type. All other program attributes are optional. Refer to F1 help for details.
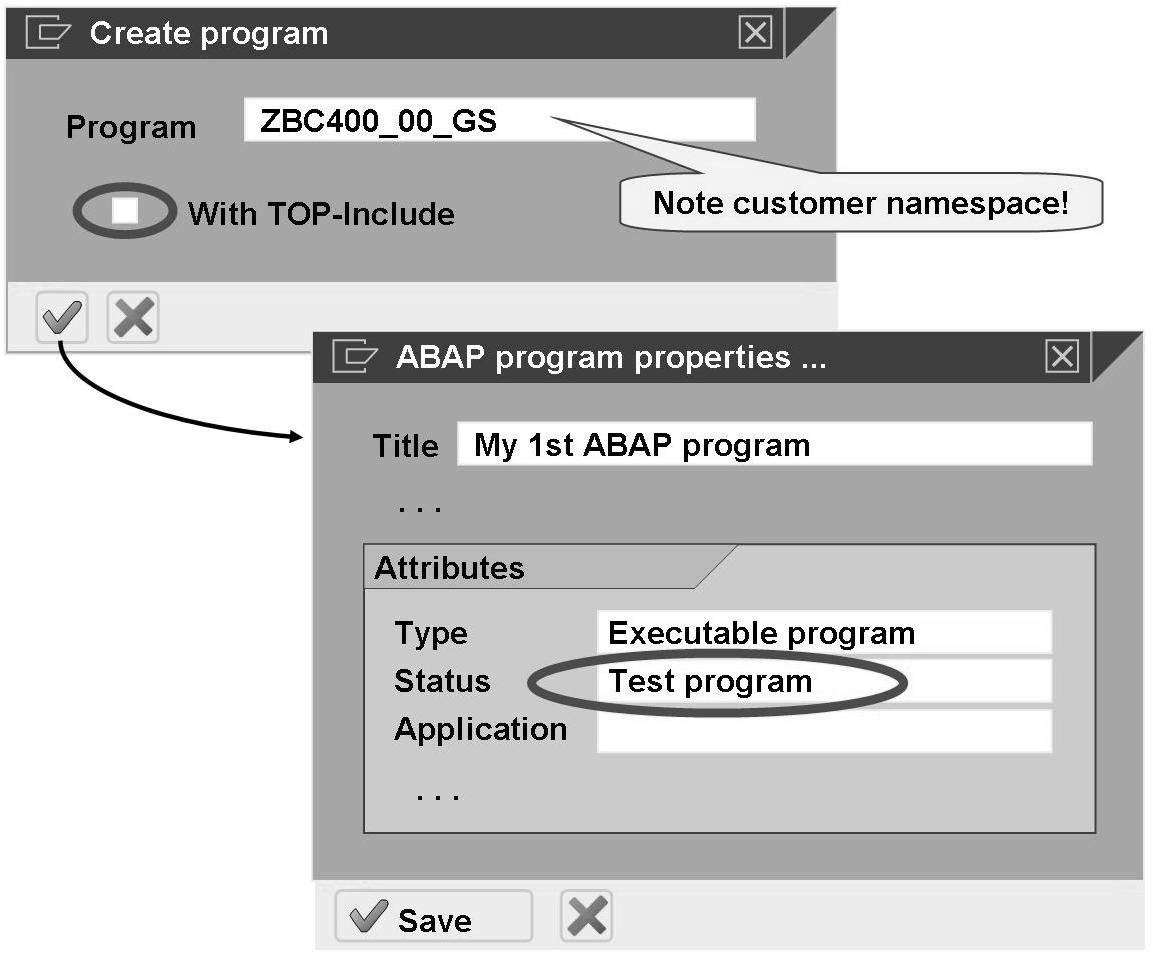
Figure 30: Creating an ABAP Program
Activating Programs
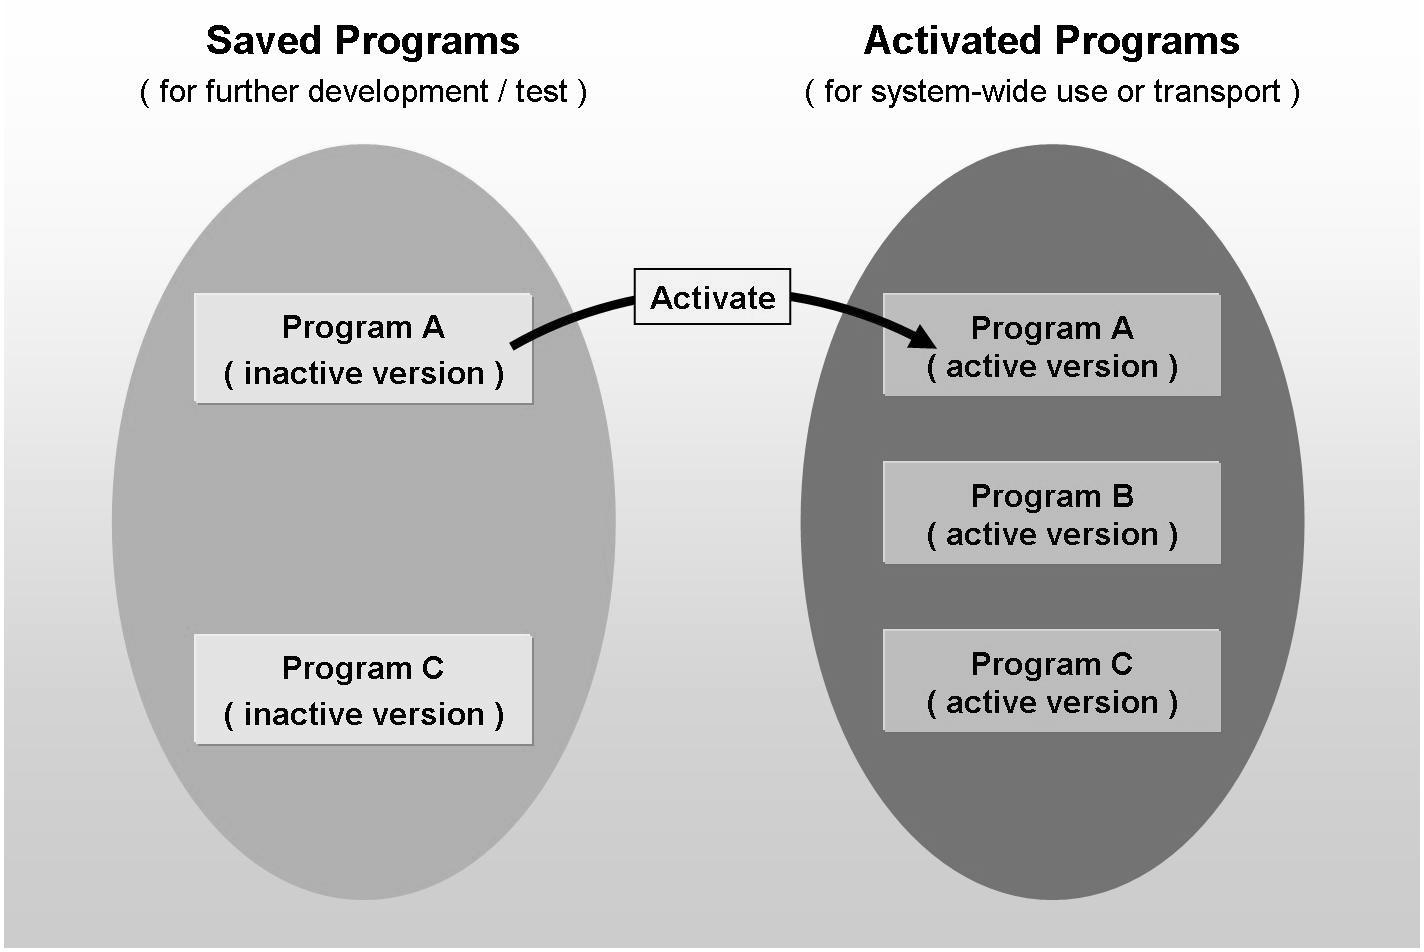
Figure 31: Inactive and Active Development Objects
Whenever you create a development object, or change and then save it, the system first stores only one inactive version in the Repository.
After that, you have an active version and an inactive version of the object. At the end of your object development, you have to activate the inactive “editing version” of the object. This version becomes the new active version of the object.
Note that the request release and hence the transport of the developed objects are only possible if all objects in the request have been activated.
If your program is available in both versions (active and inactive) then you can switch between the display of these two versions by using the corresponding button in the editor.
Whenever you activate a program, the system displays a list of all inactive objects that you have processed: Your worklist. Choose those objects that you wish to activate with your current activation transaction.
The activation of an object includes the following functions:
• Saving the object as an inactive version
• Syntax or consistency check of the inactive version
• Overwriting the previously active version with the inactive version (only after a successful check)
• Generating the relevant runtime object for later executions, if it is a program.
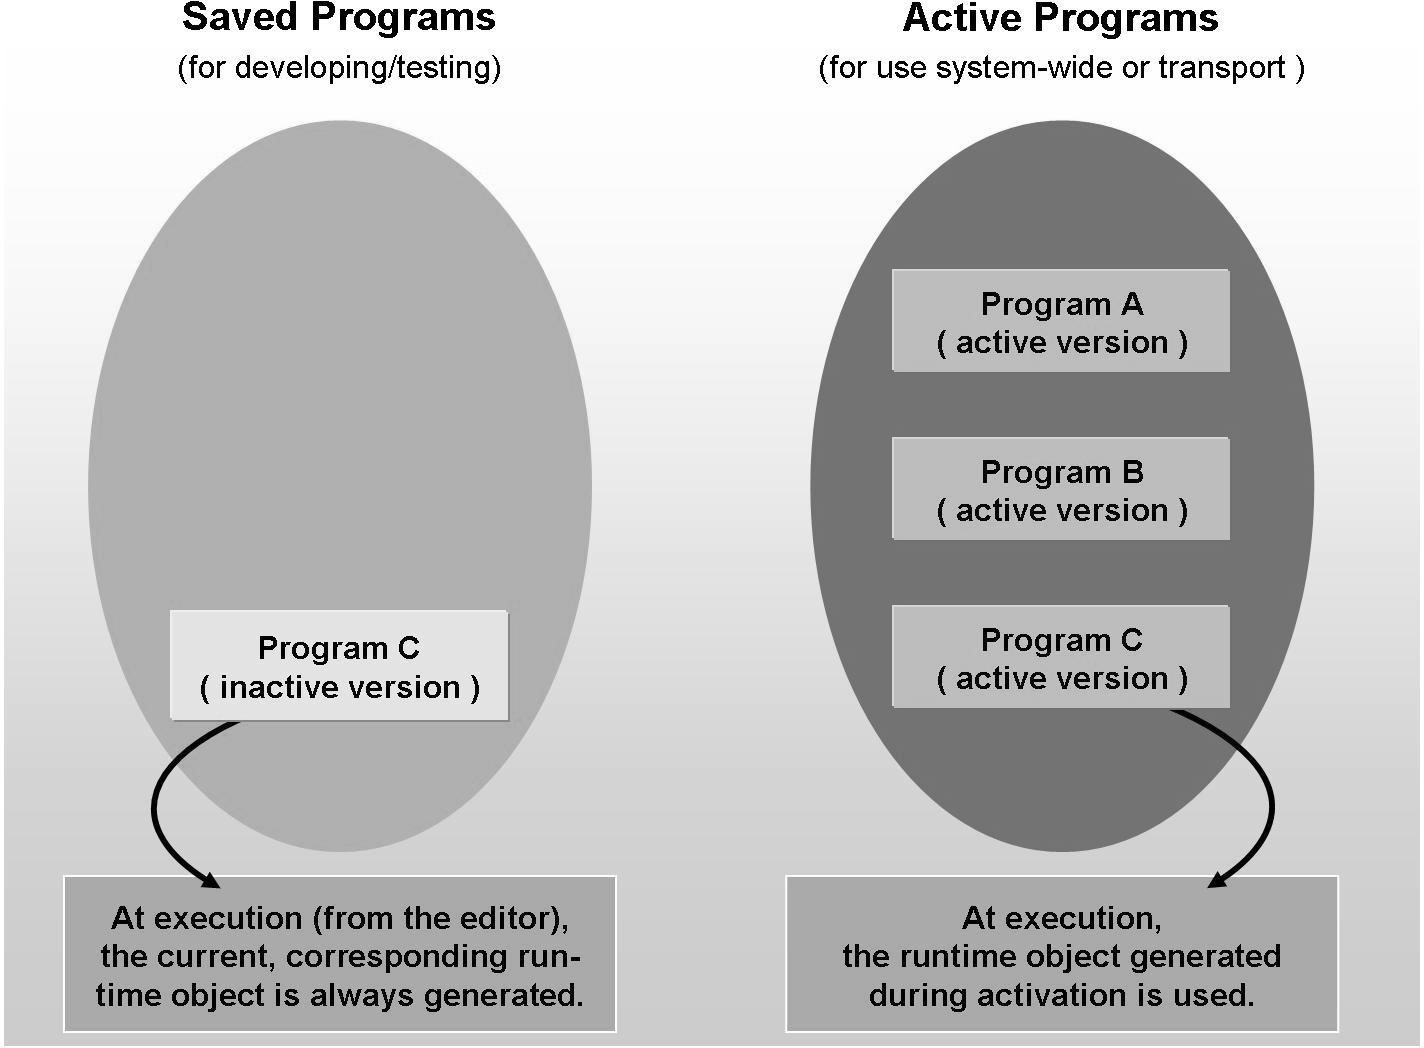
When you generate a development object, the system creates a separate runtime object (LOAD compilation) and also stores it in the Repository. This generated version is the version that is executed (interpreted) at runtime.
If your program has an inactive version as well as an active version, then you can get both versions to run as follows:
• If you start your program using the context menu of the navigation area or by means of a transaction, then the active version is used. That is, the LOAD generated for the last activation is executed.
• In contrast, if you start the inactive version loaded to the editor using the F8 button, then a temporary runtime object is generated from it and executed.
This way it is possible to continue the development of a repository object without changing the current system status. All changes to the development object become “visible” system-wide only when the object is activated.
Creating Transactions
Only transactions can be included in a role menu as well as the favorites of a user. Hence, if you want to place a program there, you must create a transaction that represents the program and integrate this in the menu. Alternatively, you can then start the program by entering the transaction code in the command field.
Creating Transactions
39
1. In the Object Navigator, display the object list for your program.
2. In the navigation area, use the context menu of the program to choose Create
→ More → Transaction.
3. Enter the required transaction code. (Make sure you comply with the customer namespace conventions!)
Assign a short text and choose the label Program and Selection Screen
(Report Transaction) .
4. On the next screen, enter the name of the program and choose Professional
User Transaction.
Under GUI enabled set the indicator SAP GUI for Windows.
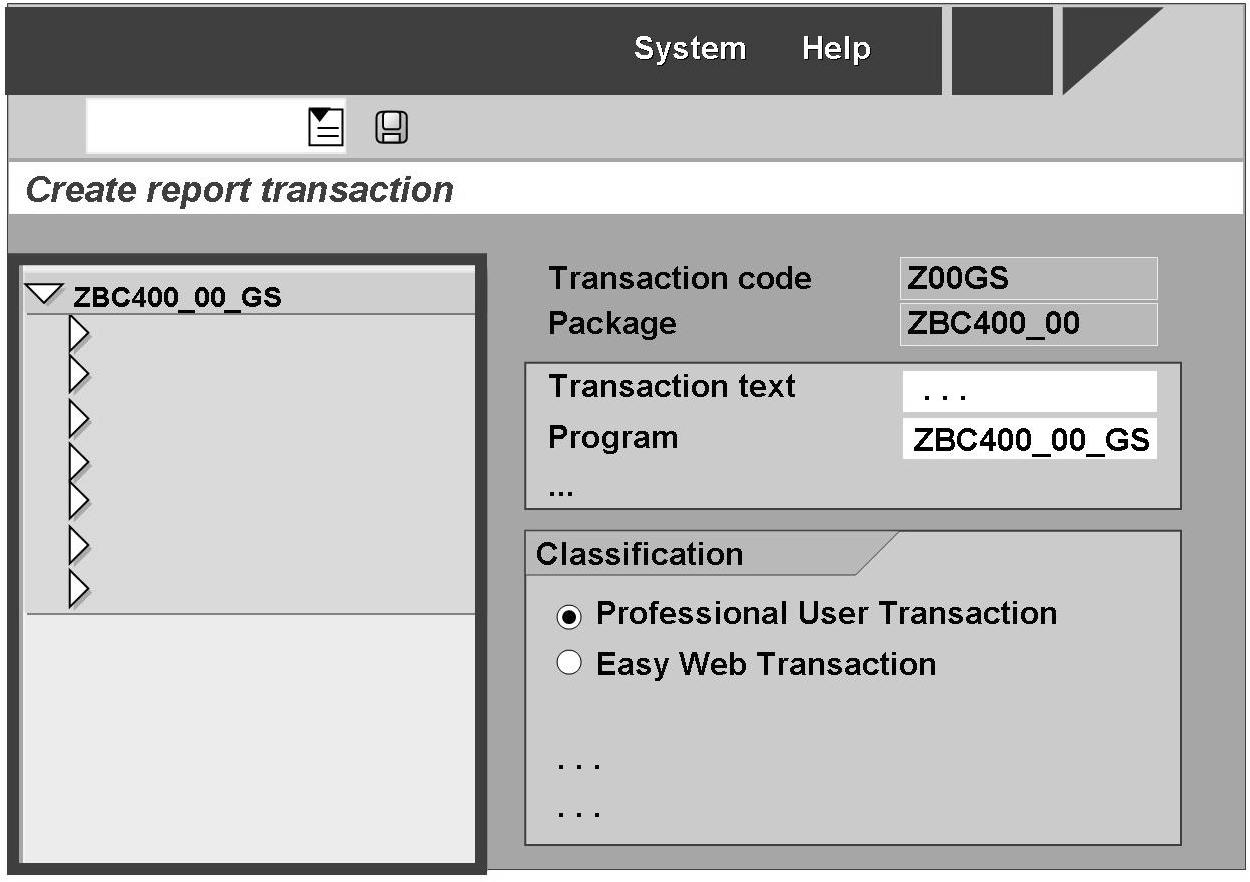
Figure 33: Creating a Transaction
5. Save the transaction.
6. Since each transaction is a Repository object, you must assign it to a package and to a change request on the following screens.
 Adding
Transactions
to
your
Personal
Favorites
Adding
Transactions
to
your
Personal
Favorites
40
1. Navigate to the initial screen (SAP Easy Access Menu).
2. In the Favorites context menu, choose Insert Transaction.
3. In the dialog box that appears, enter the required transaction code.
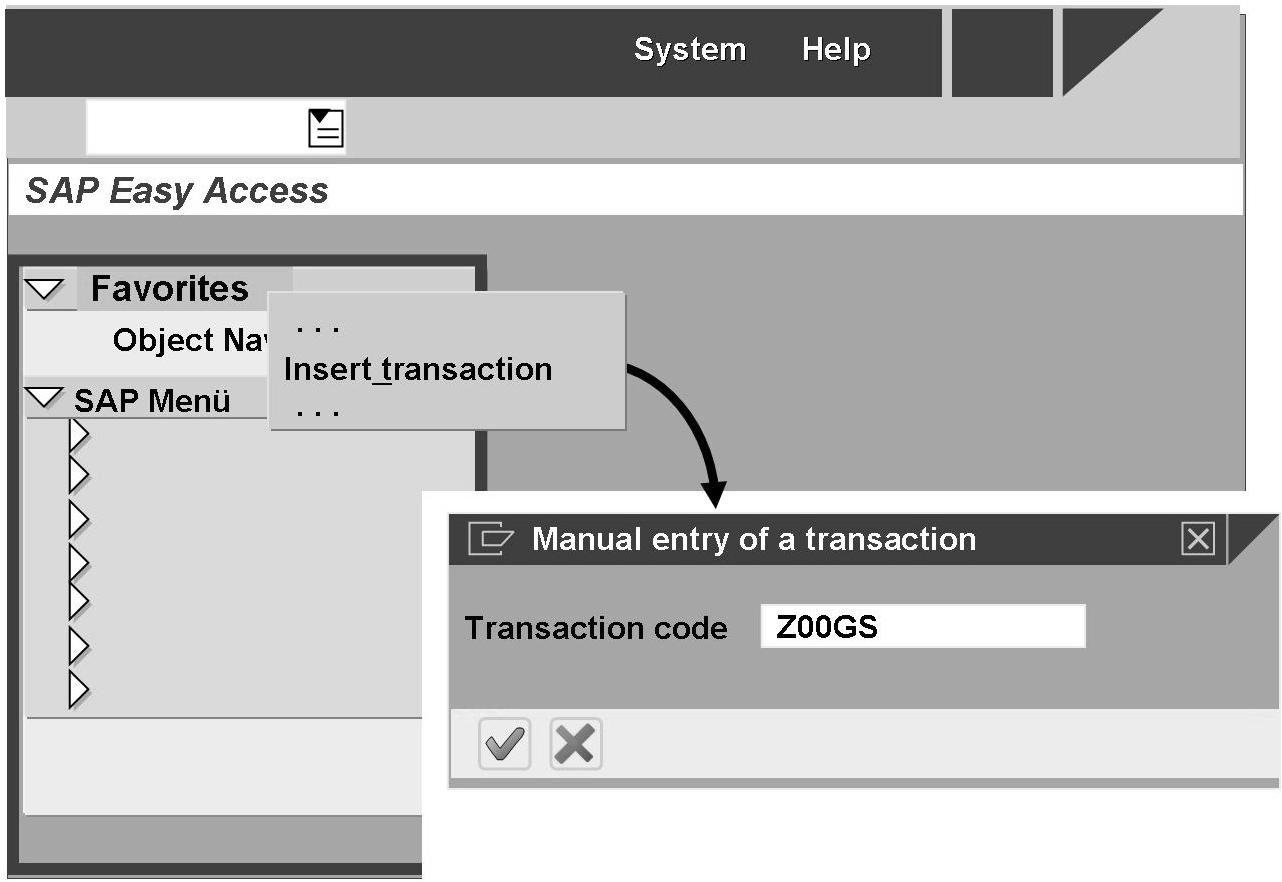
Figure 34: Inserting a Transaction Code into the Personal Favorites
Result
The short text of the transaction now appears under the Favorites and you can start the corresponding program by double-clicking.
Make the participants do the corresponding exercise.
Closing Development Projects
Once a project employee has completed his development task, he carries out a quality check and releases his task within the change request.
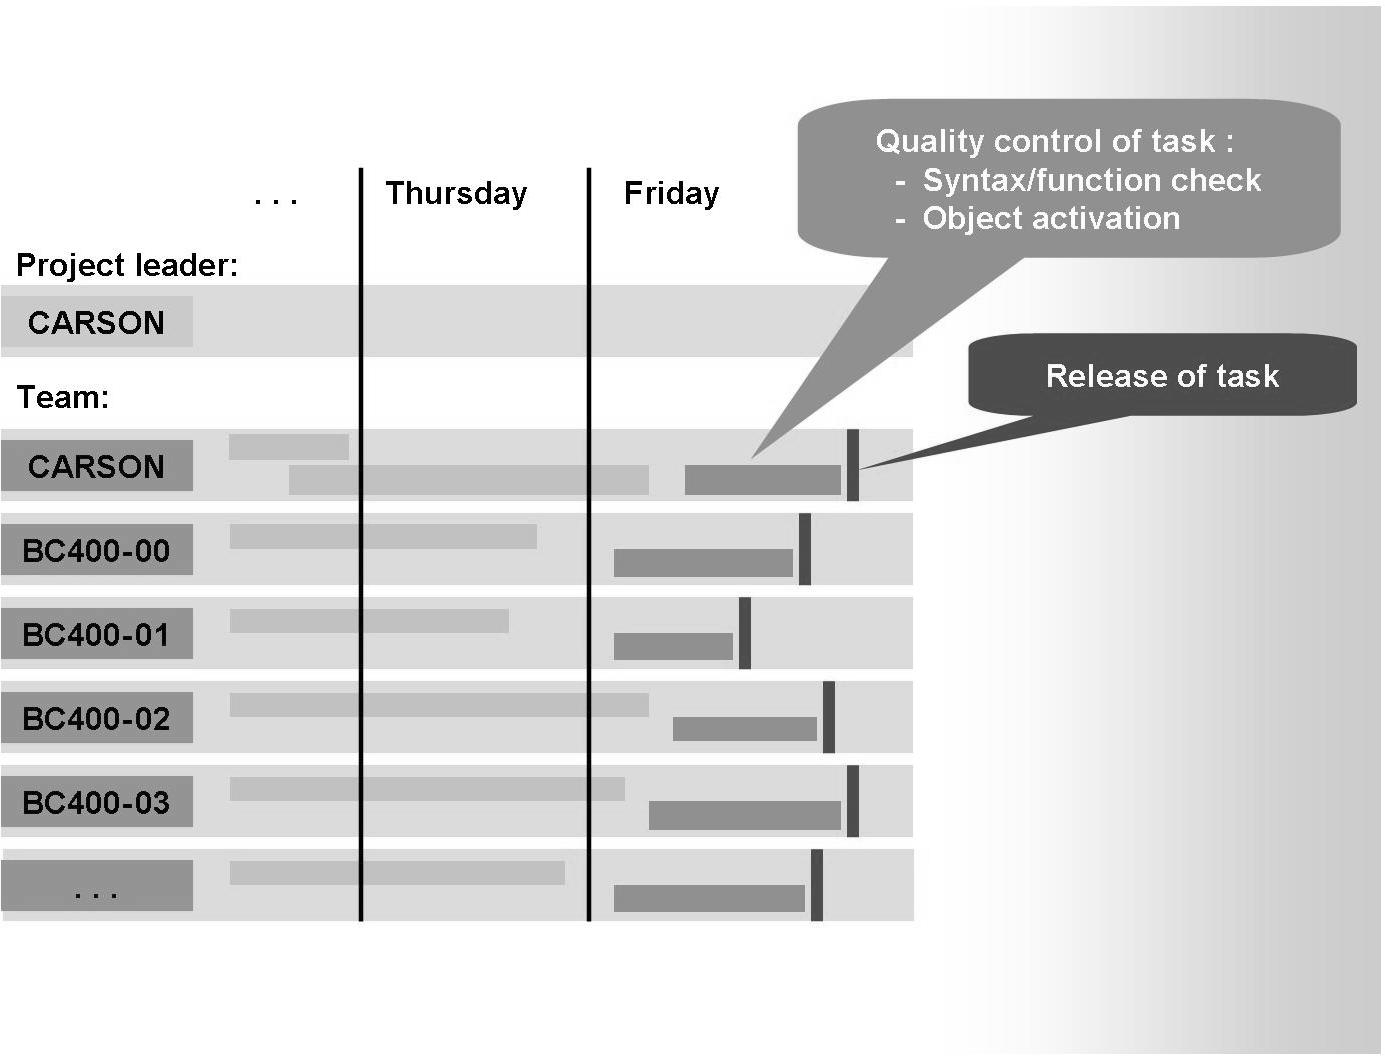
The corresponding object entries as well as the change locks of the object for third parties that were automatically set at the start of project are transferred from the task to the request.
However, all project employees can still edit these objects.
Once all tasks of a change request have been released, the project manager carries out the final check for the objects and releases the change request. This concludes the project.
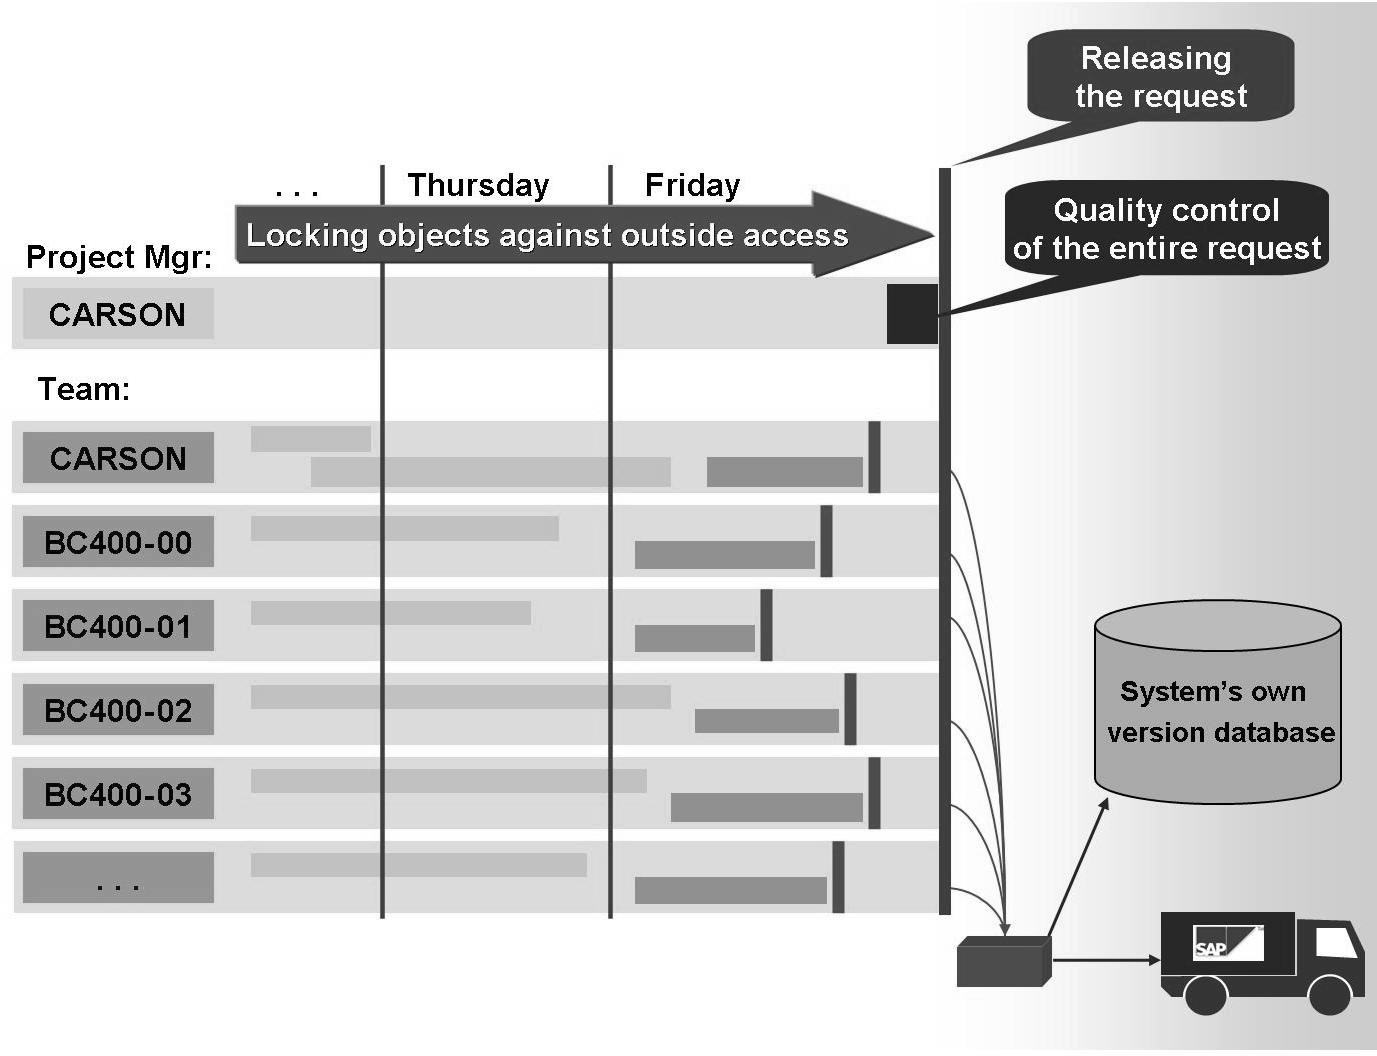
When the request is released, all object locks that belong to the request are removed.
Copies of the developed objects are exported to the system's own transport directory where they stay until the system administrator imports them to their intended target system.
Another copy of the exported development objects is stored in the system's own version database.
43 Exercise 1: Organizing Developments
Exercise Duration: 5 Minutes
Exercise Objectives
After completing this exercise, you will be able to:
• Create packages
• Assign changes in Repository objects to a change request
Business Example
You are a developer for an airline group and you are given the task of developing evaluation programs for several airline companies.
To group the repository objects together logically and also transport them, you must create a package.
System Data
System: Will be assigned Client: Will be assigned User ID: Will be assigned Password: Will be assigned
Set up instructions: No special instructions when using a standard training system
Task 1:
Logon to the training system
1. Log on to the operating system and then to the specified training system using the user name the instructor has given you.
2. Enter a new personal password.
Task 2:
Create Package
1. Create the package ZBC400_##.
Assign it to the change request the instructor has given you.
Continued on next page
2. Assign all your repository objects in the following exercises to this package and this change request.
Hint: It is best if you always work with the Object Navigator tool.
It provides you with an overview of all Repository objects in your package. From here, you can edit each object directly by selecting it from this list.
Solution 1: Organizing Developments
Task 1:
Logon to the training system
1. Log on to the operating system and then to the specified training system using the user name the instructor has given you.
a) Carry out this step as usual.
2. Enter a new personal password. a) Carry out this step as usual.
Task 2:
Create Package
1. Create the package ZBC400_##.
Assign it to the change request the instructor has given you. a) Carry out this step as described in the training material.
2. Assign all your repository objects in the following exercises to this package and this change request.
Hint: It is best if you always work with the Object Navigator tool.
It provides you with an overview of all Repository objects in your package. From here, you can edit each object directly by selecting it from this list.
a) Carry out this step as described in the training material.
45 Exercise 2: Developing ABAP Programs
Exercise Duration: 20 Minutes
Exercise Objectives
After completing this exercise, you will be able to:
• Create, edit, save, and process ABAP programs
• Check ABAP programs for correct syntax
• Test and activate ABAP programs
Business Example
You need to create an ABAP program that displays information on all existing flight departure times in a list.
The data is to be read from the database table SFLIGHT.
System Data
System: Will be assigned Client: Will be assigned User ID: Will be assigned Password: Will be assigned
Set up instructions: No special instructions required when using a standard training system
Task 1:
Create program
1. Create the executable program ZBC400_##_GS_LIST without a “TOP
include”.
Task 2:
Edit program
1. Define a work area for the data retrieval and data display (name suggestion:
wa_flight):
DATA wa_flight TYPE sflight.
2. Program a loop access to all data records in database table SFLIGHT:
SELECT * FROM sflight INTO wa_flight.
... ENDSELECT.
Continued on next page
3. For each data record, display the contents of the fields carrid, connid, fldate, seatsocc, and seatsmax in the list:
NEW-LINE.
WRITE wa_flight-carrid. WRITE ...
4. Check your program for syntax errors. Test and activate it.
Solution 2: Developing ABAP Programs
Task 1:
Create program
1. Create the executable program ZBC400_##_GS_LIST without a “TOP
include”.
a) Carry out this step as described in the training material.
Task 2:
Edit program
1. Define a work area for the data retrieval and data display (name suggestion:
wa_flight):
DATA wa_flight TYPE sflight.
a) See source code excerpt in the model solution.
2. Program a loop access to all data records in database table SFLIGHT:
SELECT * FROM sflight INTO wa_flight.
... ENDSELECT.
a) See source code excerpt in the model solution.
3. For each data record, display the contents of the fields carrid, connid, fldate, seatsocc, and seatsmax in the list:
NEW-LINE.
WRITE wa_flight-carrid. WRITE ...
a) See source code excerpt in the model solution.
Continued on next page
4. Check your program for syntax errors. Test and activate it.
a) Carry out this step as described in the training material.
Result
Source code excerpt: SAPBC400WBS_GS_LIST
REPORT sapbc400wbs_gs_list.
DATA wa_flight TYPE sflight.
SELECT * FROM sflight INTO wa_flight.
NEW-LINE. WRITE:
wa_flight-carrid, wa_flight-connid, wa_flight-fldate, wa_flight-seatsocc, wa_flight-seatsmax.
ENDSELECT.