

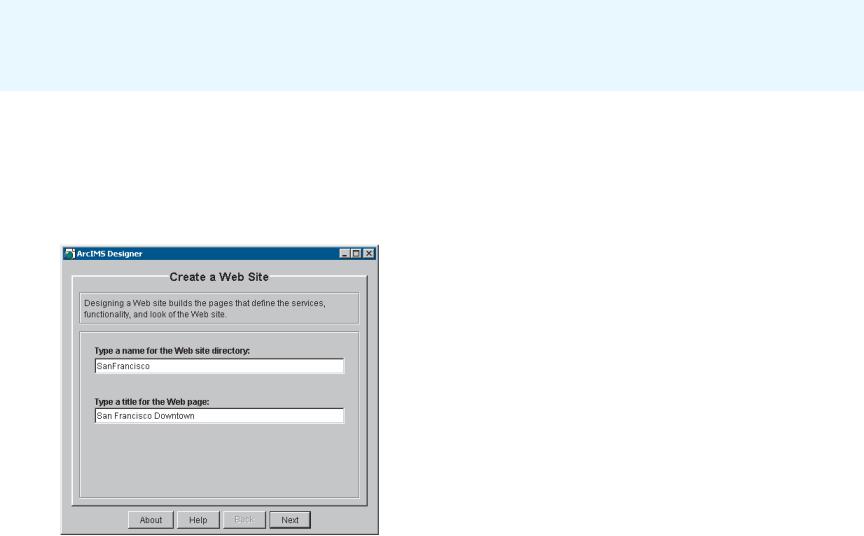
Designer
ArcIMS Designer is a wizard-driven application that guides you through the viewer design process. The panels you see depend on the choices you make. Some of the wizard panels appear only if you have selected a particular viewer. Others appear only if you have included a Feature Service in your Web site. The Stored Query panel does not appear unless you set up a stored query in Author. Most panels do not appear if you choose the Java Standard Viewer because it does not allow customization.
52 |
GETTING STARTED WITH ARCIMS |
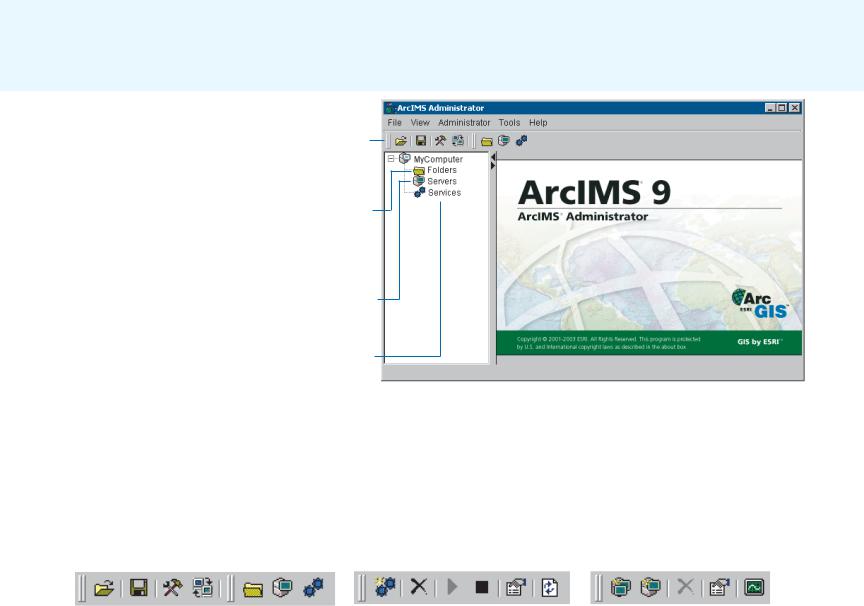
Administrator
You use the Administrator to create, start, stop, and remove services. You can also set and change service properties, such as the Virtual Server assignment.
Administrator also lets you work with servers and with MapNotes and EditNotes1 if you set up this functionality.
Saving service properties in Administrator ensures that your services are restored each time you reboot your computer.
You can restrict access to and usage of your services.
Different toolbar buttons may be available or unavailable to the right of the main toolbar, depending on which category in the left panel you have selected or what task you are performing.
Administrator’s main toolbar (details below)
Click to work with folders that store MapNotes and EditNotes from your users
Click to work with Virtual and Spatial Servers and instances
Click to work with services
Administrator’s main window. The left panel lets you select the category of the task you want to perform. After you click the category, the right panel displays details for it.
Save the current site Refresh |
|
Work with Virtual |
|
Remove |
Stop selected |
Refresh |
Add a Spatial |
Edit server |
||||||||||||||||||||
configuration |
site |
and Spatial servers |
selected service |
service selected service |
|
Server |
properties |
|||||||||||||||||||||
Open a |
Set site |
Work with |
Work with |
Add a |
Start selected |
|
Edit service |
Add a Virtual |
|
|
Remove |
|
View Virtual |
|||||||||||||||
Web site |
properties |
folders |
services |
service |
service |
|
|
properties |
Server |
|
|
|
|
Server statistics |
||||||||||||||
|
|
|
selected server |
|||||||||||||||||||||||||
|
|
|
||||||||||||||||||||||||||
|
|
|
|
|
|
|
|
|
|
|
|
|
|
|
|
|
|
|
|
|
|
|
|
|
|
|
|
|
|
|
|
|
|
|
|
|
|
|
|
|
|
|
|
|
|
|
|
|
|
|
|
|
|
|
|
|
|
Administrator’s main toolbar |
|
|
|
|
|
Administrator’s services toolbar |
|
|
|
Administrator’s servers toolbar |
||||||||||||||||||
1 EditNotes and MapNotes are being deprecated at this release. After version 9.0, EditNotes and MapNotes may no longer be available.
QUICK REFERENCE |
53 |

Service Administrator
The Service Administrator is a Web-based version of the Administrator. It lets you administer your site from a remote location. You can perform all the same tasks you can in Administrator, with the exception of managing folders. You can also administer ArcSDE services provided you’ve installed the ArcSDE administration tool on your ArcSDE application server.
The illustrations below show the first two screens of Service
Administrator as they appear inside your Web browser.
After you make changes to ArcIMS services, Spatial Servers, or Virtual Servers, you can click Save Startup File to save the new site configuration through subsequent service restarts. Site configuration information is saved to the ArcIMSSite.sez file in the ArcIMS AppServer directory.
Opens the Using ArcIMS Service
Administrator document.
54 |
GETTING STARTED WITH ARCIMS |

Viewers
A viewer is a Web site or HTML page that you create using Designer. Your users use the viewer to view and work with the maps you serve them via ArcIMS.
You can choose among three ArcIMS Viewers: HTML, Java Standard, or Java Custom.
You can customize ArcIMS Viewers or build custom clients that serve the same purpose as the ArcIMS Viewers. Essentially, the viewer or custom client is the Web site you build to serve your map content.
This section provides illustrations of the viewers and describes viewer components and toolbar buttons.
For more information on viewers, see the component and architecture discussion in Chapter 1, ‘About ArcIMS and this guide’.
QUICK REFERENCE |
55 |
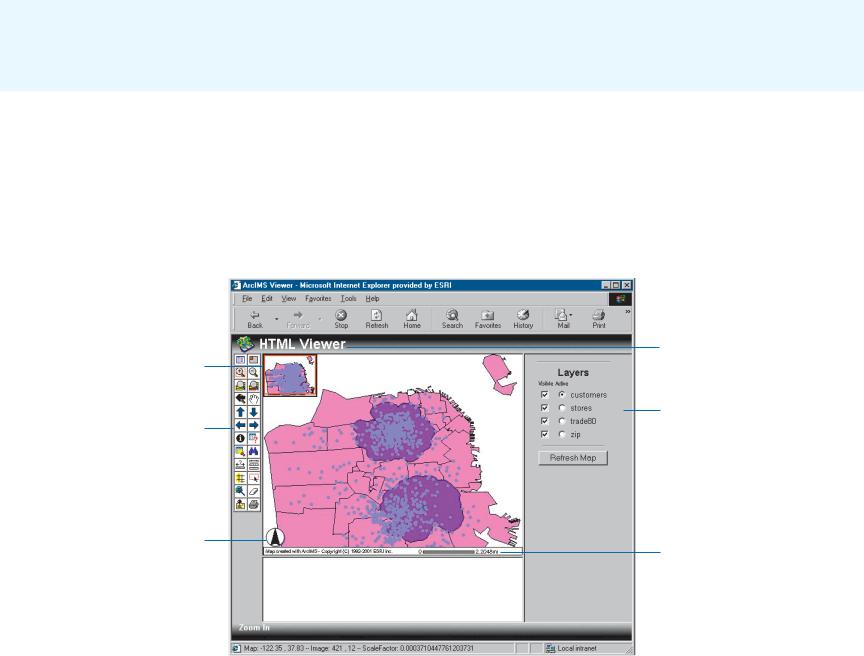
The HTML Viewer
The HTML Viewer interface consists of a map display area, title, toolbar, layer list, scalebar, North arrow, and overview map.
The toolbar appears to the left of the map display area. It includes all the tools you selected when designing your Web site as well as two buttons unique to the HTML Viewer: Toggle Between Legend and LayerList and Toggle Overview Map.
The layer list appears to the right of the map display area. Click Active to make a layer active. The active layer is the layer against which querying, buffering, and so on, will be performed.
Check a layer to make it visible; uncheck it to remove it from the map display. After making changes, you must click the Refresh Map button for your changes to be reflected on the map.
Title
Overview map
Layer list
Toolbar
North arrow
Scalebar
56 |
GETTING STARTED WITH ARCIMS |
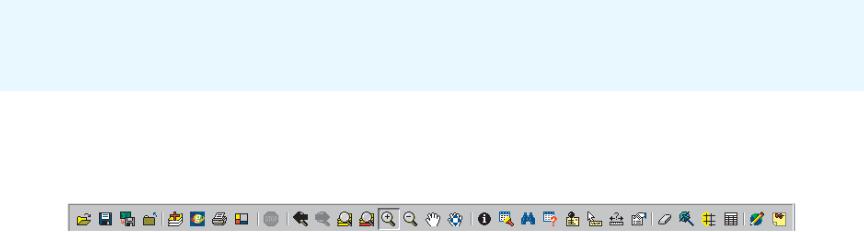
The toolbar in the HTML Viewer
Toggle Between
Legend and LayerList
Zoom In
Zoom to Full Extent
Back to Last Extent
Pan to North
Pan to West
Identify
Search
Measure
Buffer
Select by
Line/Polygon
Locate Address
Toggle Overview Map
Zoom Out
Zoom to Active Layer
Pan
Pan to South
Pan to East
Query
Find
Set Units
Select by Rectangle
Clear Selection
Toggle Between Legend and LayerList: Switches back and forth between a legend with symbology and a layer list with active layer and visibility options.
Toggle Overview Map: Adds or removes the overview map from the left top corner of the map display area.
Zoom In: Zooms in to the area of the map that you click or drag a box around.
Zoom Out: Zooms out from the area of the map that you click or drag a box around.
Zoom to Full Extent: Zooms to the full extent of the map.
Zoom to Active Layer: Zooms to the full extent of the active layer.
Back to Last Extent: Zooms to the previous extent.
Pan: Pans the display in the direction that you drag the mouse pointer.
Pan to North, Pan to South, Pan to East, Pan to West: Pans the map in one direction—north, south, east, or west.
Identify: Displays attribute information for the feature that you clicked.
Query: Searches for features based on a query expression.
Search: Searches for features based on the information you enter.
Find: Finds map features with an attribute value matching a string that you type.
Measure: Measures distances on the map.
Set Units: Sets the units for the Measure tool.
Buffer: Selects the features of one layer that are within the specified buffer distance of selected features of another layer.
Select by Rectangle: Selects the group of features contained by or in contact with a rectangle you draw on the map.
Select by Line/Polygon: Selects the group of features contained by or in contact with a line or polygon you draw on the map.
Clear Selection: Clears the selected set of features.
Locate Address: Locates a street address on the map.
Print: Prints the map to your default printer.
QUICK REFERENCE |
57 |
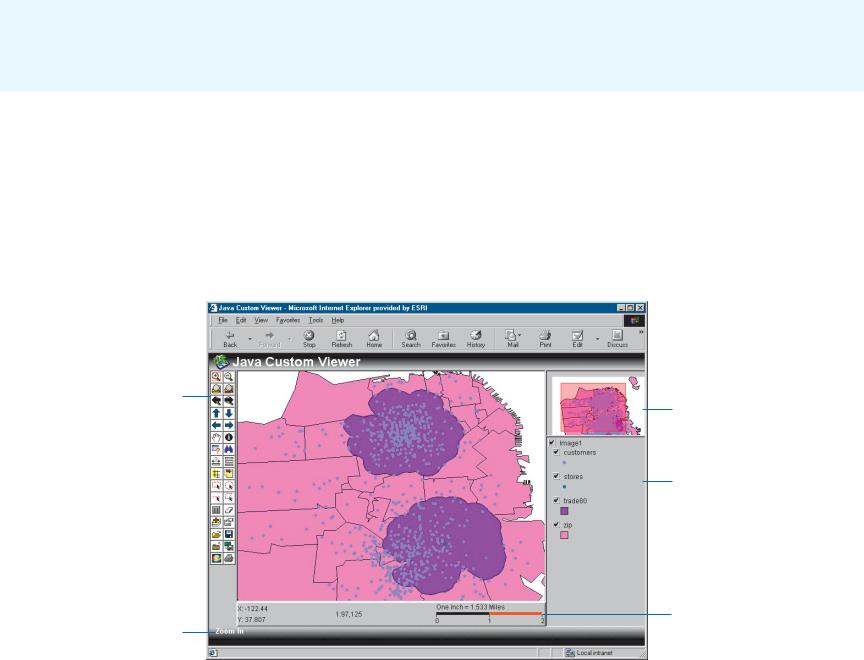
The Java Standard and Custom Viewers
Both the Java Standard Viewer and the Java Custom Viewer have the same elements: a map display area, title, toolbar, legend, scalebar, and overview map. The primary differences are the organization of the elements and the contents of the toolbar. The illustration on this page is the Java Custom Viewer.
In the Java Standard Viewer, the toolbar is above the map display area, the legend is to the left of the map display area, and the overview map is above the legend.
The toolbar contains only the tools you specified when you designed your Web site. It does not include the Viewer Elements and Cancel Data Retrieval buttons found on the Java Standard Viewer toolbar. Also, instead of a Pan One Direction button, the Java Custom Viewer has four separate buttons for panning north, south, east, and west. Instead of a single Select Features tool, the Java Custom Viewer has four tools: Select by Rectangle, Select by Circle, Select by Line, and Select by Polygon.
 Title
Title
Toolbar
Overview map
Legend
Scalebar
Tool status
58 |
GETTING STARTED WITH ARCIMS |
The toolbar in the Java Standard and Custom Viewers
The toolbar is oriented horizontally in the Java Standard Viewer and vertically in the Java Custom Viewer. The Java Standard Viewer toolbar, shown here, is slightly different from the Java Custom Viewer toolbar. Differences are noted below as applicable.
|
|
Project |
|
Project eography |
|
er ents |
|
|
Extent |
to |
Full |
|
|
In |
|
|
|
|
Locate |
|
|
|
lear |
All |
|
otes |
|||||||
|
|
|
lose |
G etwork |
View |
|
|
Zoom |
|
|
|
|
|
|
|
|
|
|
|
easure |
C |
Selection |
|
|
|
|
|||||||
|
Save |
|
C |
|
N |
|
Elem |
|
Previous |
|
Extent |
|
Zoom |
|
Pan |
|
Identify |
|
Find |
|
Address |
|
M |
|
|
|
Buffer |
|
EditN |
||||
|
|
|
|
|
|
|
|
|
|
|
|
|
|
|
|
||||||||||||||||||
|
|
|
|
|
|
|
|
|
|
|
|
|
|
|
|
|
|
|
|
|
|
|
|
|
|
|
|
|
|
||||
|
|
|
|
|
|
|
|
|
|
|
|
|
|
|
|
|
|
|
|
|
|
|
|
|
|
|
|
|
|
|
|
|
|
|
|
|
|
|
|
|
|
|
|
|
|
|
|
|
|
|
|
|
|
|
|
|
|
|
|
|
|
|
|
|
|
|
|
|
pen |
Im |
opy |
|
|
Add |
|
|
|
|
|
|
|
Zoom |
|
|
||||
|
|
|
|
|
Next |
|
|
Zoom |
||||||||||||
O |
|
|
C |
|
|
|
|
|
|
C |
|
|
|
|
|
|
|
|
||
|
|
Project |
|
|
M |
Layers |
|
|
ancel |
|
Extent |
|
|
|
to |
|
O |
|||
|
|
|
to |
ap |
|
Retrieval Data |
|
Active |
|
|
ut |
|||||||||
|
|
|
|
age |
|
|
|
|
|
|
|
Layer |
|
|||||||
|
|
|
|
|
File |
|
|
|
|
|
|
|
|
|
|
|
||||
Open Project: Opens an existing configuration file.
Save Project: Saves the map as a configuration file.
Copy Map Image to File: Saves your current view as a JPEG image.
Close Project: Closes the current project and leaves the browser window open.
Add Layers: Opens a Catalog to navigate to data to add to the map.
Geography Network: Opens the Geography NetworkSM Explorer to search for data to add to the map.
Print: Prints the map to your default printer.
Viewer Elements: Changes the display properties of the scalebar, legend, and overview map (Java Standard toolbar only).
Cancel Data Retrieval: Cancels a request sent to the Spatial Server (Java Standard toolbar only).
Previous Extent: Zooms to the last extent.
Next Extent: Zooms forward from a previous extent. This tool is unavailable until you have clicked the Previous Extent button.
Zoom to Full Extent: Zooms to the full extent of the map.
Zoom to Active Layer: Zooms to the full extent of the active layer.
Zoom In: Zooms in to the area of the map that you click or drag a box around.
Zoom Out: Zooms out from the area of the map that you click or drag a box around.
ne |
|
Search |
|
uery |
|
|
apTips |
Layer |
|
Select |
|
Attributes |
|
otes |
O |
|
|
|
|
|
|
|
|
|
|
|
apN |
||
Pan |
Direction |
Q |
|
M |
|
Properties |
Features |
M |
||||||
|
|
|
Builder |
|
|
|
|
|
||||||
Pan: Pans the display in the direction you drag the mouse pointer.
Pan One Direction: Pans the map in one direction. Available as four tools on the Java Custom Viewer toolbar.
Identify: Displays the attributes of the feature you click.
Search: Searches for features based on the information you enter.
Find: Finds map features matching the string that you type.
Query Builder: Builds query expressions to search for features.
Locate Address: Locates a street address on the map.
MapTips: Displays information about a feature when the mouse pointer hovers over it.
Measure: Measures distances on the map.
Layer Properties: Sets the display properties of the active layer.
Clear All Selection: Clears the selected set of features from the map.
Select Features: Selects features contained within or intersected by a graphic you draw on the map. Available as four tools on the Java Custom Viewer toolbar.
Buffer: Finds the features of one layer within a set buffer distance of the selected features of another layer.
Attributes: Displays tabular information about selected features.
EditNotes: Opens the EditNotes toolbar.
MapNotes: Opens the MapNotes toolbar.
QUICK REFERENCE |
59 |
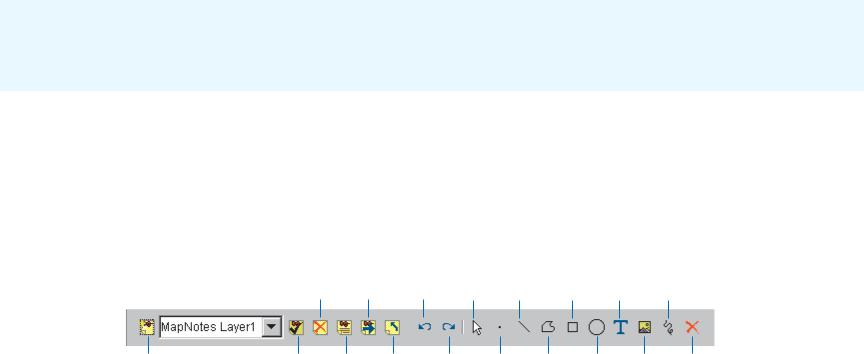
MapNotes
The MapNotes tools (for Java Viewers only) bring to life the concept of collaborative GIS—not only the sharing of data but also the sharing of ideas about data over the Internet. Use the MapNotes tools to add text or graphics about a map to a MapNotes layer, then submit your notes to the ArcIMS site administrator. The MapNotes toolbar contains a full suite of tools to add, delete, and change the appearance of the notes that you create.
When you click the MapNotes button, the MapNotes toolbar appears. Existing MapNotes layers created by you or other users are automatically loaded. Use the following tools to create and edit MapNotes layers. When you are done, submit your MapNotes. A MapNotes item will appear in the ArcIMS site administrator’s MapNotes folder with a time stamp and description. After you have submitted your layer, others accessing the same Internet GIS application will also be able to see the MapNotes layer you created.
Delete |
|
|
|
|
|
|
|
MapNotes |
|
|
Select |
Add |
Add |
Add |
Add |
Layer |
Submit |
Undo |
MapNote |
Line |
Rectangle |
Text |
Freehand |
New |
Select Description |
Stop |
MapNotes |
MapNotes |
|
Layer |
Layer |
|
New MapNotes Layer: Creates a new MapNotes layer.
Select MapNotes Layer: Makes your chosen layer the active layer (the layer to which changes will be made).
Delete MapNotes Layer: Deletes the current MapNotes layer from the list of available layers.
Description: Opens a dialog box in which you can type a description of the MapNotes layer.
Submit: Submits the current MapNotes session to the ArcIMS site administrator.
Stop: Stops your MapNotes session and closes the MapNotes toolbar.
Undo: Removes the most recently added text or graphic from the layer.
Redo: Reintroduces text or graphics that were removed using the Undo button.
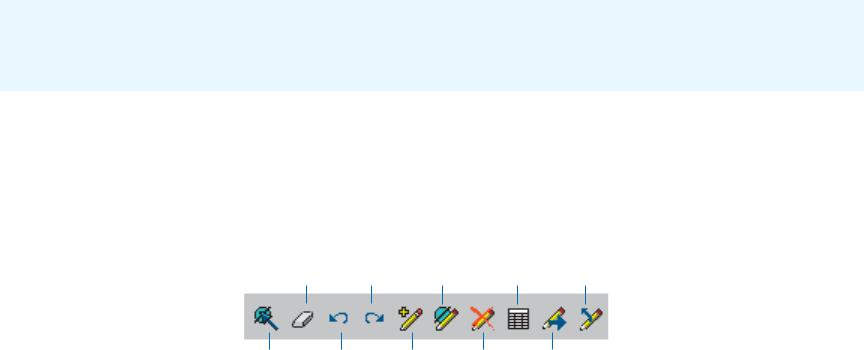
Redo |
Add |
Add |
Add |
Add |
Delete |
|
Point |
Polygon |
Circle |
Image |
MapNote |
Select MapNote: Selects the item (text or graphic) that you click.
Add Point: Adds a point to the layer.
Add Line: Adds a line to the layer.
Add Polygon: Adds a polygon to the layer.
Add Rectangle: Adds a rectangle to the layer.
Add Circle: Adds a circle to the layer.
Add Text: Adds text and allows you to change the font style and color.
Add Image: Adds an image to the layer.
Add Freehand: Adds a freehand line to the layer.
Delete MapNote: Deletes the selected item (text or graphic) from the MapNotes layer.
60 |
GETTING STARTED WITH ARCIMS |
EditNotes
Like the MapNotes tools, the EditNotes tools (for Java Viewers only) enable the sharing of ideas about data. Use the EditNotes tools to make simple edits to spatial and attribute data, then submit your edits to the ArcIMS site administrator. The EditNotes toolbar contains tools for selecting, adding, moving, and deleting the features of a layer belonging to a Feature Service.
When you click the EditNotes button, the EditNotes toolbar appears. Use the following tools to edit features. When you are finished editing, submit your session. An EditNotes item appears in the ArcIMS site administrator’s EditNotes folder with a time stamp and description. The features you added or moved can be converted to shapefile format. All your changes can be converted to XML file format.
|
|
Move |
|
|
Clear All |
|
Selected |
|
Stop |
Selection |
Redo |
Features |
Attributes |
EditNotes |
Select |
Undo |
Add |
Features |
|
Features |
Select Features: Selects the features contained within or intersecting a graphic you draw on the map. Available as four separate tools in the Java Custom Viewer—Select by Rectangle, Select by Circle, Select by Line, and Select by Polygon.
Clear All Selection: Clears all the selected features from the map.
Undo: Removes the most recently added text or graphic from the map.
Redo: Reintroduces text or graphics that were removed using the Undo button.
Add Features: Adds features to the map.
Delete |
Submit |
Selected |
Session |
Features |
|
Move Selected Features: Moves selected point features or the vertices of selected line and polygon features to new locations on the map.
Delete Selected Features: Deletes selected features from the map.
Attributes: Displays attribute information for the selected feature.
Submit Session: Submits the current EditNotes session to the ArcIMS site administrator.
Stop EditNotes: Stops your EditNotes session and closes the EditNotes toolbar.
QUICK REFERENCE |
61 |