

Central Line Placement |
91 |
|
|
Rajesh Chawla, Vishakh Varma, and Sudha Kansal |
|
A 55-year-old diabetic female patient was brought to the emergency department with history of fever with chills and rigors for the past 3 days. She also had altered sensorium for the past few hours. On arrival she was found to have tachycardia and hypotension.
Central line catheterization is a commonly performed procedure in any ICU. It is now recommended to be performed under ultrasound guidance. This is a fairly safe procedure in expert hands.
Step 1: Assess the need for central line placement
Insert a central line only for patients in whom it is indicated (as mentioned below) after ruling out contraindications (as mentioned in Step 2):
•For appropriate fluid management
–Severe sepsis and septic shock
–Low urine output
–Intraoperative
–For patients in shock
•Concentrated vasoactive agent administration
•Difficult peripheral vascular access
•Multiple drug administration
R. Chawla, M.D., F.C.C.M. (*)
Department of Respiratory, Critical Care & Sleep Medicine, Indraprastha Apollo Hospitals, New Delhi, India
e-mail: drchawla@hotmail.com
V. Varma, M.D. • S. Kansal, M.D., D.C.C.M.
Department of Respiratory & Critical Care Medicine, Indraprastha Apollo Hospitals, New Delhi, India
R. Chawla and S. Todi (eds.), ICU Protocols: A stepwise approach, |
723 |
DOI 10.1007/978-81-322-0535-7_91, © Springer India 2012 |
|
724 |
R. Chawla et al. |
|
|
•Concentrated electrolytes (e.g., potassium)
•Total parenteral nutrition
•Chemotherapy
•Agents irritating to peripheral veins (e.g. Amiodarone, Phenytoin, mannitol)
•Prolonged antibiotic therapy (e.g., endocarditis)
•Temporary hemodialysis
•During cardiopulmonary resuscitation
•Large-bore venous access for rapid administration of fluids
Step 2: Check for any contraindications
There are no absolute contraindications to central line placement. Relative contraindications are as follows:
•Local site infections or burns
•Anatomic abnormalities
•Coagulopathy (ultrasound guidance will help)
Step 3: Choose the appropriate site
The central venous cannulation site can be decided on the basis of the patient’s requirement and the comorbid conditions:
•Coagulopathy: Prefer—femoral > internal jugular > subclavian
•To decrease risk of infection: Prefer—subclavian > internal jugular > femoral
Step 4: Choose the appropriate catheter
1.Single-lumen or multilumen catheters: The more is the number of lumens, the smaller is their diameter.
•If rapid fluid infusion is required—as in trauma—single- or double-lumen catheters are preferred.
•If the number of infusions is substantial, threeor four-lumen catheters are preferred.
•The infection risk is directly proportional to the number of lumens, so the more the number of lumens, the more is the risk of infection associated with it.
2.Antimicrobial-impregnated catheters: Can use a chlorhexidine/silver sulfadiazine or minocycline/rifampin-impregnated CVC in patients:
•When catheter is expected to remain in place for more than 5 days
•If the catheter infection rates are high in the ICU even after successful implementation of a comprehensive strategy to reduce rates of infection
3.Tunneled catheters: Tunneling is ineffective in decreasing infection rate in shortterm CVCs.
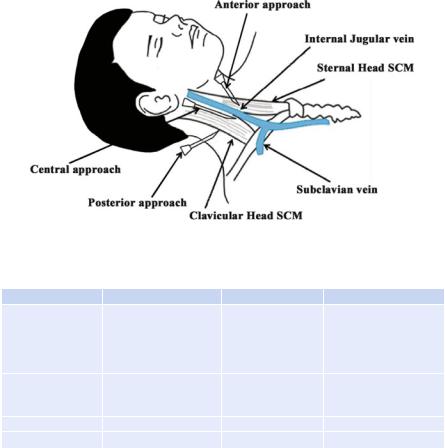
Step 5: Know the relevant anatomy
A.The subclavian vein: It crosses under the clavicle just medial to the midclavicular point. It lies underneath the clavicle at the insertion of the lateral head of the sternocleidomastoid on the clavicle. It is separated from the subclavian artery by the anterior scalene muscle, which lies deep to the vein. The vein lies in proximity to the dome of the pleura.
91 Central Line Placement |
725 |
|
|
B.The internal jugular vein: It is located in the neck at the apex of the triangle formed by the two heads of the sternocleidomastoid muscle and the clavicle. At the apex, the carotid artery is medial and posterior to the vein.
C.The femoral vein: It lies 1–1.5 cm medial to the femoral artery at the inguinal ligament. If the inguinal ligament cannot be identified as in obese patients, then the femoral artery lies approximately at the centre of the pubic tubercle and the anterior superior iliac spine.
Step 6: Take informed consent
•Communicate with the patient or their surrogate.
•Explain the detailed procedure, the benefit, the risk and the alternative in the language they understand.
•Reply to all the queries and concerns.
•Document the consent and get it signed.
Have a peripheral venous access before attempting central cannulation except
probably during cardiopulmonary resuscitation.
Step 7: Keep all equipment ready for cannulation and pressure transducing system
•Turn up the volume on the monitor so that it can be heard.
•ECG, pulse oximetry and BP monitoring instruments.
•Material for sterile preparation—cap, mask, sterile gown, gloves and drapes.
•2% chlorhexidine with alcohol.
•Shoulder roll.
•A 25-gauge needle and a syringe with 2% lignocaine.
•Sterile saline flush.
•A sterile cannulation set with CVCs, a guidewire, and a locator needle with the syringe.
•A needle holder with suture material.
•Sterile dressing.
•The pressure transducing system.
Step 8: Set up the pressure transducing system
This consists of a pressure transducing assembly with a flushing system. Details have been discussed in Chap. 92.
Step 9: Obtain a procedure-directed history and do physical examination
•Location and number of previous CVCs
•Location of any known venous thrombi
•History of clavicle fracture
•History of IVC filter placement or pacemaker insertion
•History of any bleeding disorder or current use of anticoagulants
•History of allergy to chlorhexidine, povidone-iodine, or lidocaine

726 |
|
R. Chawla et al. |
|
|
|
Table 91.1 Approaches to subclavian vein cannulation |
|
|
|
Infraclavicular (common) |
Supraclavicular |
Insertion landmark |
2 cm inferior to midportion of |
Just above the clavicle, lateral to the |
|
the clavicle and walk down the |
clavicular head of sternocleidomastoid |
|
clavicle |
|
Angle with skin |
0° |
45° |
Aim toward |
Sternal notch |
Contralateral nipple |
Depth from skin |
Just deep to the clavicle |
1–2 cm, just under the clavicle |
Step10: Central line placement
•Wear the cap and the mask.
•Wash hands with alcohol-based hand rub for 3–5 min and minimum three applications.
•Put on a sterile gown and gloves.
•Clean the skin of the patient with 2% chlorhexidine in alcohol preparation.
•Give a frictional scrub in a circular manner to at least 10 cm area from the insertion site.
•Do not shave if hair is present.
•Place large sterile drapes over the insertion site. Do not occlude the air supply or field of vision when draping neck areas of conscious patients.
•Use Seldinger technique for cannulation
–The desired vessel is punctured with a sharp, hollow needle called a trocar.
–A round-tipped (J-tipped), long guidewire is then advanced through the lumen of the trocar into the vessel.
–The trocar is withdrawn, leaving the guidewire in the vessel.
–The tract is dilated with a dilator introduced in rotating motion.
–A hollow catheter can now be passed over the guidewire into the vessel.
–The guidewire is then withdrawn and the catheter remains in situ.
–Never lose control of the guidewire.
1.Subclavian vein cannulation
•Position should be Trendelenburg with the head turned toward the opposite side and a shoulder roll placed along the spine.
•Stand on the side of the patient, where the procedure is planned.
•Ensure maximum sterile barrier precautions.
•Locate the landmarks, namely, the clavicle, sternal notch, sternocleidomastoid muscle, and its insertion on the clavicle, lateral end of the clavicle (Table 91.1).
•Apply generous local anesthesia.
•Insert the needle and syringe (filled with 1–2 mL saline), constantly aspirating for venous blood (Fig. 91.1).
•If the rapid flush of blood does not appear during insertion of the needle, gradually withdraw the needle constantly aspirating. Blood may now appear.
•If the first attempt is unsuccessful, then withdraw the needle up to the skin and reposition the needle.
91 Central Line Placement |
727 |
|
|
Fig. 91.1 Internal jugular vein cannulation |
|
|
|
Table 91.2 Approaches to the internal jugular vein (Fig. 91.1) |
|
||
|
Central |
Anterior |
Posterior |
Insertion landmark |
Apex of the triangle |
Medial edge of the |
Lateral edge of |
|
formed in the neck by |
sternocleidomastoid |
sternocleidomastoid |
|
the two heads of the |
muscle at level of |
muscle, one-third of the |
|
sternocleidomastoid |
thyroid cartilage |
way from the clavicle to |
|
muscle and the claviclea |
|
the mastoid process |
Angle with skin |
45° |
45° |
30–45°, dive under the |
|
|
|
border of the sterno- |
|
|
|
cleidomastoid muscle |
Aim toward |
Ipsilateral nipple |
Ipsilateral nipple |
Sternal notch |
Depth from skin |
Within 3 cm |
Within 3 cm |
Within 5 cm |
aIf the vein is not encountered, then enter the skin slightly more medially and retry (Fig. 91.2)
•Cannulate the vein using Seldinger technique as described above.
•Ensure backflow in all ports and flush all the ports.
•Ensure local hemostasis.
•Fix the catheter appropriately.
•Apply sterile dressing.
2.Internal jugular vein cannulation
•Position should be Trendelenburg with the head turned toward the opposite side.
•Stand at the head end of the patient.
•Feel for the carotid and always keep it under your fingers.
•Insert the needle at the following landmark and cannulate in a similar manner to subclavian vein (Table 91.2).
•It is preferable to first locate the vein with a 25-gauge needle (finder needle) and then puncture with the larger needle.
728 |
R. Chawla et al. |
|
|
•Cannulate using Seldinger technique.
•Obtain the chest X-ray after cannulation.
3.Femoral vein cannulation
•Position should be supine with the leg slightly abducted and externally rotated.
•Stand on the side of the patient.
•Insert the needle 45° angle to the skin at a point 1–1.5 cm medial to the femoral arterial pulsation and about 2–3 cm below the inguinal ligament.
•Direct the needle cephalad.
•Cannulate using Seldinger technique.
4.Ultrasound use for vascular access A. Advantages
•Fewer complications
•Fewer attempts for successful cannulation
•Fewer failed procedure
•Shorter time for procedure (can be used in emergency situations)
•Can be used in patient with contraindication to blind technique; patient with coagulopathy
•Can be used in “difficult access” category; obesity, short neck, swollen neck, burns/postradiotherapy/postsurgical contracture, etc.
•Decrease need of postprocedure radiological confirmation
B.B mode ultrasound
•B mode ultrasound allows for detailed evaluation of vascular anatomy.
C.Transducer selection
•For central venous cannulation, high-frequency transducer (5–7 MHz) is ideal. Though in obese patients you may require low-frequency transducer.
D.Technique
•USG guidance can be:
–Static guidance: better than landmark approach and inferior to dynamic guidance. USG is used to localize the venipuncture site.
–Dynamic guidance: here the procedure is performed under realtime guidance, i.e., while doing the puncture, needle is seen puncturing the vessel wall, however more difficult clinically.
E.View
•Transverse view: here cross section view of vessel is obtained.
•Longitudinal view: here longitudinal view of the vessel is obtained.
F.Method of orientation
The transducer has an identification mark on one side which corresponds to mark displayed on one side of image, or alternatively finger can be rubbed on one side of transducer surface to produce an image and confirm orientation.
91 Central Line Placement |
729 |
|
|
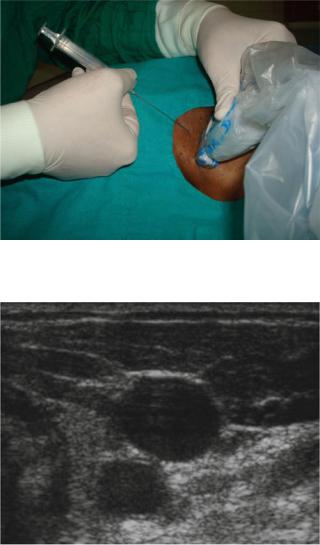
Fig. 91.2 Central line cannulation under USG guidance
Fig. 91.3 Ultasonographic transverse view of internal jugular vein (above) and common carotid artery (below)
G.Procedure IJV (Figs. 91.2 and 91.3)
•Position the patient in supine Trendelenburg position.
•Turn head to other side.
•Identify the landmark and select the site of puncture.
•Place the USG machine on ipsilateral side.
•Confirm the site puncture with ultrasound.
730 |
R. Chawla et al. |
|
|
•Use transverse and longitudinal view to identify the structure around the vein.
•Can use Doppler to differentiate between vein and artery (depending on the flow velocity).
•The procedure should be performed under strict aseptic protocol (as described).
•Skin is prepared as described.
•The assistant holds the transducer and applies ultrasound gel over it.
•A sterile sheath (camera cover; used in laparoscopy) is placed on the sterile field.
•The operator takes the transducer from the assistant, ensuring that the transducer is covered in the sterile sheath. To maintain sterility, sterile sheath is also stretched over the cord. Then apply band available with the sheath over the transducer to secure the sheath.
•Reconfirm the site of puncture. Can apply chlorhexidine over the transducer if image is not clear.
•Ensure that the vessel to be punctured is in the center of screen so that the vessel is lying just deep to the center of transducer.
•A dummy poke can be done by laying the needle on the skin surface and then pressure is applied near the tip of the needle, and visualize acoustic disturbance in the subcutaneous tissue due to this to ensure that it is positioned directly over the needle.
•Perform the skin puncture proximal to transducer, and while puncturing the subcutaneous tissue, ensure that the needle tip is seen advancing. If the tip is not seen, move the probe along the axis of the vein.
•Advance the needle further and visualize the needle tip entering the vessel lumen. Aspirate with the syringe to confirm the flash of blood.
•Reconfirm the needle position on the ultrasound.
•Now keep the probe aside in sterile environment.
•Proceed as before with placement of guidewire (Seldinger technique).
•Once the line is placed, reconfirm the position of line with the transducer by scanning distally.
•Examine with the probe for any pneumothorax.
Disadvantages
1.Cost and maintenance of equipment
2.Special USG training for operator
3.Difficulty to maintain sterility during procedure
Step 11: Check the post-central-line chest X-ray
The chest X-ray should be done after a subclavian and internal jugular cannulation. The following points should be noted in the X-ray:
•Catheter tip location
–Catheter tips located within the heart or below the pericardial reflection of the superior vena cava increase the risk of cardiac perforation and fatal cardiac tamponade.

91 |
Central Line Placement |
731 |
|
||
Table 91.3 Management of mechanical complication |
||
Complication |
Management |
|
I. Vascular |
|
|
1. |
Arterial puncture |
Press the artery for at least 15 min or until bleeding stops |
2. |
Venous bleeding |
Compress till bleeding stops |
3.Hematoma
4. |
Hemothorax |
Correct coagulopathy, if any; may need drainage if massive |
5.Cardiac tamponade
|
Cardiac perforation |
Surgical intervention |
6. |
Thoracic duct injury, |
Usually conservative |
|
chylothorax |
|
II. Pneumothorax |
Always put an intercostal tube drainage if the patient is on |
|
|
|
positive-pressure ventilation |
|
|
If tension pneumothorax is present, release immediately with |
|
|
the needle thoracocentesis and follow with tube drainage |
|
|
Small pneumothorax in the spontaneously breathing patient |
|
|
can be kept under close observation |
III. Air embolism |
Always position the patient flat if the head is not down while |
|
|
|
inserting the line |
|
|
Never leave the lumen of the catheter uncapped |
|
|
If suspected, place the patient the right side up and the head |
|
|
down and aspirate blood mixed with air |
IV. Nerve injuries |
Conservative management |
|
V. Tracheal/laryngeal injury |
May need intubation |
|
VI. Arrhythmia |
Pull out the catheter till it is in the superior vena cava |
|
VII. Malposition |
May need repositioning |
|
–Ideally, the catheter tip should lie within the superior vena cava, parallel to the vessel walls, and be positioned below the inferior border of the clavicle and above the level of the third rib, the T4 to T5 interspace or the tracheal carina.
•Pneumothorax
•Pleural fluid / hemothorax
Step 12: Remove the line
•As soon as it is not required
•Induration, redness or frank pus discharge from insertion site
•Suspected or confirmed catheter-related infection
•Catheter occlusion/thrombosis
•Vascular erosion caused by the catheter
Step 13: Manage complications
I.Mechanical complications (Table 91.3)
•Never force the guidewire or the catheter; it may cause rupture of the vessel or injury to nearby structures.
•Do not overdilate—dilating the skin and subcutaneous tissue may be enough.