

Office PowerPoint2003
.pdfStep 2: Send To Microsoft Office Word dialog box will open. You can customize your page layout for Word (This option is not included in PowerPoint).
MS Word gives an opportunity to add notes for each slide on the printed presentation.
Send To Microsoft Office Word Dialog Box
A Presentation Exported to MS Word
Package for CD
What would you do if you want to run your presentation from a different computer in which the PowerPoint is possibly not installed? PowerPoint offers you to save the presentation together with the linked files on a CD and use the presentation from any computer. You can run the presentation from any computer even if it does not have PowerPoint installed. It saves the file along with a viewer program. It also provides an automatic run feature. In this way the presentation is viewed automatically upon inserting the CD. You will need a CD Burner and a blank CD to save the presentation.
PRINTING A SHOW
P O W E R P O I N T 71
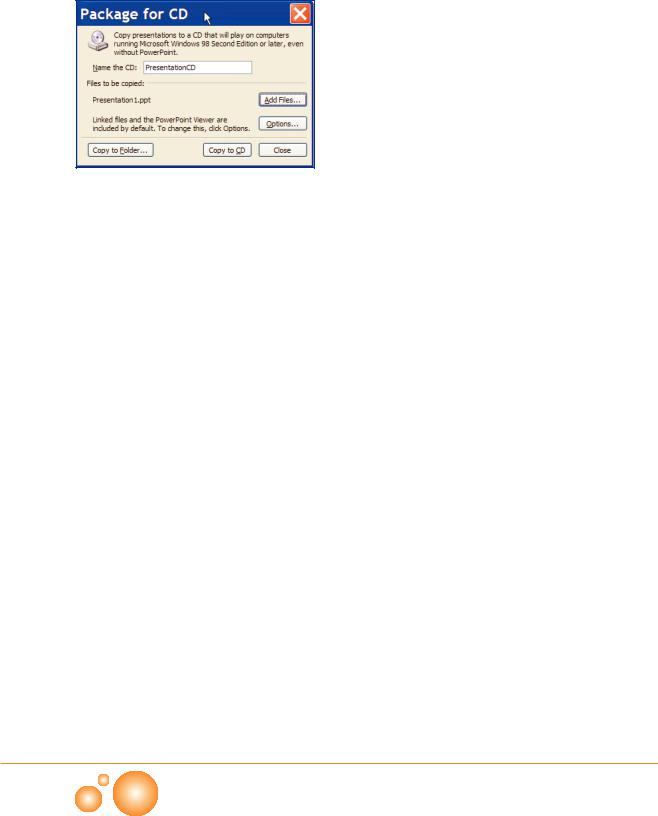
Step 1: Click File>Package for CD…
Step 2: Give a title to your CD. If you don’t, PowerPoint names the CD as ‘PresentationCD’
step 3:You can add the additional files to be used in the
presentation. Click the  button to browse and add files to burn.
Step 4: is used to modify the burning properties. You Package for CD Dialog Box can set a password to open/read the files or you can
enable/disable automatic starting.
Step 5: You can use the  option in case you do not have a CD burner or you want to create the CD at a later time. PowerPoint saves the files under a folder and names the folder as CD title.
CHAPTER 6
72 P O W E R P O I N T

Review
In this chapter you have learned various and effective ways of printing your slide show;
 You can add any personal information to all slides in a header or footer, such as the company name or the page number.
 You can print your presentations as slides, handouts, speaker notes, outlines, and export them to MS Word.
 Printing every slide on a separate page may not be useful, you learned printing different types of handouts.
 You can use Print Preview to see your presentation as on a paper before printing, change some properties or switch between slides, handouts, notes, or outlines.
PRINTING A SHOW
P O W E R P O I N T 73

Questions
1.Slide show is the most common way of delivering a presentation. (T)(F)
2.You can not add a header or a footer to customize your printouts. (T)(F)
3.Print range section on Print dialog box sets the number of copies that will be printed.
(T)(F)
4.Color/Grayscale section on Print dialog box allows you to select your printouts to be Color, Grayscale, or Pure Black and White. (T)(F)
5.Pure Black and White means that you will print black, white, and tones of gray. (T)(F)
6.You can not change any printing options on Print Preview toolbar. (T)(F)
7.In general, outline printing is used for toner and paper saving purposes. (T)(F)
8.You can export your slides to the MS Word.
(T)(F)
9.In PowerPoint 2003 you can print _________.
I. Slides |
|
II. Handouts |
|
III. Notes |
|
IV. Outlines |
|
A) I-II |
B) II-III-IV |
C) I-IV |
D) I-II-III-IV |
10.Which one is used to select the slides tobe printed, on the Print dialog box of PowerPoint
2003? |
|
A) Printer |
B) Print range |
C) Copies |
D) Print what |
11.Print what section (which is replaced on Print dialog box) is used for ____________.
A)selecting the printer
B)selecting the slides to be printed
C)setting the number of copies.
D)selecting Slides, Handouts, Notes Pages, Outline View
12.You export your slides to MS Word because,
_____________.
A)you can not print Speaker Notes in PowerPoint 2003
B)in some conditions you can get better printing capabilities of MS Word.
C)using PowerPoint 2003 you can only print every slide in your presentation on a page
D)you can not use printer in PowerPoint 2003
13.What program is required to run a presentation on a computer that does not have PowerPoint installed?
A) Photoshop |
B) Flash Player |
C) PowerPoint Viewer |
D) FrontPage |
CHAPTER 6
74 P O W E R P O I N T
Select the Type of Presentation
Adding Title
If you want to increase the effectiveness of the presentation, permanent documents may be quite useful for the reference of the audience later on. Printing handouts may help you for this purpose; however publishing your presentation on the Internet or intranet might be a better solution since the Internet is becoming more and more important in all areas of society.
Creating a Group Home Page
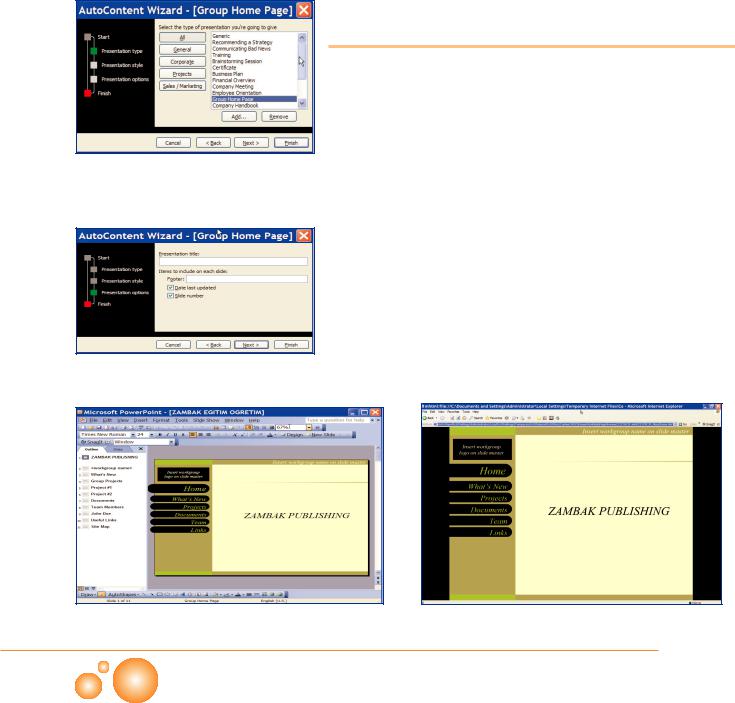
Creating a presentation by using the AutoContent wizard was discussed in the first chapter. Besides, you can use this feature to create a group home page or a summary page. Group Home Page is more likely a web site rather than a presentation, and group members share and add information. Let us start AutoContent Wizard.
Step 1: Click File>New
Step 2: Choose 
Step 3: Select Group Home Page and click <Next> from the list.
Step 4: Choose Web Presentation from the output types. Click <Next>
Step 5: You can add a title that will be displayed on the title bar of the browser.
Step 6: Click <Finish> button to finish creating home page.
Group Home Page Presentation View |
Web Page Preview |
CHAPTER 7
76 P O W E R P O I N T
As you see, a sample Group Page was created with sample texts. All you have to do is to replace these texts with your own ones. A navigation menu is located on the left hand side of the slide. If you pay attention, you will see that it looks like a web site, though slides exist in place of web pages. Now let us see what will happen, when you save the presentation as a web page. You will click File>Web Page Preview to see it through a web browser.
You have noticed that it has mhtml:file on the title bar. This file type is used for web archive purposes. PowerPoint can save the whole presentation with all the texts, animations and effects as a single file. But the viewers must have higher versions of the web browsers to view it correctly.
Saving a Presentation |
|
|
There are several ways of saving your presentation according to |
|
|
your purpose of use. |
|
|
Saving as an MHT (Single File Web Archive) |
|
|
You can save the presentation as a web archive. This feature lets |
|
|
you save all the contents as a single file. On the other hand, it |
|
|
slows down the web page loading. It is better to use an MHT |
|
|
archive in a local area network or as an attachment to an e-mail. |
|
|
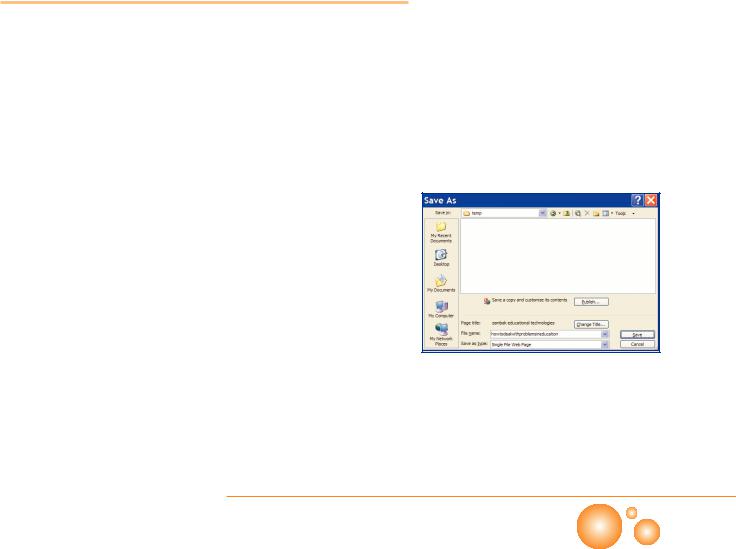
Step 1: Choose Single File Web Page from the Save as type drop- |
|
|
down box. Save as dialog box changes and Publish and Change |
|
|
Title appears on top of the File Name tab. This title appears on the |
|
|
title bar of the browsers when the presentation is viewed in the |
|
|
Internet. It is the main title by default. If you want, you can add a |
|
|
descriptive title for your presentation, or simply type the name of |
|
|
the company. |
|
|
Step 2: Publish option will be discussed later in this unit. It is used |
|
|
to change some properties of the web site format. |
Save as Web Page Dialog Box |
|
Step 3: Just give a name and click the <Save> button. |
||
|
||
Now go to the location where you saved your file and double-click |
|
|
to see what you have created. When clicked, your presentation will |
|
|
start in the web browser. |
|
CREATING A WEB PRESENTATION
P O W E R P O I N T 77
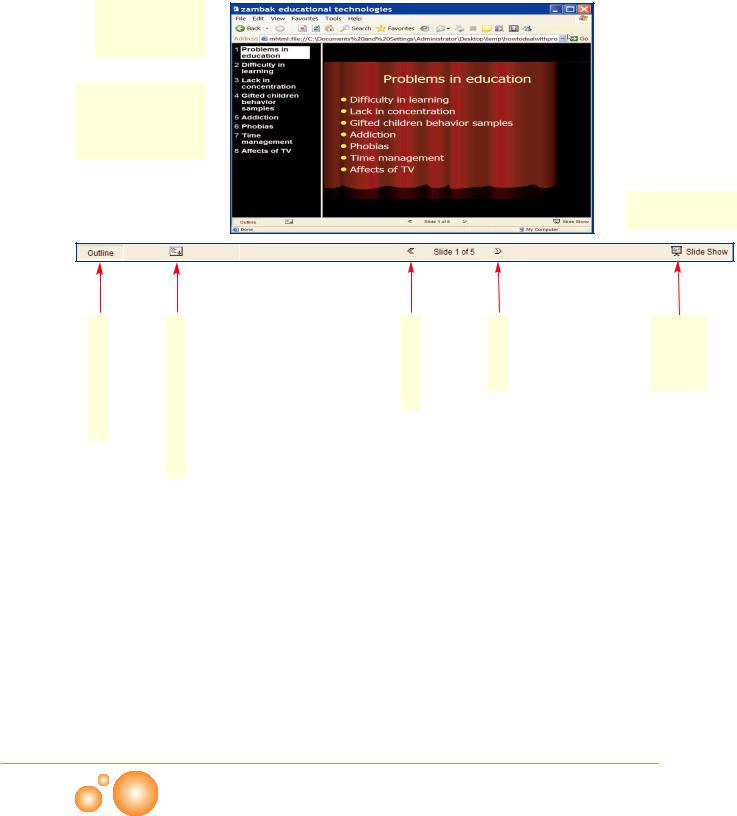
Page title added  in the Save as dialog box.
Slide titles has the role of navigation  menu to switch between the slides.
Slide navigation
 control bar
Show/Hide outline |
Expand/Collapse Outline |
Previous Slide |
Next slide |
Show full |
s c r e e n |
slide show |
|
|
Slide Navigation Control Bar. |
|
|
|
|
Saving as a Web Site
Single File Web page is a new type, so the older versions of the browsers do not support this type. You can use web page format for older version of browsers that do not run web archive files. When using web page option, PowerPoint creates a folder and puts all the components of your presentation including pictures in this folder. It creates an array of GIF and HTM files, - and WAV, AVI, JPG and other file types depending on your presentation.
To save a presentation as a Web Site, choose web page from the
Save as type combo box in the Save As dialog box.
CHAPTER 7
78 P O W E R P O I N T
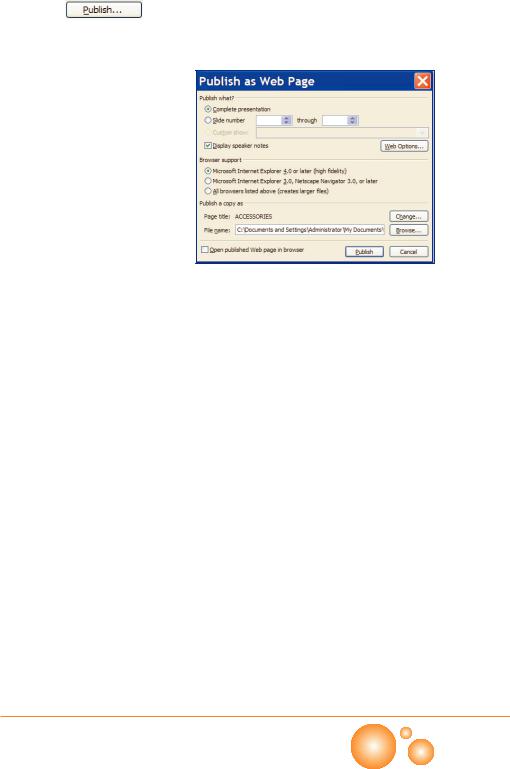
Publishing to the Internet
So far you have learned how to save the presentation without
changing the web site features. If you click |
while |
saving, you will be able to make some arrangements that are |
|
necessary for web creating. |
|
Publish what? |
|
Use this section to specify whether you want to create a web page |
|
of the whole presentation or of a custom show. |
|
Display speaker notes |
|
This option is selected by default. Uncheck this option if you do |
|
not want the viewers to see your notes automatically. You can |
|
leave this option checked if you publish the presentation for |
|
reviewing purposes. |
|
Browser support |
Publish as Web Page Dialog Box |
|
|
This section has three options; |
|
Microsoft Internet Explorer 4.0 or later (high fidelity): When this option is selected, almost all of the effects, sound, transitions etc. of the presentation are transferred to the web page. Viewers can see the animation in full screen mode, or they can edit the presentation in PowerPoint later. Use this option if you are sure all of the viewers have the later versions of the web browsers, otherwise they will face error messages or will lose most of the animation effects.
Microsoft Internet Explorer 3.0, Netscape Navigator 3.0 or later: You will lose many of the special effects that you used in the presentation. You create a presentation with basic elements; hence more people can view it. You can not open or edit this file in PowerPoint anymore.
All browsers listed above: When you select this option, all versions of the browsers can view the presentation. Newer browsers can show the animation effects, but older browsers can view the basic presentation. This option creates more files and occupies more space in memory. The file sizes are important in the Internet; they affect the webpage's loading time-which is essential for viewers. It is not preferred unless it is necessary.
CREATING A WEB PRESENTATION
P O W E R P O I N T 79
Web Options Dialog Box
FTP Locations in Save As Dialog Box
Publish a copy as
This section is used to specify the destination folder which the presentation takes place. You can change if you want.
Open published Web page in browser
Select this option if you want to preview the web page immediately after the creation
Web Options
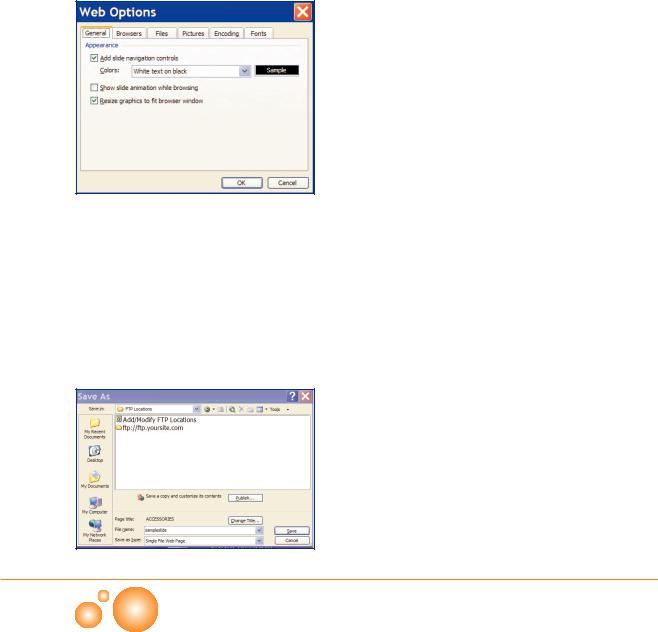
Click the  Click this button to modify the details of the web page.
General: You can enable/disable slide navigation controls (Slide navigation control bar and navigation menu).You can disable the animations if you want. If you select Resize graphics to fit browser window, it automatically fits the pictures into the browser window.
Browsers: You can select the default browser with the version you want.
Pictures: You can specify the screen resolution. Default resolution is 800x600 which works fine in many of the computers. If you are sure the viewers can view better resolutions, change the value as you wish.
Encoding: Browsers support many languages. You can set the default language for your web page. Default language is Western European (Windows).
Fonts: This tab is used to specify a font for your presentation web page.
You can upload the web page to the Internet after making all the changes by using any upload manager program.
Publishing to an FTP Address
FTP (File Transfer Protocol) provides remote accessibility to the files. You usually download the files from the Internet from FTP sites. You can save the presentation in an FTP site and the others can download your presentation from that site.
Step 1: While saving,choose Add Modify FTP Site from the Save In drop-down box
CHAPTER 7
80 P O W E R P O I N T