

MusculoSkeletal Exam
.pdfit is normal or pathological. Assess the limitation of movement and see if it fits into a capsular pattern. The capsular pattern of the knee is a greater restriction of flexion than extension so that with 90 degrees of limited flexion there is only 5 degrees of limited extension. Limitation of rotation is only noted when there is significant limitation of flexion and extension (Kaltenborn, 1999).
Physiological Movements
You will be assessing the amount of motion available in all directions. Each motion is measured from the anatomical starting position, which is the knee extended with the longitudinal axes of both the femur and tibia in the frontal plane. They normally meet at an angle of 170 degrees (Kaltenborn, 1999).
Flexion
The best position for measuring flexion is the prone position with the patient’s foot over the edge
Chapter 12 The Knee
of the table. If the rectus femoris appears to be very shortened, you should place the patient in the supine position. Place your hand over the distal anterior aspect of the tibia and bend the leg toward the buttock. The normal end feel for this movement is soft tissue from the contact between the gastrocnemius and the hamstrings. If the rectus femoris is the limiting factor, then the end feel is abrupt and firm (ligamentous) (Kaltenborn, 1999; Magee, 1997). Normal range of motion is 0–135 degrees (American Academy of Orthopedic Surgeons, 1965) (Figure 12.38).
Extension
Full extension is achieved when the patient is placed in either the prone or the supine position. The normal end feel is abrupt and firm (ligamentous) because of tension in the posterior capsule and ligaments (Kaltenborn, 1999; Magee, 1997). The normal range of motion is 0 degree (Figure 12.39) (American Academy of Orthopedic Surgeons, 1965).
Figure 12.38 Passive flexion of the knee.
355

The Knee Chapter 12
Figure 12.39 Passive extension of the knee.
Medial and Lateral Rotation
You can measure medial and lateral rotation with the patient either in the sitting position with the leg dangling off the end of the table or in the prone position with the knee flexed. Place your hand over the distal part of the leg, proximal to the ankle joint, and rotate the tibia first in a medial direction to the end of the available range, back to the midline, and then in a lateral direction to the end of the available range. The normal end feel is abrupt and firm (ligamentous) (Kaltenborn, 1999; Magee, 1997). Normal range of motion is 20–30 degrees of medial rotation of the tibia and 30–40 degrees of lateral rotation of the tibia
(Magee, 1997) (Figure 12.40).
Mobility Testing of the Accessory
Movements
Mobility testing of accessory movements will give you information about the degree of laxity present in the joint. The patient must be totally relaxed and comfortable to allow you to move the joint and obtain the most accurate information. The joint should be placed in the maximal loose packed (resting) position to allow for the greatest degree of joint movement. The
Lateral |
Medial |
rotation |
rotation |
Figure 12.40 Passive lateral and medial rotation of the tibia.
356

Figure 12.41 Traction of the tibiofemoral joint—mobility testing.
resting position of the knee is 25 degrees of flexion (Kaltenborn, 1999).
Traction
Place the patient in the supine position with the hip flexed to approximately 60 degrees and the knee flexed approximately 25 degrees. Stand to the side of the patient, facing the lateral aspect of the leg to be tested. Stabilize the femur by grasping the distal medial aspect of the femur with your index finger at the joint line, to enable you to palpate. Stabilize the leg against your trunk. Hold the distal end of the tibia, proximal to the malleoli from the medial aspect. Pull the tibia in a longitudinal direction producing traction in the tibiofemoral joint (Figure 12.41).
Ventral Glide of the Tibia
Place the patient in the supine position with the knee flexed to approximately 90 degrees. Stand on the side of the patient, with your body facing the patient. You can rest your buttock on the patient’s foot to stabilize it. Place your hands around the tibia, allowing your thumbs to rest on the medial and lateral joint lines, to enable you to palpate the joint line. Pull the tibia in an anterior direction until all the slack has been taken up.
Chapter 12 The Knee
Figure 12.42 Anterior drawer test.
This not only tests for anterior mobility of the femoral tibial joint but also tests for the integrity of the anterior cruciate ligament. The test for the anterior cruciate ligament is referred to as the anterior drawer test (Figure 12.42).
Medial and lateral rotation of the tibia can be added to the anterior drawer test to check for rotational instability. Medial rotation increases the tension in the intact posterolateral structures and decreases the degree of anterior displacement. Lateral rotation increases the tension in the intact posteromedial structures and decreases anterior displacement of the tibia even when the anterior cruciate ligament is compromised (Figure 12.43) (see p. 358).
Posterior Glide of the Tibia
Place the patient in the supine position with the knee flexed to approximately 90 degrees. Stand on the side of the patient, with your body facing the patient. You can rest your buttock on the patient’s foot to stabilize it. Place your hands around the tibia so that the heels of your hands are resting on the medial and lateral tibial plateaus and your fingers are wrapped around the medial and lateral joint spaces. Push the tibia in a posterior direction until all the slack has been taken up. This not only tests for posterior mobility of the femoral tibial joint but also tests for the integrity of the posterior cruciate ligament. The test for the posterior
357

The Knee Chapter 12
Figure 12.43 Anterior drawer test with medial and lateral rotation.
cruciate ligament is referred to as the posterior drawer test or the gravity test (Figure 12.44).
Medial and Lateral Gapping (Varus–Valgus Stress)
Place the patient in the supine position, and stand on the side of the table and face the patient. Hold the patient’s ankle between your elbow and trunk to secure the leg. Extend your arm proximally to the joint space on the medial aspect of the knee, allowing you to palpate. Place your other hand on the distal lateral aspect of the patient’s femur, as the stabilizing force. Allow the patient’s knee to flex approximately 30 degrees. Apply a valgus force to the knee by pulling the distal aspect of the tibia in a lateral direction while maintaining your stabilization on the lateral part of the femur. This will create a gapping on the medial side of the knee joint. You should expect to feel a normal abrupt and firm (ligamentous) end feel (Kaltenborn, 1999; Magee, 1997). If there is increased gapping, a different end feel, or a “clunk” as you release, you should suspect a loss of integrity of the medial collateral ligament. This procedure should be repeated with the patient’s knee in extension. If you have a positive finding in both the flexed and the extended position, involvement of the posterior cruciate ligament in addition to the medial collateral ligament should be suspected (Figure 12.45).
Figure 12.44 Posterior drawer test.
To test the integrity of the lateral collateral ligament, the same test should be repeated by reversing your hand placements. This will allow you to create a varus force, creating gapping on the lateral aspect of the knee joint (Figure 12.46).
358

Chapter 12 The Knee
Figure 12.45 Valgus strain (medial gapping).
Medial and Lateral Glide of the Tibia
Place the patient in the supine position so that the knee is at the end of the table. Face the patient and secure the ankle between your legs. Place your stabilizing hand on the distal medial aspect of the femur just proximal to the joint line. Your mobilizing hand should be on the proximal lateral part of the tibia just distal to the joint line. Use your mobilizing hand to push in a medial direction until all the slack has been taken up. You should feel an abrupt and firm (ligamentous) end feel (Kaltenborn, 1999; Magee, 1997). This tests for normal mobility of medial glide of the tibia (Figure 12.47).
Testing for normal mobility of lateral glide can be assessed in the same manner by reversing your hand placements (Figure 12.48).
Patellar Mobility
Place the patient in the supine position, with a small towel placed underneath the knee to avoid full extension. Stand on the stand of the table, facing the patient. With both hands, grasp the patella between your thumb and index and middle fingers. Distract the patella by lifting it away from the femur (Figure 12.49).
Stand so that you are facing the lateral aspect of the patient’s lower extremity. Place your extended
thumbs on the lateral aspect of the patella. Push your thumbs simultaneously in a medial direction. This will create medial glide of the patella (Figure 12.50). Lateral glide can be accomplished by placing your hands on the medial aspect of the patella. The patella should move approximately one-half its width in both medial and lateral glides in extension. The lateral glide is easier to perform and has a greater excursion than the medial glide (Figure 12.51). Inferior glide can be accomplished by turning so that you face the patient’s foot. Place the heel of one hand over the superior pole of the patella, allowing your arm to rest on the patient’s thigh. Place your other hand on top of the first hand and push in an inferior (caudad) direction (Figure 12.52). This will test inferior mobility of the patella. It is important to remember not to create any compressive forces on the patella during the glide.
Resistive Testing
The primary movements of the knee to be examined are flexion and extension. Resisted internal and external rotation of the tibia can also be tested. The ability to resist rotational forces is especially important when
359

The Knee Chapter 12
A
B
Figure 12.46 (A) Varus strain (lateral gapping). (B) Varus strain with flexion of the knee.
360

Chapter 12 The Knee
Figure 12.47 Medial glide of the tibia—mobility testing.
Figure 12.48 Lateral glide of the tibiaamobility testing.
Figure 12.49 Distraction of the patellaamobility testing.
361

The Knee Chapter 12
Figure 12.52 Inferior glide of the patellaamobility testing.
Remember not to compress the patella.
Figure 12.50 Medial glide of the patellaamobility testing.
Figure 12.51 Lateral glide of the patellaamobility testing.
damage has occurred to the ligamentous stabilizers of the knee.
Flexion
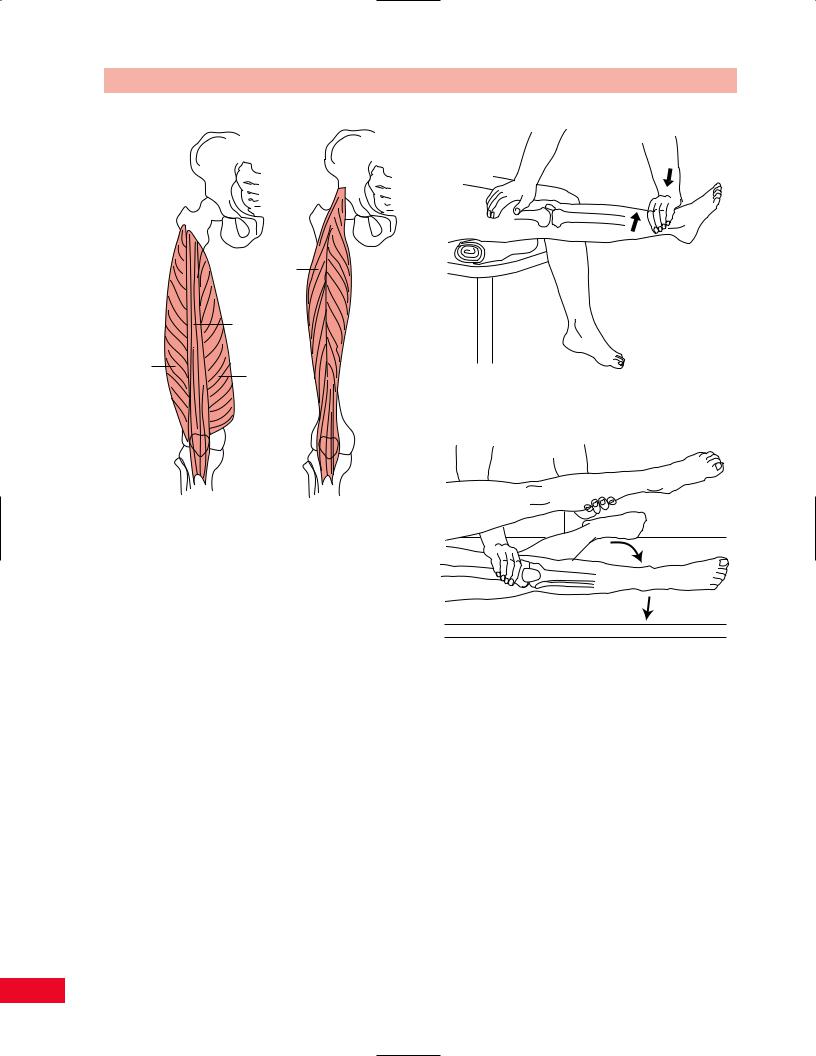
The flexors of the knee are the hamstringsasemitendinosus, biceps femoris, and semimembranosus (Figure 12.53). The hamstrings are assisted by the sartorius, gracilis, and popliteus muscles. Except for the popliteus muscle, all the knee flexors cross the hip as well. As the hip is flexed, the strength of the hamstrings as knee flexors increases.
•Position of patient: Prone with the hip in neutral (Figure 12.54).
•Resisted test: Ask the patient to bend the knee so as to bring the heel toward the buttock. Resist the movement by placing one hand posteriorly above the ankle. Stabilize the patient’s thigh downward with the other hand. Note: Medial and lateral hamstrings may be relatively isolated by rotating the thigh and leg medially to test the medial hamstrings and laterally to test the lateral hamstrings.
Testing knee flexion with gravity eliminated is per-
formed in the same manner, except that the patient is in the side-lying position (Figure 12.55).
362

Chapter 12 The Knee
Semitendinosus
Biceps
femoris
Semimembranosus
Figure 12.53 The primary knee flexors. Note that the long head of the biceps is innervated by the tibial portion of the sciatic nerve and the short head of the biceps femoris is innervated by the peroneal portion of the sciatic nerve.
Painful resisted knee flexion may be due to tendinitis of the hamstring muscles or the muscles of the pes anserinus. A popliteal (Baker’s) cyst may also cause pain during knee flexion.
Figure 12.54 Testing knee flexion.
Weakness of knee flexion results in an abnormal gait. A hyperextension deformity of the knee may result from lack of dynamic stability. Isolated weakness of the medial or lateral hamstrings will result in knee instability on the same side of the joint as the weakness. For example, weakness of the lateral hamstrings causes a tendency toward varus deformity of the knee on weight-bearing.
Figure 12.55 Testing knee flexion with gravity eliminated.
363
The Knee Chapter 12
Rectus femoris
Vastus intermedius
Vastus |
Vastus |
|
lateralis |
Figure 12.57 Testing knee extension. |
|
|
medialis |
Figure 12.56 The primary extensors of the knee. Note that the rectus femoris muscle also crosses the hip joint and acts as a hip flexor as well as a knee extensor.
Extension
The primary extensor of the knee is the quadriceps femoris muscle (Figure 12.56). The rectus femoris also crosses the hip as well and assists in hip flexion.
•Position of patient: Sitting with the legs hanging over the edge of the table. Place a rolled towel or small pillow under the patient’s knee and distal part of the thigh to act as a cushion (Figure 12.57).
•Resisted test: Ask the patient to extend the knee while applying downward pressure with your hand above the ankle.
Testing knee extension with gravity eliminated is per-
formed with the patient lying on the side and the knee initially bent. The patient attempts to extend the knee while the leg is resting on the table (Figure 12.58).
Painful resisted knee extension may be due to patellar tendinitis, also known as jumper’s knee. Disorders of the patellofemoral joint may also be painful if knee extension is tested in a position of extreme knee flexion. This position increases the force within the patellofemoral joint.
Figure 12.58 Testing knee extension with gravity eliminated.
Weakness of knee extension causes difficulty in getting out of a chair, climbing stairs, and walking up an incline. An abnormal gait also results.
Rotation
The medial hamstrings, sartorius, gracilis, and popliteus muscles are medial rotators of the tibia (Figure 12.59). This rotation occurs as the knee is unlocked from its extended position during initiation of knee flexion.
The lateral rotators of the tibia are the biceps femoris and tensor fasciae latae muscles (see Figure 12.59). All the rotators of the knee act as dynamic stabilizers in conjunction with the ligaments.
364