

СУБД Oracle / Литература / PowerDesigner 9 / GeneralFeatures
.pdf&KDSWHU 8VLQJ WKH 3RZHU'HVLJQHU ,QWHUIDFH
'RFNLQJ ZLQGRZV
You can customize the PowerDesigner environment by docking windows in the interface. Dockable windows are windows that align themselves with the edge of another interface element, typically a window or a pane.
There are three dockable windows in the PowerDesigner interface:
'RFNDEOH ZLQGRZ |
3XUSRVH |
|
%URZVHU WUHH YLHZ |
Provides a hierarchical view of the contents of the |
|
|
workspace |
|
2XWSXW :LQGRZ |
Displays PowerDesigner messages during check model, |
|
|
generation, reverse operations, or script execution |
|
5HVXOW /LVW |
Displays result lists for a Find or a Check Model |
|
|
operation |
|
|
|
ϖ7R GRFN D ZLQGRZ
1 Click the window title bar and keep the mouse button pressed.
2 Drag the selected window to another location in the main window.
,I \RX GUDJ WKH ZLQGRZ FORVH WR DQRWKHU LQWHUIDFH HOHPHQW The dockable window automatically aligns itself with the edge of the closest interface element.
,I \RX GUDJ WKH ZLQGRZ DQ\ZKHUH LQ WKH ZRUN HQYLURQPHQW The window is resized and displays a title.
'LVDEOLQJ WKH GRFNLQJ IHDWXUH
You can turn off the docking mode and turn the dockable windows into MDI windows.
ϖ7R GLVDEOH WKH GRFNLQJ IHDWXUH
♦Right-click the dockable window background and deselect the Docking View command from the contextual menu.
The window becomes an MDI window.
General Features Guide |
|

0DQDJLQJ ZLQGRZV
'LVDEOLQJ WKH GRFNLQJ IHDWXUH WHPSRUDULO\
If you want to move a window in the PowerDesigner environment without using the docking feature you have to press CTRL while you drag the window.
+LGLQJ GRFNLQJ ZLQGRZV
The Browser tree view and the output windows are displayed by default. You can hide any of these windows by clicking the X button in the window title bar.
5HVWRULQJ D GRFNLQJ ZLQGRZ
You can restore the display of a window of the PowerDesigner interface.
ϖ7R UHVWRUH D ZLQGRZ
♦Select View→Browser.
RU
Select View→Output.
RU
Select View→Result List.
|
PowerDesigner |
&KDSWHU 8VLQJ WKH 3RZHU'HVLJQHU ,QWHUIDFH
0DQDJLQJ WRROEDUV
Toolbars are designed to provide quick access to specific menu commands.
PowerDesigner has a series of predefined toolbars:
WRROEDU |
'HVFULSWLRQ |
|
6WDQGDUG |
Provides quick access to the most commonly used commands of the |
|
|
File and Edit menus |
|
'LDJUDP |
Provides quick access to the most commonly used commands for |
|
|
diagram management |
|
9LHZ |
Provides quick access to the most commonly used commands for |
|
|
display management |
|
/D\RXW |
Provides quick access to the most commonly used commands for |
|
|
symbol management in the diagram |
|
)RUPDW |
Provides quick access to the most commonly used commands for |
|
|
symbol formatting in the diagram |
|
:LQGRZ |
Provides quick access to the most commonly used commands for |
|
|
window navigation |
|
3DOHWWH |
Is a specialized toolbar for graphical operations in the diagram |
|
|
window of a model or package |
|
5HSRUW |
Provides quick access to the most commonly used commands for |
|
|
report management |
|
&KHFN |
Provides quick access to the most commonly used commands for a |
|
|
check model operation |
|
5HSRVLWRU\ |
Provides quick access to the most commonly used commands for |
|
|
Repository management |
|
3UHGHILQHG |
Provides quick access to the default shape assigned to symbols |
|
6\PEROV |
|
|
|
|
By default, the Standard toolbar appears when you start PowerDesigner for the first time. You can display other toolbars in the interface, this parameter is saved in the registry.
&UHDWLQJ D WRROEDU
You can create new toolbars in the PowerDesigner environment.
General Features Guide |
|
0DQDJLQJ WRROEDUV
ϖ7R FUHDWH D QHZ WRROEDU
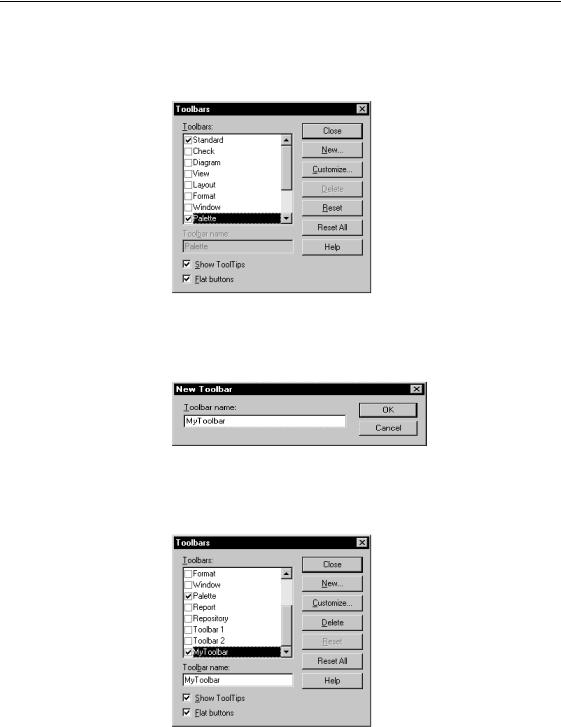
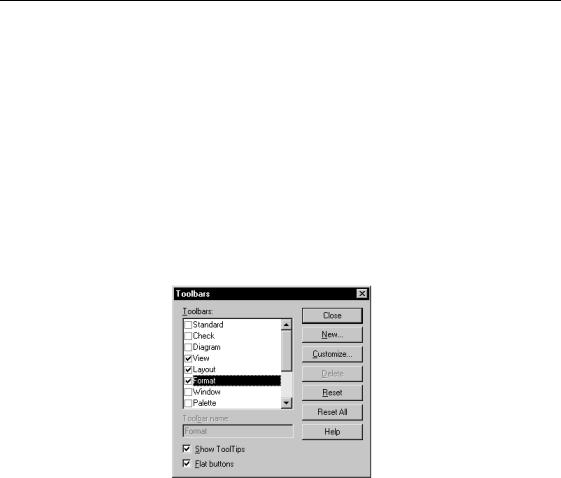
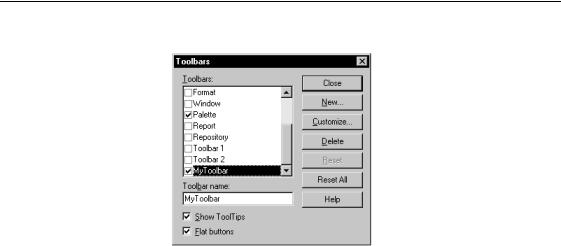
1Select Tools→Customize Toolbars. The Toolbars dialog box appears.
2Click the New button.
The New Toolbar dialog box appears.
3Type a name in the Toolbar Name box.
4Click OK.
The new toolbar appears, it is empty.
5Select the newly created toolbar in the Toolbars list.
|
PowerDesigner |
&KDSWHU 8VLQJ WKH 3RZHU'HVLJQHU ,QWHUIDFH
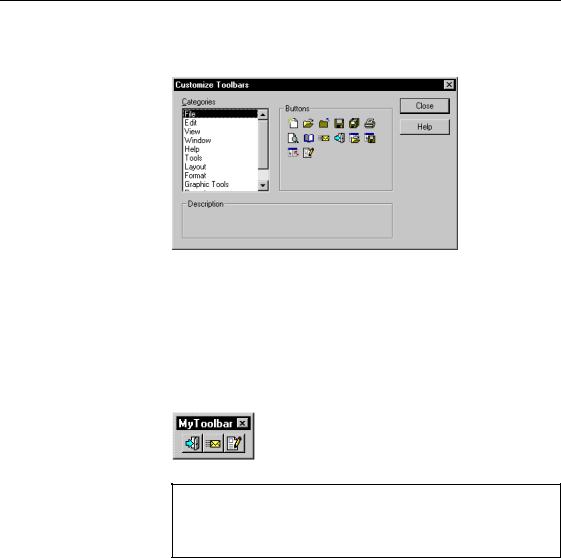
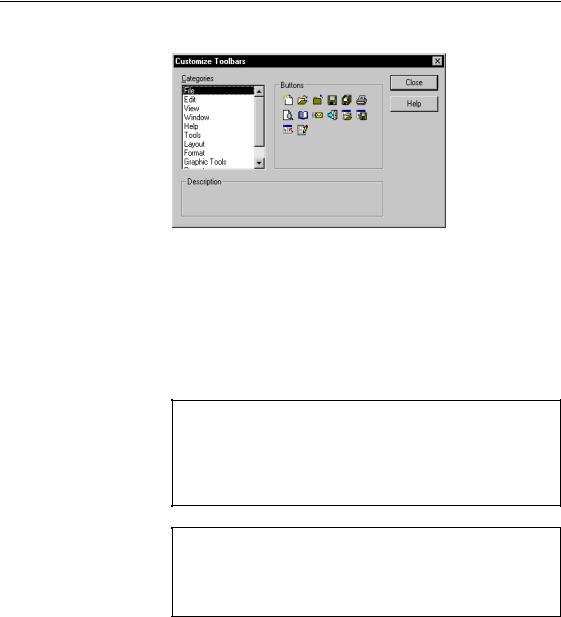
6Click the Customize button.
The Customize Toolbars dialog box appears.
7Select a menu category in the Categories pane.
The tools corresponding to the commands of the menu appear in the right pane of the window with a description in the lower part of the window.
8Select the tools you want to add, drag them to the new toolbar, and release the mouse button.
The tools are inserted into the new toolbar.
'HOHWLQJ D WRRO LQ D WRROEDU
To delete a tool in a toolbar, you must be in Customize mode, then right-click the tool to be deleted and select Delete from the contextual menu.
9 Click Close in each of the dialog boxes.
General Features Guide |
|
0DQDJLQJ WRROEDUV
&XVWRPL]LQJ D WRROEDU
You can customize the PowerDesigner toolbars according to your needs.
The customization options are the following:
2SWLRQ |
'HVFULSWLRQ |
|
Show Tooltip |
Activates or desactivates the display of small pop-up windows |
|
|
that provide descriptive labels for a control or graphic object |
|
Flat button |
Toggles the display of buttons between flat and 3D |
|
Customize |
Opens the toolbar customization dialog box in which you can |
|
|
select icons corresponding to commands of the PowerDesigner |
|
|
menus |
|
|
|
ϖ7R FXVWRPL]H D WRROEDU
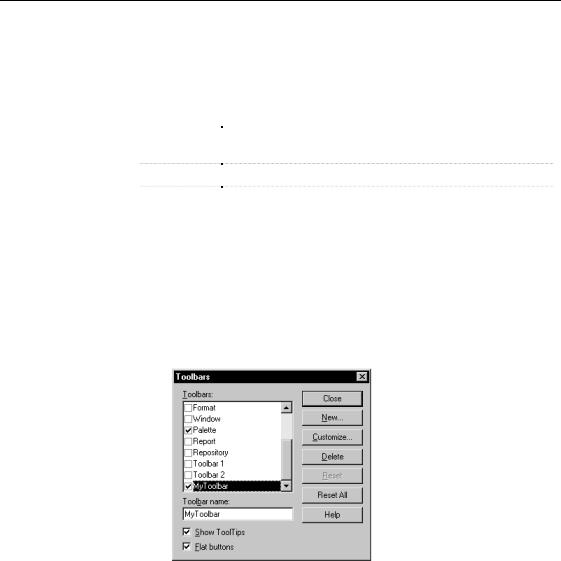
1Select Tools→Customize Toolbars. The Toolbars dialog box appears.
2Select a toolbar in the list of toolbars.
3Select or clear the customization check boxes in the lower part of the dialog box.
4Click the Customize button.
|
PowerDesigner |
&KDSWHU 8VLQJ WKH 3RZHU'HVLJQHU ,QWHUIDFH
The Customize Toolbars window appears.
5Select a menu category in the Categories pane.
The tools corresponding to the menu commands appear in the right pane of the window, with a description in the lower part of the window.
6Select the tool you want to add, drag it to the desired toolbar, and release the mouse button.
The tool is inserted into the target toolbar.
7Click Close in each of the dialog boxes.
*URXSLQJ UHODWHG WRROV RQ D WRROEDU
You can group related tools on a toolbar by adding a separator bar before the first and after the last one in the group to distinguish the group from other tools on the toolbar.
To do so, right-click the tool before which you want to add a separator bar and select Begin Group from the contextual menu.
&XVWRP *UDSKLF 7RROV FDWHJRU\
The Custom Graphic Tools category lets you define custom tools for stereotyped objects, as defined in extended model definitions.
For more information on custom tools, see chapter Extended Model Definitions Reference Guide in the Advanced User Documentation.
5HVWRULQJ WKH GHIDXOW VHWWLQJV RI D WRROEDU
You can restore the default settings of a customized toolbar.
General Features Guide |
|

0DQDJLQJ WRROEDUV
ϖ7R UHVWRUH WKH GHIDXOW VHWWLQJV RI D WRROEDU
1Select Tools→Customize Toolbars. The Toolbars dialog box appears.
2Select a modified toolbar in the list of toolbars.
3Click the Reset button.
4Click Close.
5HVHW GHIDXOW VHWWLQJV IRU DOO WRROEDUV
You can reset the default settings of all toolbars by clicking the Reset All button.
0RYLQJ D WRROEDU
You can move the toolbars to another location in your work environment.
The new settings will be stored in the registry.
ϖ7R PRYH D WRROEDU
1 Select a toolbar.
2 Drag the toolbar to the desired location in the interface. The toolbar displays a title bar.
|
PowerDesigner |
&KDSWHU 8VLQJ WKH 3RZHU'HVLJQHU ,QWHUIDFH
+LGLQJ DQG VKRZLQJ D WRROEDU
By default, the Standard toolbar appears in the PowerDesigner main window and the Palette in the diagram window. You can choose to hide or show a toolbar from the PowerDesigner interface.
ϖ7R KLGH D WRROEDU
1Select Tools→Customize Toolbars. The Toolbars dialog box appears.
2Clear the check box corresponding to the toolbar you want to remove
from the interface.
RU
Select the check box corresponding to the toolbar you want to add to the interface
The toolbar instantly appears or disappears from the interface.
3 Click Close.
'HOHWLQJ D WRROEDU
You can delete any new toolbar you have created.
The default PowerDesigner toolbars cannot be deleted, when you select one of these toolbars, the Delete button is grayed.
ϖ7R GHOHWH D WRROEDU
1 Select Tools→Customize Toolbars.
General Features Guide |
|
0DQDJLQJ WRROEDUV
The Toolbars dialog box appears.
2Select a user-defined toolbar in the list of toolbars.
3Click the Delete button.
4Click Close.
8VLQJ WKH 3DOHWWH
The Palette is displayed by default in the diagram windows. Each type of model has its corresponding palette.
The Palette is a specialized toolbar made up of three types of tools:
♦Selection and zoom tools
♦Graphic tools
♦Object creation tools
The selection, zoom and graphic tools are common to all PowerDesigner models. The object creation tools are related to the type of model you are working in.
|
PowerDesigner |