

СУБД Oracle / Литература / PowerDesigner 9 / GeneralFeatures
.pdf&KDSWHU 0DQDJLQJ 2EMHFW 5HSOLFDWLRQV
'HOHWLQJ D UHSOLFDWLRQ IURP WKH OLVW RI UHSOLFDWLRQV
You can delete a replication from the list of replications.
ϖ7R GHOHWH D UHSOLFDWLRQ IURP WKH OLVW RI UHSOLFDWLRQV
1 Select Model→Replications to open the list of replications. 2 Select a replication in the list.
3 Click the Delete tool.
4 Click OK.
&RPSDULQJ DQG PHUJLQJ UHSOLFDWLRQV
You can compare and merge a replica together with its list of replicated attributes and replicated collections.
Sub-replications are also compared and merged under their parent replication and appear in the sub-replications category.
The replication represents the link with the target object and allows you to get the replica.
When merging models containing object replications, you must select to merge both replication objects and replica objects in order to merge a complete replication. Otherwise they will be merged as ordinary objects and not as replicas.
General Features Guide |
|

&KDSWHU 0DQDJLQJ 2EMHFW 5HSOLFDWLRQV
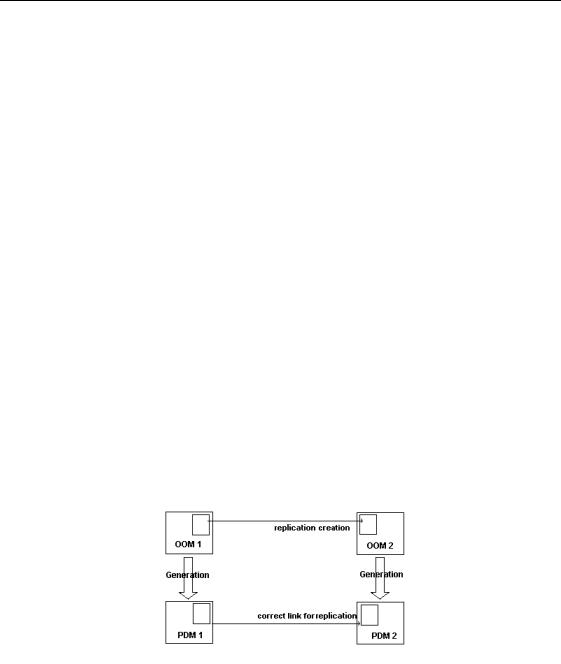
♦OOM 1 is generated to PDM 1
♦OOM 2 is the referencing model that contains the replica
♦OOM 2 is generated to PDM 2 while preserving the link between the replica in PDM2 and the original object in PDM 1
0RYLQJ UHSOLFDWLRQV
When you move a replica, the corresponding replication object is also moved.
You can move a original object within the same model without loosing its corresponding replicas and replication objects, but if you move an original object to another model its corresponding replicas and replication objects are deleted.
You cannot move a replication object alone, it stays together with the replica and can only be moved when the replica is moved.
For more information on moving objects, see section Moving objects from package to package in chapter Managing Objects.
'HOHWLQJ D UHSOLFDWLRQ
Whenever you delete a replication object, you automatically break the link with its corresponding replica. The replica becomes a common object and is no longer a local copy of an original object. Any further synchronization is impossible.
You can delete a replication from the List of Replications, or from the Version Info page of the replica property sheet.
For more information on how to delete a replication from the list of replications, see section Deleting a replication from the list of replications.
'HOHWLQJ D UHSOLFDWLRQ IURP WKH UHSOLFD SURSHUW\ VKHHW
You can delete a replication from the Version Info page of the replica property sheet.
ϖ7R GHOHWH D UHSOLFDWLRQ IURP WKH 9HUVLRQ ,QIR SDJH RI WKH UHSOLFD SURSHUW\ VKHHW
1 Double click a replica in the Browser to open its property sheet.
General Features Guide |
|

C H A P T E R 1 0
&RPSDULQJ DQG 0HUJLQJ 0RGHOV
About this chapter |
This chapter describes the comparison and merge features of models in |
|
|
PowerDesigner. |
|
Contents |
7RSLF |
3DJH |
|
||
|
Comparing models |
360 |
|
Merging models |
372 |
General Features Guide |
|


&KDSWHU &RPSDULQJ DQG 0HUJLQJ 0RGHOV
3URSHUW\ FRPSDULVRQ SDUW
The property comparison part displays the properties of the nodes selected in the model trees in the object comparison part. The property comparison part is divided in three columns:
♦Property: this column displays the name of the compared property
♦Model 1: this column displays the properties of the object belonging to the model on the left of the dialog box
♦Model 2: this column displays the properties of the object belonging to the model on the right of the dialog box
'HILQLQJ FRPSDULVRQ SDUDPHWHUV
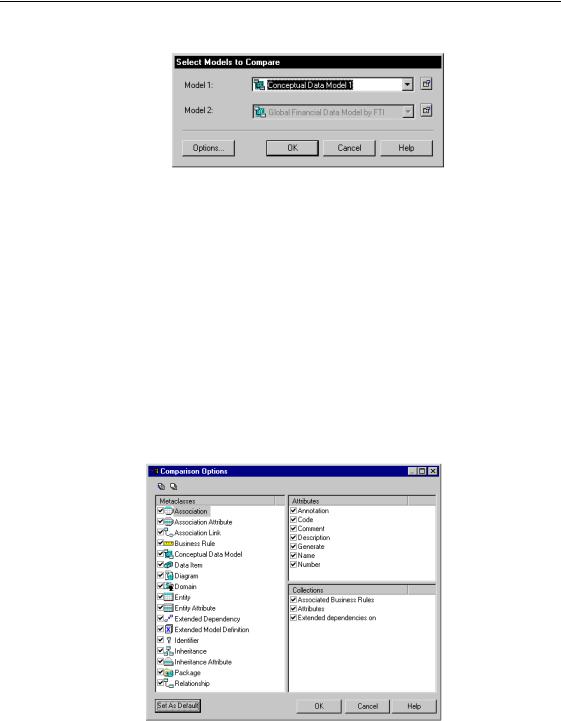
When you start a comparison, you have to select the models you want to compare; these models must be of the same type. You can also define the types of objects and the properties you want to compare.
6HOHFWLQJ PRGHOV WR FRPSDUH
When you start the comparison process, Model 2 is by default the model whose diagram is displayed, and Model 1 must be of the same type in the Select Model to Compare dialog box.
Models to compare must be opened in the workspace to be included in the
Model 1 dropdown listbox of the Select Models to Compare dialog box.
If you click the Options button, you can open the Comparison Options dialog box and define options before you start comparison.
For more information on defining comparison options, see section Defining comparison options.
ϖ7R VHOHFW PRGHOV WR FRPSDUH
1Select Tools→Compare Models.
The Select Models to Compare dialog box appears. The model selected in the Browser tree view appears by default in the Model 2 box.
General Features Guide |
|
&RPSDULQJ PRGHOV
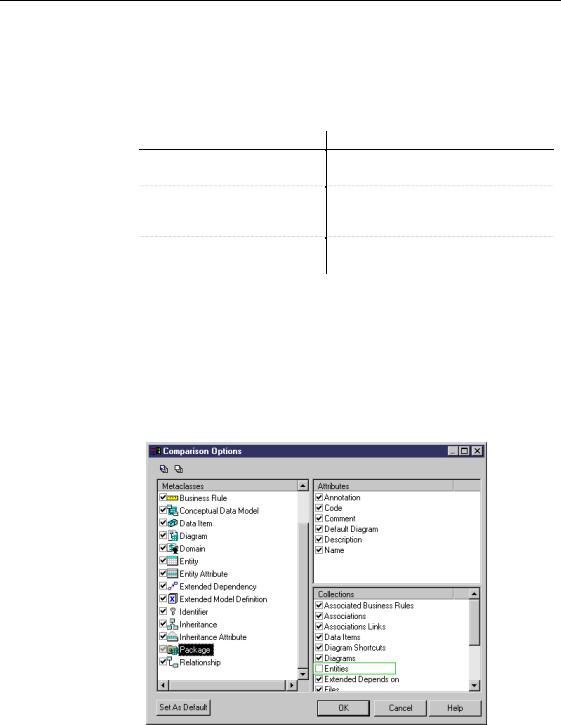
Check box status Depending on the option selections you perform, the metaclass check box can have the following statuses:
6WDWXV |
&KHFN ER[ |
'HVFULSWLRQ |
Deselected |
|
No attributes or collections are selected for the |
|
|
metaclass |
Selected |
|
All attributes and collections are selected for the |
|
||
|
|
metaclass |
Selected |
|
Some attributes or/and collections are selected for |
|
||
and grayed |
|
the metaclass and others are not |
|
|
|
'HIDXOW FRPSDULVRQ RSWLRQV
You can set your current selection of comparison options as default by clicking the Set as default button in the Comparison Options dialog box.
ϖ7R GHILQH FRPSDULVRQ RSWLRQV
1Select Tools→Compare models to display the Select Models to compare dialog box.
2Select a model from the Model 1 dropdown listbox.
3Click OK.
The Compare Models window appears.
4Select the Comparison Options tool.
|
PowerDesigner |