

The iSQL*Plus Work Screen
The iSQL*Plus Work Screen
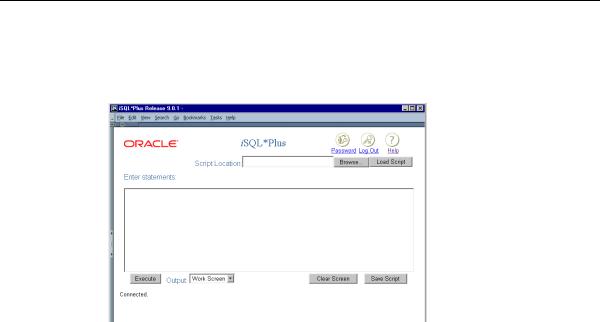
After successfully logging in, the iSQL*Plus Work screen is displayed.
Different web browsers, and the size of the web browser window, may affect the appearance and layout of the Work screen.
 Password Icon Click the Password icon to change your password. The Change Password screen is displayed.
 Log Out Icon Click the Log Out icon to exit iSQL*Plus. You are returned to the Log In screen.
 Help Icon Click the Help icon to access the iSQL*Plus User’s Guide and Reference in a separate browser window.
Enter statements: Enter SQL statements, PL/SQL blocks, or iSQL*Plus commands. This area is also referred to as the input area.
Script location: Enter the path and name of a script that you want to load for editing or execution.
Browse... Click the Browse... button to search for a script file that you want to load for editing or execution. When you select the file, its path and name are entered in the Script location: field.
3-4 iSQL*Plus User’s Guide and Reference
The iSQL*Plus Work Screen
Load Script Click the Load Script button to load the script specified in the Script location: field into the iSQL*Plus input area for editing or execution.
Execute: Click the Execute button to execute the contents of the input area. Depending on the Output dropdown list selection, the results of the execution are displayed, or saved to a file.
Output: The Output dropdown list has three options:
■Work Screen—when the contents of the input area are executed, the resulting output is displayed on screen under the input area. This is the default.
■File—when the contents of the input area are executed, the resulting output is saved to a file. You are prompted to enter the name of the file. As the output is in HTML format, it is useful to give the saved output file a .HTM or .HTML extension.
■Window—when the contents of the input area are executed, the resulting output is displayed in a new browser window.
Clear Screen Click the Clear Screen button to clear all statements in the input area, and all displayed output. It does not clear the SQL buffer, nor does it clear any variable values altered by options of the SET command.
Save Script Click the Save Script button to save the contents of the input area to a file. You are prompted to enter the name of the file. The file extension you choose is for your convenience. It may be convenient to identify scripts with an extension of
.SQL.
The iSQL*Plus User Interface 3-5